We haven't had steak in awhile. With the cost of beef these days, it's not always the cheapest way to go.. and now with oil/gas prices going up, the cost is getting even more ridiculous, BUT, I was lucky to find some New York strips that were pretty dang cheap, so I thought, why not make something different for a change!
Actually, it gave me a good excuse to make a steak sauce :) And not just any steak sauce, but a nice tart and tangy steak sauce made with balsamic vinegar. I know that a good steak doesn't usually need a sauce - some even say it's sacrilegious to put sauce on steak - but my theory is... sure, it might not NEED it, but it if it's a good sauce (and this was a REALLY good sauce) what will it really hurt??
Grilled New York Strip with Balsamic Steak Sauce
Adapted from Food Network
- Serves 2 -
Printable Recipe
Ingredients:
2 New York strip steaks
Olive oil
6-8 sprigs of fresh rosemary
salt and pepper
For the sauce -
6 Tablespoons balsamic vinegar
5 1/2 Tablespoons ketchup
2 Tablespoon honey
1 Tablespoon Worcestershire sauce
1 1/2 teaspoon Dijon mustard
1/8 teaspoon each: allspice, salt, pepper, granulated sugar
Directions:
Rub both sides of the steak with a little olive oil and season a bit with pepper. Place rosemary sprigs on the steak and press them down a bit. Refrigerate for 2 hours.
To make the sauce, add all ingredients to a small sauce pan/pot and stir to combine. Heat over medium heat until it comes to a boil. Reduce heat and simmer, stirring occasionally, until sauce has thickened. Remove from heat and allow to cool.
Preheat grill to 400 degrees F. Clean and oil grill grates. Remove the rosemary sprigs from the steak and season with both sides with salt. Place on the grill and grill about 4-5 minutes per side or until the steak is done to your liking. Remove and allow to rest for 5 minutes. Serve with sauce. Enjoy!
One Year Ago: Guest Blogger- Filet Mignon with Creamy Mushroom Sauce
Two Years Ago: Chicken & Pasta with Creamy Pesto Sauce
The only way you would not fall madly in love with this sauce is if you did not like Dijon or tarragon. Simple as that :) But...If you like those two flavors, this is the perfect sauce for you! This can go on salmon, tilapia, shrimp, chicken..... you could use it as a dip for vegetables... The possibilities are endless!!
Dijon Tarragon Sauce
Slightly adapted from Life's Ambrosia
Printable Recipe
Ingredients:
3 Tablespoons mayonnaise
2 Tablespoons Dijon mustard
2 teaspoons dried tarragon
1 Tablespoon lemon juice
pinch of granulated sugar
1/4 teaspoon kosher salt
1/8 teaspoon white pepper
Directions:
Mix everything together until smooth. Taste for seasoning. Refrigerate for up to 1 week. Serve with fish or chicken. Enjoy!
One Year Ago: Braised Beef Short Ribs in Red Wine Sauce
Two Years Ago: Basil Pesto
Have you ever had that wonderful whitish, pinkish shrimp sauce they serve at some Japanese steak houses? No? Well, trust me... it is fantastic. The first time I had it, I poured it on everything on the plate! Knowing how much I love sauces, I'm sure this is no surprise, but it had to be said.. it's just that good. And don't think this sauce is meant for just shrimp... no, oh no.. you can put this on virtually anything! So don't run away!!!
I found a couple different versions of this sauce and thought that I had picked the one closest to what I had remembered having, but, alas, this did not hit the mark. It was good (a bit on the vinegary side, so I cut it back in this recipe), but it wasn't as good as I remember... so I guess the search for the perfect shrimp sauce goes on....
Japanese Shrimp Sauce
Adapted from atlblogs.com
Printable Recipe
Ingredients:
1/4 cup mayonnaise
1 teaspoon granulated sugar
1/2 Tablespoon rice vinegar
1/4 teaspoon paprika
1/8 teaspoon garlic powder
pinch of salt and white pepper
1/8 - 1/4 teaspoon cayenne pepper (optional)
Directions:
In a bowl, mix all ingredients together until well combined. Cover and place in refrigerator until ready to use. Can be stored in an airtight container for 1 week. Serve with shrimp, fish or chicken. Enjoy!
One Year Ago: Cinnamon Rolls
Two Years Ago: Peanut Butter Ice Cream
A long time ago... on this blog... I posted a recipe for Honey & Hoisin Trout. It was DE-LIC-OUS! So, I thought... it worked so well on the trout, why not try it out on my beloved chicken? Other than not getting a really good picture of it, I am very pleased with the results. It was sweet and savory and grilled to perfection.
Hoisin and Honey Grilled Chicken
Created by Jenn's Food Journey
- Serves 2 -
Printable Recipe
Ingredients:
2 Tablespoons hoisin
1 1/2 Tablespoon honey
1 Tablespoon soy sauce
1/2 Tablespoon lime juice
1/4 teaspoon red pepper flakes
1 large garlic clove, minced
2 large boneless, skinless chicken breasts
Directions:
In a bowl, mix together everything except the chicken until well combined. Rinse chicken and pat dry. Place in resealable bag or shallow dish. Pour marinade over the chicken, seal bag, and refrigerate for 2-4 hours.
Preheat grill to 375 degrees F. Clean and oil grill grates. Remove chicken from marinade and place on grill. Grill for 6-10 minutes per side or until the chicken reaches an internal temperatures of 165 degrees F. Remove from grill and serve. Enjoy!
One Year Ago: Teriyaki Chicken over Fettuccine
Two Years Ago: Sriracha Chicken Strips
This dish is not even remotely close to what I had in mind for dinner the night I made this. I had intended to grill the shrimp with some stuffed peppers and some garlic rice... instead, I realized my shrimp were too small for the skewers I had AND I didn't really want to hassle with stuffing the peppers, AND, well... things just spiraled out of control from there :)
Actually, I'm getting better at thinking on my feet when curve balls are thrown at me in the kitchen. You see, I couldn't change things up too much because I already had the shrimp marinating in pomegranate balsamic vinegar.... so pomegranate balsamic shrimp HAD to be the star.
I'm not saying it's my best adaptation of a recipe ever, but it really was pretty darn good. We ate it as the main course with some bread and a salad, but you could use this as a side dish too. It would feed more people that way too.
Pomegranate Balsamic Shrimp and Rice Casserole
Inspired by Chris at Nibble Me This
Printable Recipe
Ingredients:
3 Tablespoons pomegranate balsamic vinegar
2 Tablespoons olive oil
1 garlic clove, minced
1/4 teaspoon red pepper flakes
1 teaspoon dried parsley
16 large frozen shrimp, thawed, tails removed
10 mini sweet peppers (or 2 regular size sweet peppers), chopped
3/4 cup uncooked rice
2 Tablespoons sour cream
salt and pepper, to taste
Directions:
Mix together the vinegar, oil, garlic, red pepper flakes, and parsley. Pour 2 Tablespoons of the mixture over the shrimp and toss to coat. Cover and place in refrigerator for 1 hour.
Meanwhile, cook rice according to package directions. Five minutes before the rice is ready, add the sweet peppers to the pot and cover. Let it sit for 5-8 minutes. Remove lid and allow to cool for 10 minutes.
Preheat oven to 375 degree F. Spray a baking dish with non-stick cooking spray and set aside. Add the sour cream to the rice and stir to combine. Season with salt and pepper to taste. Pour into prepared baking dish and top with shrimp. Place in oven and bake for 10 minutes or until everything is heated through. (you could totally add cheese in this to make it melty and cheesy!!) Remove from oven and serve immediately. Enjoy!
One Year Ago: Jo Jo Potatoes
Two Years Ago: Tarragon Tilapia
I think I may have mentioned before that my mom makes a killer taco. Yep, that's right.. my Italian mother makes THE BEST tacos on the planet. It's a two day, labor intensive project, but, bless her heart, she made and continues to make them for every birthday request, every special occasion request, every time I visit, every time she visits.... Man, I wish I had one of her tacos right now....Mmmmmmmmmm!!!!
Anyway, this is in no way a comparison to my mom's tacos.... I mean you can't really compare pizza and tacos anyway... can you? :) No, this is pizza was nowhere near as good as my mom's tacos, it's just that if I am going to talk about tacos, I need to only mention my mother's!! (enough kissing her butt, i know, but it's true, you will never find a better taco!!!)
Taco pizza is not a new invention, but it's the first time I actually made one, if you can believe that. Funny how sometimes we don't even remember to try making the simplest of things!
Taco Pizza
Created by Jenn's Food Journey
Printable Recipe
Ingredients:
1/2 lbs ground beef
1 1/2 Tablespoons homemade taco seasoning
1 Tablespoon cream cheese, softened
1/4 cup taco sauce or salsa
1-2 cups shredded Mexican cheese blend
2-3 Tablespoons sliced black olives
1 cup cherry tomatoes, quartered
1/2-1 cup shredded lettuce
14 oz pizza dough ball
Directions:
In a skillet over medium heat, add the ground beef, breaking it up with a wooden spoon. Cook beef until no longer pink, about 5-8 minutes. Drain excess fat. Add taco seasoning to beef and stir to coat. Remove from heat.
In a small bowl, mix together cream cheese and taco sauce or salsa; set aside.
Place a pizza stone in the oven and preheat to 450 degrees F. Stretch out pizza to desired size and shape on parchment paper. Spread on cream cheese mixture and top with cooked beef and cheese. Add the olives and tomatoes. Slide pizza onto preheated stove and bake for 20-30 minutes or until the crust is golden brown and cheese and melted and bubbly. Remove from oven and top with lettuce. Slice and serve. Enjoy!
One Year Ago: Chocolate Mayonnaise Cake
Two Years Ago: Strawberry Chicken
I've been in a funk lately. I don't know where the feeling comes from exactly, but it's causing me to struggle a bit when it comes time to come up with new ideas for meals. I know I don't HAVE to cook something new each night, but if I don't..... well... whatever will I post about? What? What's that you say? Don't post? Well, that's just crazy talk.....
You see, I have come to the realization that I am an addict. Yep, that's right.. I am addicted to blogging. Seriously, I cannot NOT post - it makes me crazy. Ok, maybe crazy is pretty extreme, but honestly, I can go one day during the week and the entire weekend without posting, but after that, I feel like something is seriously missing. It's like I went to work and forgot to get dressed or something. It's a strange, strange feeling and an even stranger feeling when you realize exactly what is happening. I mean, do they have a bloggers anonymous somewhere that I can join or am I in this all alone?? What's a girl to do??? :)
ANYWAY.... I could go on and on, but you didn't come to hear me confess, did you? Nope, you came here for the food... so let's talk chicken! And not only chicken, but simple chicken with an even easier aioli to go with it! I used Herbes de Provence in this recipe, but you can use any mixture of herb combination you would like. Don't want to use dried herbs? Perfect! Get your hands on some fresh herbs and create an even more flavorful meal. All I know is you are going to want to try this.. it was GRRRRREAT! (sorry had to channel my inner Tony the Tiger for a minute!)
By the way... I do a lot of grilling and I know there are a lot of people out there that read my blog that do not grill. Don't let that discourage you from making any of these dishes. They can be easily adapted to bake or even pan sear. If you have any questions on any other ways of preparing these dishes, hit me up via email - jennsfoodjourney@gmail.com - I'll give you the best recommendations I can!
Lemon Herb Grilled Chicken
Created by Jenn's Food Journey
- Serves 2 -
Printable Recipe
Ingredients:
zest of 1 lemon
1/4 cup lemon juice
2 Tablespoons basil olive oil (or extra virgin)
1/2 Tablespoon Dijon mustard
2 garlic cloves, finely minced
1 1/2 teaspoons Herbes de Provence
2 large boneless, skinless chicken breasts
For the aioli -
1/4 cup mayonnaise
1 Tablespoon champagne vinegar
1/8 teaspoon garlic powder
1/2 teaspoon Herbes de Provence
1 teaspoon lemon juice
salt and pepper to taste
Directions:
In a bowl or measuring cup, mix together the zest, lemon juice, olive oil, Dijon, garlic, and herbs until well combined. Place the chicken in a resealable bag and pour the marinade over it. Seal and place in refrigerator for 1 hour.
Meanwhile, in a small bowl, mix together all the ingredients for the aioli until well combined. Season with salt and pepper. Cover and refrigerate until ready to use. (can be made up to 3 days ahead of time)
Preheat grill to 375 degrees F. Clean and oil grill grates. Remove the chicken from the bag and discard marinade. Place the chicken directly over the fire and grill 6-10 minutes per side or until the chicken has reached an internal temperature of 165 degrees F. Remove from grill and serve with aioli. Enjoy!
One Year Ago: Thai Steak with Fried Rice
Two Years Ago: Honey Garlic Pasta
Simple and packed with a ton of flavor, this dish is bound to please anyone. Not a shrimp fan? No worries, you can use chicken, or veggies, or even tofu instead - so no excuses from you on why you can't make this! The mint just adds a whole new dimension to the classic basil pesto. If for some reason you can't find mint or don't like it, just substitute it with more basil and you will have a fantastic basil pesto to use instead!
Spaghetti with Shrimp and Basil Mint Pesto
Created by Jenn's Food Journey
Printable Recipe
Ingredients:
1/2 cup fresh basil leaves
1/2 cup fresh mint leaves
1 Tablespoon pine nuts
1 garlic clove, quartered
1/4 cup parmesan cheese
1/4 cup olive oil
salt and pepper
24 large (61/70 count) shrimp, cooked, tails removed
8-10 oz spaghetti
Directions:
In a food processor add the basil, mint, pine nuts, and garlic; pulse until everything is chopped - not finely, but close - add the parmesan and pulse two more times. While the motor is running, slowly add the olive oil. Season with salt and pepper and set aside.
Cook pasta according to package instructions; drain. Serve pasta in a bowl or a plate, top with cooked shrimp and pesto. Enjoy!
***Cook's note: do not heat up the pesto - it will turn a nasty black color if you do, it still tastes fine, but it is not pretty!***
One Year Ago: Teriyaki Hoisin Sauce
Two Years Ago: Parmesan Crusted Chicken
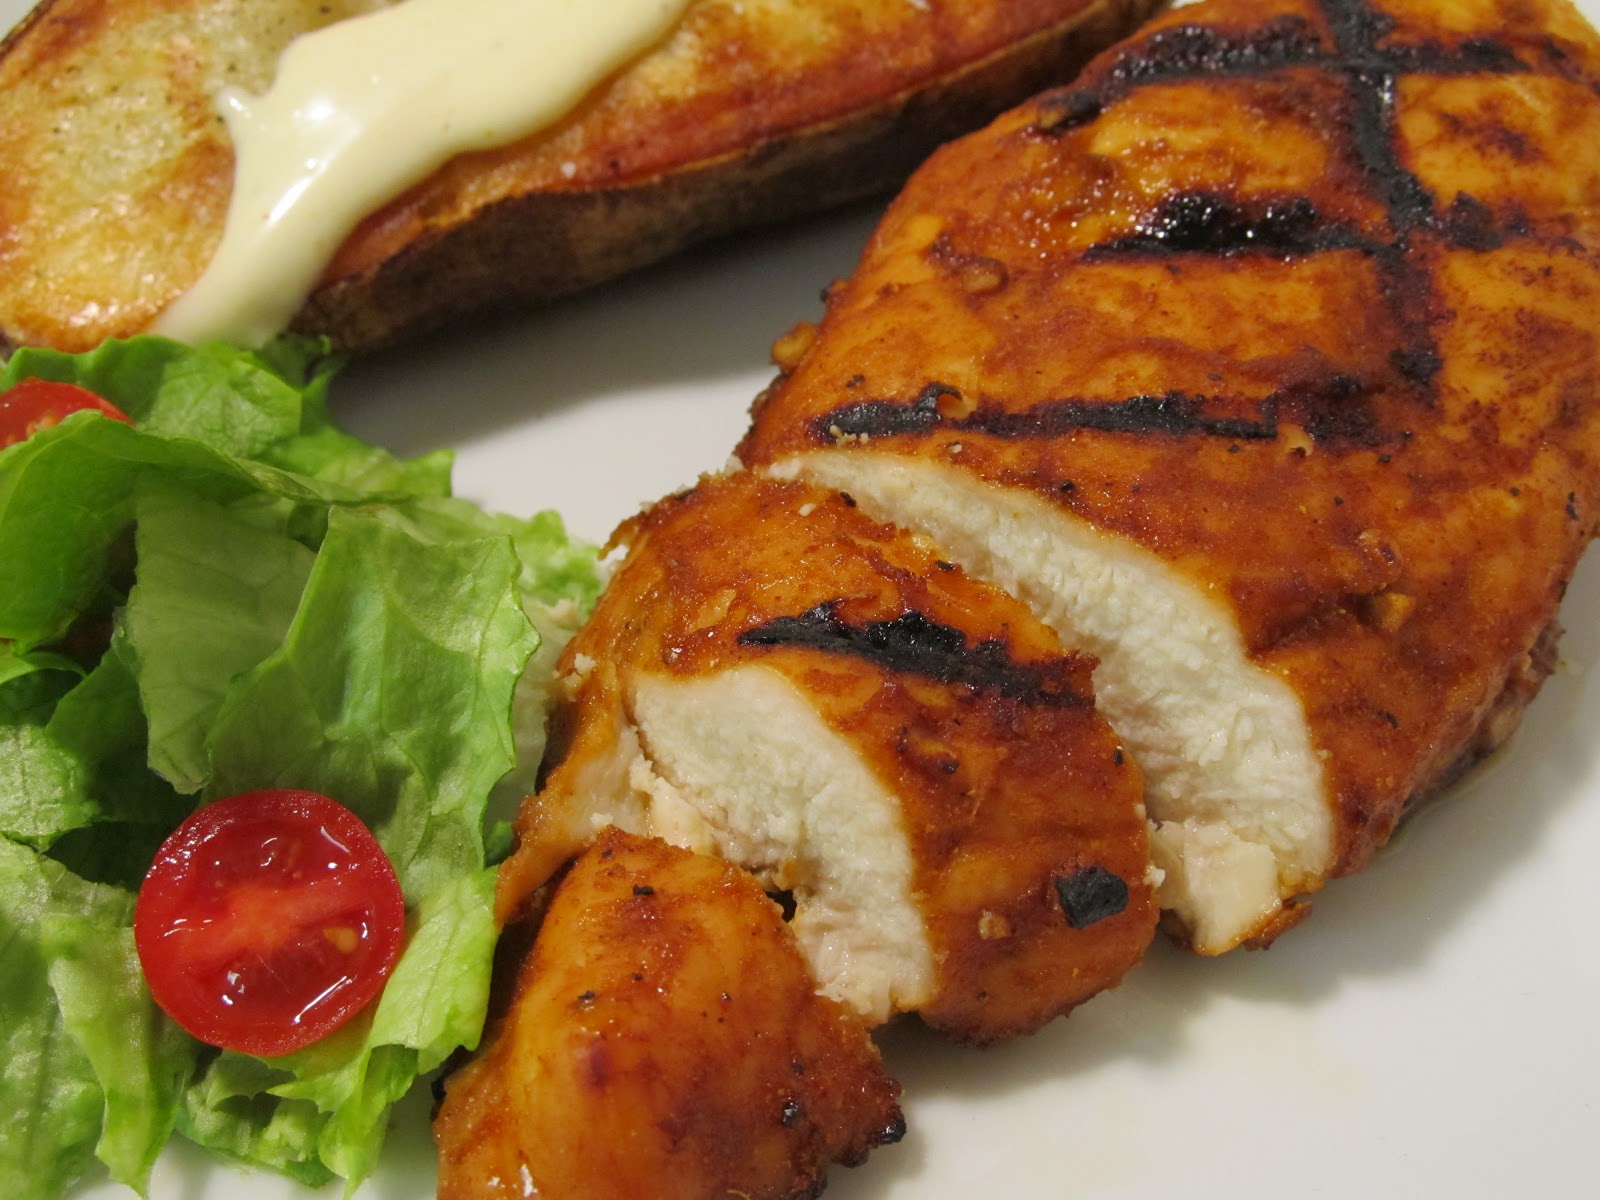
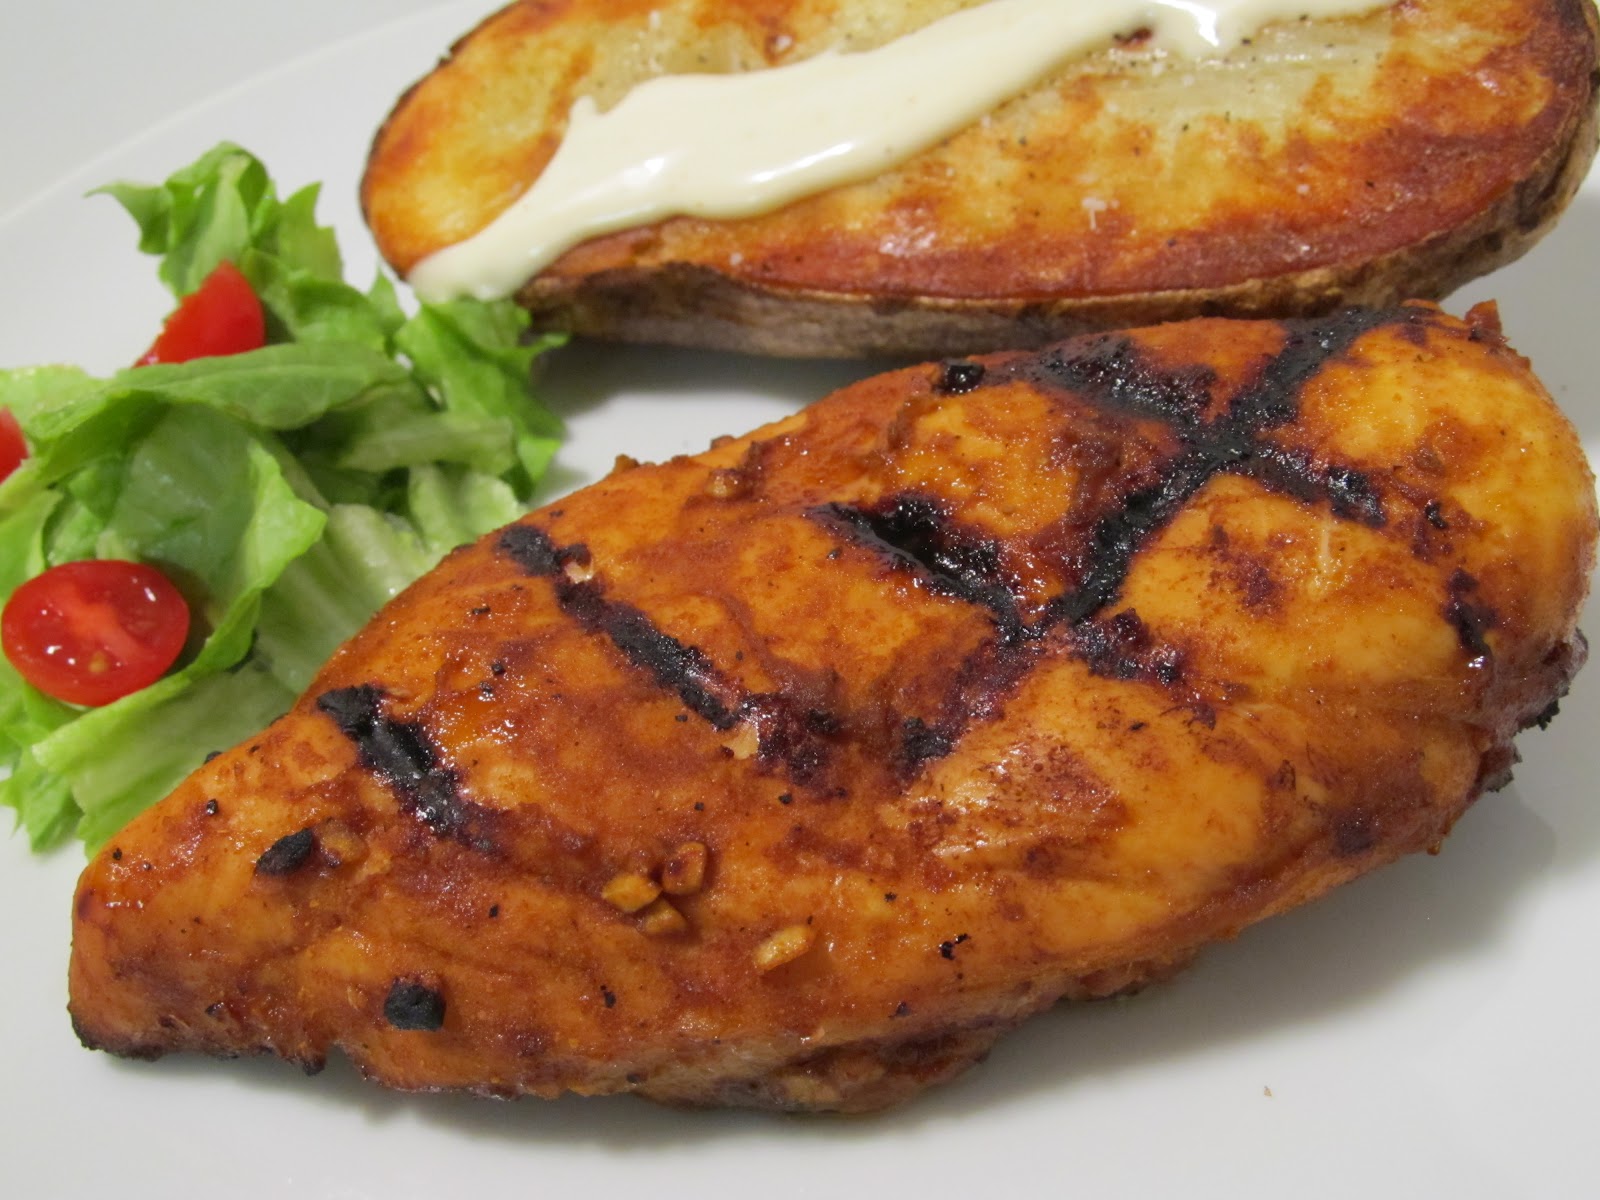
I know it's not exactly blackened...but that was the intention. I guess sometimes food has a will of it's own. At least that's my excuse here :)
Either way, this was a fantastic meal. The chicken was flavorful with a tad bit of a kick. And the sauce... well you know how I feel about them, so do I really have to tell you? Ok, ok.. it was DE-LIC-OUS! I would have just spooned it directly into my mouth, but I'm pretty sure Chris would have fought me for it, so I decided to keep the peace and just dip my chicken in it. It was still really good!!
Blackened Grilled Chicken with Cajun Mayo Dipping Sauce
Created by Jenn's Food Journey
- Serves 2 -
Printable Recipe
Ingredients:
1 Tablespoon sweet paprika
1 teaspoon garlic powder
1 teaspoon onion powder
1/4 teaspoon coriander
1/4 teaspoon kosher salt
1/4 teaspoon cayenne pepper
1/4 teaspoon black pepper
olive oil
2 large boneless, skinless chicken breasts
For the Cajun Mayo Dipping Sauce -
1/4 cup mayonnaise
2 teaspoons lemon juice
1/4 teaspoon cayenne pepper
1/8 teaspoon garlic powder
1/8 teaspoon black pepper
1/8 teaspoon onion powder
1/8 teaspoon dried thyme
1/8 teaspoon paprika
1/8 teaspoon salt
pinch of dried oregano
Directions:
In a small bowl, mix together all the ingredients for the dipping sauce until well combined. Cover and place in refrigerator until ready to use.
In another bowl, mix together the paprika, garlic powder, onion powder, coriander, salt, cayenne, and pepper until well combined. Rub both sides of the chicken with olive oil. Sprinkle/rub with season mixture. Cover and refrigerate for 2 hours.
Preheat grill to 375 degrees F. Clean and oil grill grates. Place the chicken over the fire and grill 5-8 minutes per side or until the chicken reaches an internal temperature of 165 degrees F. Remove from grill and allow to rest for 3 minutes. Serve with Cajun mayo dipping sauce. Enjoy!
One Year Ago: Orange Chicken Stir Fry
Two Years Ago: Honey & Spice Glazed Pork Chops
I truly should have shared this with you right before St. Patrick's day, but honestly, I just have been in a bit of a slump lately when it comes to writing. I've been a bit busy with work and most nights, when I come home, sitting in front of the computer sounds like the worse idea ever. Long story short, I just didn't get it to it in time. But this chili can be eaten any time of the year, so I figured, who really cares, right? You can pretend it's St. Patrick's day again if you want.
***Just added: Check out Stephen's (The Obsessive Chef) post today for Classic Gingerbread Cake with Stout if you are looking for another way to cook with Guinness - it's definitely one I'll be trying soon!! Thanks Stephen!***
Guinness Chili
Adapted from Robyn the Grill Grrrl
Printable Recipe
Ingredients:
1 Tablespoon olive oil
1 cup finely chopped onion
2 jalapenos, finely chopped
1 lbs bottom round steak, cubed
1/2 lbs ground sirloin
2 garlic cloves, finely minced
1 Tablespoon flour
12 oz bottle of Guinness
1 cup beef broth
1 (14.5 oz) can fire roasted diced tomatoes in tomato puree
2-3 Tablespoons chili powder (to taste)
1 teaspoon ground cumin
1 teaspoon Worcestershire sauce
8 oz can chili beans
1 Tablespoon tomato paste
Directions:
Heat the olive oil in a Dutch oven over medium heat. Add the onions and cook for 5-8 minutes, until the onions are soft and tender; stirring occasionally. Add the jalapeno and cook for 3 minutes. Add the steak and cook, stirring occasionally, for 3 minutes. Add the ground beef, breaking it up with a wooden spoon. Cook another 3-4 minutes or until meat is no longer pink. Add the garlic and cook 1 minute. Stir in flour and cook 1 more minute. Slowly stir in the Guinness, beef broth, and tomatoes. Add the chili powder, cumin, and Worcestershire. Stir and bring to a boil. Reduce heat, cover and simmer for 2 hours. (the meat should be really tender by this point, if not, let it continue to simmer until it is) Add the beans and tomato paste and cook another 15-20 minutes. Taste for seasoning. Serve immediately and Enjoy!
One Year Ago: Baked Camembert Pasta
Two Years Ago: The Obessive Chef's Tilapia Fillets
Do your weekends fly by as quickly as mine do? I mean sometimes I feel like there truly was no weekend, yet I KNOW I there was. I guess even when I have three day weekends, they seem to go by pretty quickly. I think the solution here is to retire.... A girl can dream, right?
I loved this recipe. The flavors that are combined here really are delicious. Simple and perfect... serve it up with a quick lemon aioli and it just makes each bite that much better!
Smoked Paprika & Garlic Grilled Chicken
Adapted from Redbook
- Serves 2 -
Printable Recipe
Ingredients:
1 1/2 Tablespoons smoked paprika
1 1/2 Tablespoons champagne vinegar
1 1/2 Tablespoons honey
2-3 garlic cloves, finely minced
1/4 teaspoon salt
1/4 teaspoon pepper
2 large boneless, skinless chicken breasts
Directions:
In a small bowl, mix together all the ingredients, except the chicken, until well combined. Rinse the chicken and pat dry with a paper towel. Spread mixture over both sides of the chicken, cover and refrigerate for 2-4 hours.
Preheat grill to 375 degrees F. Clean and oil the grill grates. Place the chicken directly over the fire and grill 5-8 minutes per side or until the chicken reaches an internal temperature of 160-165 degrees F. Remove from grill and allow to rest for 3-4 minutes before serving. Enjoy!
One Year Ago: Guest Blogger - Orzo Salad with Prawns, Petit Pois and Arugula Pesto
Two Years Ago: Hamburger & Macaroni (aka Chris' Goulash)
I saw this recipe on Pam's site - For the Love of Cooking - way back in 2010 - yep, it's taken me this long to finally make it! I know.. crazy, right? But, if you collect recipes like I do, you know there are just SO many great recipes out there and SO little time to actually make them all. Oh if only someone would pay me to stay home and cook all day!! Granted, I would have to eat whatever I made so I could probably gain somewhere close to 100 pounds and... well... Ok, maybe this isn't such a good idea after all....
Let's get back to the goulash! When I was a kid, my mom would make goulash from time to time and it was one of my favorites. Now I believe that everyone that is reading this was raised eating some type of goulash. And I'm sure that the ones we ate were the best ever. And that is true in my case, at least - my mom's was simple and it was the best I have ever had... Until now... (gulp, did I just say that out loud?) Sorry mom!!
See.. the goulash is so good I would dare tell my mom that this one just might be a tad bit better (only a tiny bit, Mom, I swear). Oh goodness... I think I'm going to be getting a phone call today... :)
Italian Goulash
Adapted from Pam, For the Love of Cooking
Printable Recipe
Ingredients:
1 teaspoon olive oil
1/2 sweet onion, finely diced
1 pound lean ground beef (94/6 if you can get it)
6 mini sweet peppers, diced
1/2 zucchini, diced
2 garlic cloves, finely minced
salt and pepper
3 cups homemade or jarred marinara sauce
12oz elbow macaroni
fresh basil (I did not have it, but if you do, use it!)
Parmesan cheese (optional)
Directions:
Heat the olive oil in a Dutch oven or a deep skillet over medium heat. Add the onions and cook until tender, about 5-8 minutes. Add the ground beef and cook for 4 minutes; stirring and breaking up the beef as it cooks. Add the peppers and zucchini and cook for another 3-4 minutes. Drain any excess grease and season with salt and pepper. Pour in the marinara sauce, stirring to combine. Simmer for 30 minutes to 1 hour.
Cook the pasta according to package directions; drain. Add the pasta to the sauce and toss to coat. Remove from heat and stir in the basil. Taste for seasoning and salt and pepper if needed. Top with cheese if desired. Enjoy!
One Year Ago: Baked Fish with Sour Cream-Parmesan Sauce
Two Years Ago: Creamy Ranch Chicken Enchiladas
Since so many of you have been encouraging me to write a cookbook of sauces, I decided I would put together a list of some of my favorites. Ugh.. let me just say what a chore it has become!! Honestly, it's a bit overwhelming, but I think it has to be done if for no other reason than to get myself a bit more organized when it comes to the sauces that I have made. Now these might not be my all time favorite sauces... just my all time favorites that I have created myself. No adaptations... no straight copies... just my ideas turned into tasty little concoctions! Let's see what you all think...these are in no particular order:
Thanks for stopping by!
I probably owe Chris an apology after this meal,. You see, as we sat down to dinner he said, "Yea, we've had this before, it was good". I was immediately all over that... "Oh no, this is new, I've never made this before". Chris says, "no, I remember this". I say.. "No you don't, I've never made this, this is a new recipe". And so on and so on..... After dinner, I happened to be on my blog and realized... although this is a new recipe, this is VERY similar to the Baked Cajun Tilapia I made back in January of last year. So similar that it even LOOKS like it.. heck, I even served it over the same rice concoction!!! lol! Oh well... it was good and I really wanted to share it. Plus, it's NOT the same and I cooked it completely differently... so there!
Just one note... this uses a lot of cayenne... if you do not like hot stuff, cut back on it and add until you hit the right heat level. You know what I'm going to say, right? Yep.. you can always add more, you can never take away!!
Oh... and.... Sorry, Chris!! xo
Grilled Cumin-Cayenne Tilapia
Adapted from Cooking Light
- Serves 2 -
Printable Recipe
Ingredients:
2 teaspoons olive oil
2 tilapia fillets
1 teaspoon ground cumin
1/4 teaspoon salt
1/4 teaspoon garlic powder
1/2 teaspoon cayenne pepper
1/2 teaspoon black pepper
1/4 teaspoon Hungarian sweet paprika
Directions:
Preheat grill to 350 degrees F. Prepare two large squares of aluminum foil large enough to create a packet for the fish - spray with non-stick cooking spray.
In a small bowl, mix together the cumin, salt, garlic, cayenne, pepper, and paprika. Coat the fish with 1 teaspoon each olive oil. Sprinkle on cumin mixture and place on prepared foil. Bring sides of foil together to create a packet and place directly on the grill. Grill for 12-14 minutes or until the fish flakes easily with a fork. Carefully remove from grill and allow to cool for a few minutes before opening the packet. Carefully open packet and serve. Enjoy!
One Year Ago: Penne with Meat Ragu
Two Years Ago: Classic Steakhouse Marinated Steaks w/Red Pepper Aioli