Search This Blog

Monday, April 30, 2012

Horseradish Crusted Steak Roulade

I saw this recipe a while back and thought that I would try it - but like most recipe I want to try, it got pushed back each time something else came along.  I decided to make this right before our big heat wave (sorry it took so long to post) because I knew once the summer hit, I was not going to want to use the oven for this.  Not only am I sorry it took so long to post, but I'm sorry it took me so long to make this.  The Roulade was DEEEE-licious!!!  Now, I did not cook the peppers that went into the filling first, but you could certainly do that.  I actually liked the little crunch that it still had after the Roulade was done - it gave it great texture.  And, the great thing about this dish, you can fill it with just about anything you desire.  And, if you don't like horseradish, leave it out, the topping would still be fantastic!

Horseradish Crusted Steak Roulade
Adapted from The Food Network Magazine
Printable Recipe 
Ingredients:
1/2 red pepper, finely diced
1 garlic clove, mashed and minced
1/4 cup fresh chopped parsley
1/3 cup crumbled feta cheese
1 lbs boneless, thin cut sirloin tip
1 teaspoon olive oil
For the crust -
1/4 cup panko
2 Tablespoons plain breadcrumbs
1 Tablespoon fresh rosemary, chopped
1 Tablespoon fresh parsley, chopped
1 Tablespoon horseradish, drained
1-2 teaspoons olive oil
salt and pepper

Directions:
In a bowl, mix together the red pepper, garlic, parsley and feta cheese.  Spread the steak out - pound them down to about 1/4 inch if they are not already that thin - on a cutting board and season with salt and pepper.  Spread the mixture evenly over each piece of steak, leaving about a 1-inch boarder all around.  Roll the meat away from you into a tight cylinder, tucking in the filling as you go.  Secure with toothpicks or twine.

To make the crust - mix all ingredients together until well combined.  Season with salt and pepper; set aside.

Preheat oven to 425 degrees F.  In an oven proof skillet, over medium heat, add the oil.  Carefully place each roulade into skillet and quickly brown each side, about 2 minutes per side.  Remove  skillet from heat and top the roulade with the crust - pressing down to ensure it sticks.  Place in oven and continue to bake until the center registers about 130 degrees for medium rare, about 10-15 minutes.  Remove from oven and transfer to a cutting board and allow to rest for at least 5 minutes.  Serve and enjoy!

One Year Ago:  Penne with Tuna and Roasted Garlic and Red Pepper Sauce
Two Years Ago:  Hudson's Baked (or Grilled) Fish with Dill Sauce

Friday, April 27, 2012

Red Pepper Jelly Pork Chops

Can I just say how happy I am that it's Friday?  I mean, really... my weeks are flying by so fast it seems like we don't get much of a weekend at all.  I'm completely amazed each Sunday night as we are sitting down to dinner that the weekend is over and it's back to work again.  I enjoy our weekends, don't get me wrong, and I make the most of every minute... there just aren't enough minutes to enjoy on the weekend though!!  I need to work 2 days and have 5 days off... that sounds like a deal but I doubt I can get my boss to go for that one!!

Anyway, this is absolutely, hands down, the easiest recipe I have created.  Mix 2 ingredients together... marinate the pork chops in it.  Grill.  Done!  See... easiest recipe ever!

Red Pepper Jelly Pork Chops
Created by Jenn's Food Journey
- Serves 2 - 
Printable Recipe 
Ingredients:
1/4 cup red pepper jelly
1 Tablespoon Greek yogurt or sour cream
2 boneless pork loin chops

Directions:
Mix together the jelly and yogurt.  Place pork in resealable bag and pour marinade over top.  Seal bag and place in refrigerator for 2-4 hours.

Preheat grill to 375 degrees F.  Clean and oil grill grates.  Remove pork from bag and discard marinade.  Place pork directly over the fire and grill for 4-6 minutes per side or until the pork reaches an internal temperature of 140-145 degrees F.  Remove from grill and allow to rest for 3-4 minutes.  Enjoy!

One Year Ago:  Thai Style Honey Peanut Chicken
Two Years Ago:  Rigatoni with Spring Herbs and Tuna

Thursday, April 26, 2012

Southwest Grilled Tilapia (a redux)

Before I get started... I wanted to give a quick shout out to my pal Stephen, The Obsessive Chef.  Today is Stephen's birthday!  If you have a quick moment, pop on over to his blog and wish him a happy birthday!  Hope you have a great day Stephen!  Happy birthday!

Now, on with the food!!  My very first recipe that I posted here was for Southwest Baked Tilapia.  I believe no one saw it.  That's ok, though, it gave me this great opportunity to share a really good dish with you again.  Now, I grilled it this time and added a nice little aioli to go along with it, but I used pretty much all the same ingredients.  I don't know if that makes it a true redux or not, but it's close enough in my book!

Southwest Grilled Tilapia (a redux)
Created by Jenn's Food Journey
- Serves 2 -
Printable Recipe 
Ingredients:
2 teaspoons chili powder
1/4 teaspoon ground cumin
1/2 teaspoon Hungarian sweet paprika
1/4 teaspoon black pepper
1/4 teaspoon cayenne pepper
1/4 teaspoon garlic powder
1/4 teaspoon dried oregano
1/8 teaspoon salt
lemon juice
2 tilapia fillets
For the aioli -
1/4 cup mayonnaise
1 teaspoon lime juice
1/2 teaspoon champagne vinegar (white wine vinegar would work too)
3/4 teaspoon spice mixture for the fish

Directions:
Preheat grill to 350 degrees F.  In a small bowl, mix together the first 8 ingredients.  Remove 3/4 teaspoon for use in aioli.  Tear off 2 squares of aluminum foil - big enough to enclose one piece of fish each.  Spray with non-stick cooking spray.  Rinse the fish and pat dry with a paper towel.  Place fish on prepared foil.  Drizzle the fish with a little lemon juice and sprinkle the spice mixture evenly over each piece (you might have a tad bit left over... if so, save it or add a bit more to the aioli).  Fold opposite edges of the foil together creating a packet over the fish.  Place packets directly over the fire and allow to grill for 12-15 minutes or until the fish flakes evenly with a fork.  Serve with aioli.

Meanwhile, in a bowl, mix together all the ingredients for the aioli until well combined.  Cover and place in refrigerator until ready to use.  Enjoy!

One Year Ago:  Chorizo and Shrimp Wraps
Two Years Ago:  Murphy's Hot Hamburger

Wednesday, April 25, 2012

Prosciutto and Provolone Panini Sandwiches

This is not my recipe... and it's not really a guest post either.  I'm cheating today.  Ok, cheating is not the correct word... I'm taking the day off.  That's right, I'm taking the day off, but yet I'm still going to share an amazing recipe with you.   I received this recipe, along with the photos, from a representative of Carapelli Olive Oil.  I use Carapelli from time and time and have no problem sharing this recipe with you or letting you know that you can head on over to their website and get a $1 off coupon on any one Carapelli olive oil 17oz or larger!  And with those products you can make fantastic meals like this one:

Prosciutto and Provolone Panini Sandwiches
Recipe from CarapelliUSA
Printable Recipe 
Ingredients:
1/4 cup Carapelli extra virgin olive oil
8 slices rustic Italian or sourdough bread
1/4 cup prepared basil pesto
16 thin slices provolone cheese
12 thin slices of prosciutto
4 whole, well drained bottled roasted red peppers, cut into strips

Directions:
Heat a Panini grill or waffle iron.  Brush oil over bread slices.  Turn 4 slices over and spread pesto evenly on the bread.  Top with half of the cheese, tearing to fit if necessary, all the prosciutto and pepper strips and remaining cheese.  Close sandwiches with remaining bread oiled sides up.  Cook in Panini* maker or waffle iron for 3-4 minutes or until golden brown and cheese is melted.  Serves 4.

*Panini sandwiches may also be cooked in a ridged grill pan or non-stick skillet over medium heat for 3-4 minutes per side.

Thanks again to Carapelli for this awesome recipe!

One Year Ago:  Alabama Barbecue Chicken
Two Years Ago:  Italian Baked Pork Chops

Tuesday, April 24, 2012

Spicy Cashew Chicken Stir Fry

If you've been reading my blog for at least the last two months, you have probably figured that I love making stir fry.  I always talk about the ease, but I also love it's versatility.  Stir fry possibilities are endless!  This is my take on the well known dish refereed to as cashew chicken.  Hope you enjoy it as much as we do!

Spicy Cashew Chicken Stir Fry
Created by Jenn's Food Journey
Printable Recipe 
Ingredients:
2 large boneless, skinless chicken breasts, cut into chunks or bite size pieces
2 Tablespoons sweet chili sauce
2 Tablespoons Sriracha
1/2 cup chicken broth
2 Tablespoons low sodium soy sauce
1 teaspoon fish sauce
1/8 teaspoon sesame oil
1/4 teaspoon brown sugar
1/2 teaspoon red pepper flakes
2 teaspoons cornstarch
pinch of ground ginger
1 garlic clove, finely minced
1-2 cups broccoli florets
1/4 cup dry roasted cashew nuts
1 teaspoon vegetable oil

Directions:
Place cut up chicken in a resealable bag.  Mix the sweet chili sauce and Sriracha together.  Pour over chicken, toss to coat.  Seal bag and place in refrigerator for 1-2 hours.

In a bowl or measuring cup, add the chicken broth, soy, fish sauce, sesame oil, brown sugar, red pepper flakes, cornstarch and ginger.  Stir until well combined; set aside.

In a wok or deep, non-stick skillet, add the vegetable oil and heat over medium high heat.  Add the marinated chicken and quickly stir fry for 3-4 minutes.  Add garlic and stir fry 1 more minutes.  Add the broccoli and stir fry another 2 minutes.  Add the sauce and allow to thicken, stir constantly.  Remove from heat and stir in the cashews.  Serve over rice or noodles.  Enjoy!


One Year Ago:  Baked Hoisin Tilapia with Hot Mustard Sauce 
Two Years Ago:  Pass it On Week 3:  Brava Steak


Monday, April 23, 2012

Hamburger and Goat Cheese Pizza

I don't know if I should be upset or proud about the news I'm about to share with you:  We got in our pool this weekend!  Ok, it was a bit colder than I would have liked it to be... the temperature reads at 70 degrees, although I'm sure it's about 60 the further down you go... When it is 100 degrees outside, 70 feels pretty darn good, though, I must say!  Now, we didn't swim.. it was still a bit too chilly for that, we did, however, lay on floats... it was actually perfect!  As, I said, I don't know if I should be proud or upset... proud because we finally got to use our pool!!  We spent so many summers wishing we had one.. and now we have it!  AND, Chris has put so much work into keeping it clean, I'm sure it gave him a sense of fulfillment!  I should be upset though... I mean, come on.. it's April... and it's 100 degrees............  I'm just sayin'

But enough about me... how about this pizza?  It's simple, it's flavorful - what more can you ask for in a pizza, right?  I actually made this pizza about two weeks ago, but completely forgot about posting it.  I don't know how that happened.. that NEVER happens, trust me.   If I had made this pizza this week, it would have been on the grill, but it was still a bit cooler when I made this, so I decided on the oven method.  If you want a grill method, hit me up via email (jennsfoodjourney@gmail.com) and I'll give you instructions if you need them.  Either way... try this.. it's fantastic!

Hamburger and Goat Cheese Pizza
Created by Jenn's Food Journey
Printable Recipe 
Ingredients:
1 14oz dough ball or ready made pizza crust such as Boboli or Pillsbury
1/2 lbs ground beef
2 Anaheim peppers, chopped
2 garlic cloves, finely minced
1/2 teaspoon red pepper flakes
1 teaspoon Italian herb blend (or use a mixture of oregano, parsley and basil)
3/4 cup pizza sauce
2 1/2 oz crumbled goat cheese
2 cups shredded mozzarella cheese

Directions:
Place a pizza stone in the oven and preheat to 450 degrees F.  (if you are using a ready made crust, follow the directions on the packaging)

In a skillet, over medium heat, add the ground beef.  Cook for 3 minutes.  Add the peppers and cook another 3-4 minutes or until the beef is cooked through and no longer pink.  Add the garlic and cook 1 minute.  Stir in the red pepper flakes and Italian herb mix.  Remove from heat.

Stretch the dough to desired size on parchment paper.  Spread on the pizza sauce.  Top with meat mixture.  Add the crumbled goat cheese and finish off with mozzarella cheese.  Slide the pizza onto pizza stone and bake for 15-20 minutes or until the crust is golden brown and the cheese has melted.  Carefully remove from oven and allow to cool for a few minutes before slicing.  Enjoy!


One Year Ago:  Vanilla Bean Cake with White Chocolate Frosting
Two Years Ago:  Tilapia Oreganata 


Friday, April 20, 2012

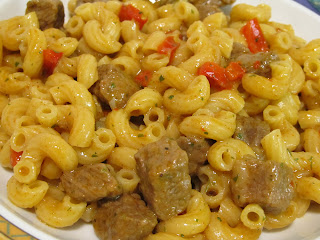
My Mom's Beef Goulash

Well, here it is... my mom's recipe for beef goulash!  I'm so excited to share this recipe with you.  I grew up with this dish and love it!  The interesting thing is how very simple it really is.  Ok, so I've jazzed it up just a tad bit by adding a red pepper, a little cayenne, AND I used elbow pasta (a request by Chris) instead of egg noodles, but, otherwise, this recipe is straight out of my mom's recipe box.  I love the simplicity of this dish.  Minimal ingredients and most of us should have everything, except for maybe the beef, on hand at all times.  Now I know why my mom made it... it's simple and it can make a lot of food without inflating that grocery bill!  Plus, it was loved by the pickiest eater in the house - me!

Thanks, Mom!  Chris and I can't wait to have it again :)

My Mom's Beef Goulash
Slightly adapted from my mom
Printable Recipe 
Ingredients:
1 lbs boneless beef round, cut into 1/2" cubes
2 Tablespoons flour
1 1/2 Tablespoons olive oil
1/2 sweet onion, roughly chopped
1 red pepper, chopped
2 cups water
1 Tablespoon Paprika (I used Hungarian sweet)
3/4 teaspoons salt
1 bay leaf
1 garlic clove, minced
1/4 teaspoon cayenne
2 cups elbow pasta

Directions:
Put the beef chunks in a bowl and add the flour.  Toss to coat and set aside.

In a deep skillet, over medium heat, add the olive oil.  Add the onions and cook for 4 minutes.  Add the red pepper and cook another 2 minutes.  Now add the beef and cook until it is no longer pink in the middle, about another 5 minutes.  Stir in the water, paprika, salt, bay leaf, garlic, and cayenne.  Reduce heat to low, cover, and simmer until meat is tender, about 2 1/2 hours, stirring occasionally.

Cook noodles according to package directions; drain well.  Pour goulash mixture over pasta and serve.  Enjoy!

One Year Ago:  Dragon Chicken
Two Years Ago:  Saucy Sirloin Steaks 

Thursday, April 19, 2012

Crunchy Wasabi Crusted Tilapia with Wasabi Soy Sauce

I don't know if I've ever said this, but I am a HUGE sushi fan.  I seriously could eat that and mac and cheese for the rest of my life and not crave another thing. (ok, I'd have to include chocolate in there too) I have, however, met a man who does not like it at all, so I don't frequently go out for it.  One of the things I love the most about sushi...the wasabi.  Crazy, probably, but I love that spicy little bite it brings to the meal.  That really strong, eye watering split second of heat is invigorating.  It just adds something to the whole sushi experience.

What better way to bring that home in a way both Chris and I could enjoy, than with our beloved tilapia.  And with the added wasabi soy sauce to compliment it, it was hard not to close my eyes and pretend I was enjoying a rainbow roll!

Crunchy Wasabi Crusted Tilapia with Wasabi Soy Sauce
Created by Jenn's Food Journey
- Serves 2 -
Printable Recipe 
Ingredients:
2 large tilapia fillets
2 Tablespoons mayonnaise
1 1/2 teaspoons wasabi paste
1/4 cup panko (Japanese bread crumbs)
For the sauce -
2 teaspoons wasabi paste
3 Tablespoons low sodium soy sauce

Directions:
Preheat oven to 400 degrees F.   Spray a baking dish with non-stick cooking spray.  Rinse fish and pat dry.  Place in prepared baking dish.  In a small bowl, mix together the mayo and 1 1/2 teaspoon wasabi paste until well combined.  Spread the mixture evenly over the top of each piece of fish.  Sprinkle with panko.  Place in oven and bake 12-15 minutes or until the fish flakes evenly with a fork.

While the fish is baking, make the sauce:  In a small, shallow dish, add the wasabi paste.  Slowly stir in the soy sauce until well combined.  Serve along side fish.  Enjoy!

One Year Ago:  Fettuccine Alfredo with Grilled Chicken and Shrimp
Two Years Ago:  Beef Rigatoni in an Intensely Tomato-y Cream Sauce 

Tuesday, April 17, 2012

Sweet Chili Grilled Chicken

This dish was inspired by a recipe I saw on Lea Ann's site for Sweet Chili Mustard Chicken Salad.  It looked sooooo good and I just love sweet chili sauce.  I love it even more that I have learned how to make it myself.  Who needs store bought when making it is so incredibly easy and inexpensive?  (I have Andrea The Kitchen Witch to thank for that recipe!)

Simple, delicious, and so very easy.  This is another great meal for those busy week nights!

Sweet Chili Grilled Chicken
Inspired by Lea Ann, Highlands Ranch Foodie
- Serves 2 -
Printable Recipe 
Ingredients:
3 Tablespoons homemade sweet chili sauce
2 Tablespoons pineapple juice
1 Tablespoon low sodium soy sauce
1/2 teaspoon Dijon mustard
2 large boneless, skinless chicken breasts
For the sauce -
1/4 cup low fat mayonnaise
1 Tablespoon homemade sweet chili sauce
1 Tablespoon Sriracha

Directions:
In a small bowl or measuring cup, add the homemade sweet chili sauce, pineapple sauce, soy sauce, and Dijon.  Sit until well combined.  Place the chicken in a resealable bag or shallow dish and pour marinade over.  Seal/cover and place in refrigerator for 2-4 hours.

Meanwhile, to make the sauce.  Mix mayo, homemade sweet chili sauce and Sriracha in a small bowl until well combined.  Cover and place in refrigerator until ready to use.  Can be made up to three days in advance.

Preheat grill to 375 degrees F.  Clean and oil grill grates.  Remove chicken from bag and discard marinade.  Place the chicken directly over the fire and grill 6-9 minutes per side or until the chicken registers an internal temperature of 160-165 degrees F.  Remove from grill and allow to sit for 3 minutes.  Serve with sauce.  Enjoy!

One Year Ago:  Spicy Grilled Pork Chops with Mango Pineapple Salsa
Two Years Ago:  Chocolate Peanut Butter Ice Cream

Monday, April 16, 2012

Creole Shrimp Pasta

It's definitely not the prettiest pasta... nor was it the tasty one ever, but it was good.  And good is worth posting.  At least that's what I believe.  They can't all be winners, right?  This was good, like I said, it just wasn't a "Wow" dish.  It was a bit too salty for my taste and I don't know if I just added too much salt or the spices I used had too much salt already in them.  Either way, it was salty and I have cut the regular salt completely out of the recipe.  You can always add some later :)

Creole Shrimp Pasta
Adapted from Simple and Delicious
Printable Recipe 
Ingredients:
1/2 lbs frozen shrimp (I used small shrimp), deveined, peeled and tails removed
1/2 teaspoon seafood seasoning
1/4 teaspoon garlic powder
10 oz penne pasta
1 small shallot, finely minced
2 teaspoons olive oil
3 Tablespoons heavy cream
1 Tablespoon lemon juice
1 Tablespoon Worcestershire sauce
2 teaspoons Cajun seasoning
2 teaspoons Louisiana hot sauce

Directions:
Place the shrimp in a bowl or shallow dish.  Add the seafood seasoning and garlic powder; toss to coat.  Set aside.

Cook pasta according to package directions.  Drain, reserving 1/4 cup of the pasta water.  Set aside.

In a skillet, over medium heat add the olive oil and shallots.  Cook the shallots until softened, about 5 minutes.  Do not let them burn.  Add the cream, lemon juice, Worcestershire, Cajun seasoning and hot sauce.  Stir to combine.  Reduce heat to low and simmer for 2 minutes.  Add the shrimp and simmer until the shrimp is pink and warmed through, about 5 minutes.  Toss with cooked pasta.  Add reserved pasta sauce to thin out the sauce if necessary.  Serve immediately.  Enjoy!

One Year Ago:  Chorizo and Goat Cheese Pizza
Two Years Ago:  Buttermilk Marinated Pork Chops w/South Carolina Mustard Sauce

Friday, April 13, 2012

Cocoa and Chili Rubbed Pork Chops

This is hands down one of the best pork chop recipes I've tried in a while.  Seriously, I wish I could think of some wonderful way to explain so that you would really get how incredible it really was, but alas, I am all out of words today.  It's Friday, I've had two very, very, very long weeks and... well... just know this is an amazing pork chop recipe and I highly recommend trying it.

Oh, and don't forget to serve it up with a wonderful little sauce, such as Po'Dunk or Lemon Aioli and life will be just about perfect!

Cocoa and Chili Rubbed Pork Chops
Adapted from Food and Wine
- Serves 2 -
Printable Recipe 
Ingredients:
4 cups water
1 Tablespoon kosher salt
2 teaspoon red pepper flakes
2 garlic cloves, minced
2 thick boneless pork loin chops
1/2 Tablespoon unsweetened cocoa powder
1/2 Tablespoon light brown sugar
1/2 Tablespoon ancho chile powder
olive oil

Directions:
Mix together the water, kosher salt, red pepper flakes, and garlic.  Place pork chops in a resealable bag place in a deep bowl.  Pour the brine over the pork chops and seal the bag.  Refrigerate for 2 hours.  Remove pork from brine and rinse thoroughly.

In a small bowl, mix together the cocoa powder, brown sugar, and chile powder. Rub a little olive oil on both sides of each pork chop.  Rub spice mixture on both sides and set aside.

Preheat grill to 350-375 degrees F.  Clean and oil grill grates.  Place pork over the fire and grill about 4-5 minutes per side or until the internal temperature reaches about 135-140 degrees F.  Remove from grill and allow to rest for 5 minutes before serving.  Enjoy!

One Year Ago:  Crispy Baked Fish with Balsamic Mustard Sauce
Two Years Ago:  Tilapia with Spiced Mustard Sauce

Thursday, April 12, 2012

Grilled Jalapeno Popper Topped Chicken

I love, love, LOVE jalapeno poppers.  But how could you not?  Spicy little peppers filled with cheeses and sometimes even bacon?  I mean really?  You'd have to be crazy not to like them.  Ok, if you don't like spicy things or cheesy things, you might not like it and I can forgive you for that.. but if not.... there's no excuse!!

So, of course, when I saw Desi's recipe for Mexican Chicken with Jalapeno Popper Sauce, I knew I was going to have to put my own little twist on it.  I mean, why didn't I think to top chicken with this before???  Yes, it's decadent and a little indulgent, but hey, you can splurge from time to time.. it's perfectly acceptable!!

Grilled Jalapeno Popper Topped Chicken
Inspired by Desi - SteakNPotatoesKindaGurl
- Serves 2 -
Printable Recipe 
Ingredients:
2 boneless, skinless chicken breasts
3 Tablespoons mayonnaise
1 Tablespoon lime juice
2 teaspoons homemade taco seasoning
1 large or 2 small jalapeno peppers, seed and diced
2 Tablespoon cream cheese, softened
2 Tablespoons shredded Mexican blend cheese
salt and pepper

Directions:
Rinse chicken and pat dry.  In a small bowl, mix together the mayonnaise, lime juice and taco seasoning until well combined.  Place chicken in shallow dish and cover with marinade.  Place in fridge for 2-4 hours.

Preheat grill to 375 degrees F.  Clean and oil grill grates.  In a small bowl, mix together the cream cheese, jalapeno, and shredded cheese.  Season with salt and pepper; set aside.  Shake off the excess marinade and place chicken directly over the fire on the grill.  Grill 5-8 minutes per side, or until the chicken reaches 160 degrees F.  Evenly top each piece of chicken with the cheese mixture, close the grill lid and allow to grill for another 2 minutes or until the cheese begins to melt.   (Just remember to make sure the chicken registers 160-165 degrees F.)  Remove from grill and serve immediately.  Enjoy!

One Year Ago:  Spicy Garlic Shrimp Pasta
Two Years Ago:  Steaks with Balsamic, Dijon & Garlic Marinade

Tuesday, April 10, 2012

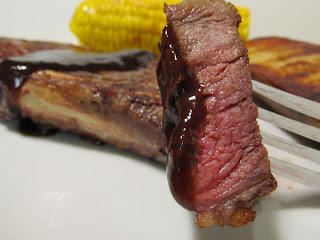
Grilled New York Strip with Balsamic Steak Sauce

We haven't had steak in awhile.  With the cost of beef these days, it's not always the cheapest way to go.. and now with oil/gas prices going up, the cost is getting even more ridiculous, BUT, I was lucky to find some New York strips that were pretty dang cheap, so I thought, why not make something different for a change!

Actually, it gave me a good excuse to make a steak sauce :)  And not just any steak sauce, but a nice tart and tangy steak sauce made with balsamic vinegar.  I know that a good steak doesn't usually need a sauce - some even say it's sacrilegious to put sauce on steak - but my theory is... sure, it might not NEED it, but it if it's a good sauce (and this was a REALLY good sauce) what will it really hurt??

Grilled New York Strip with Balsamic Steak Sauce
Adapted from Food Network
- Serves 2 -
Printable Recipe 
Ingredients:
2 New York strip steaks
Olive oil
6-8 sprigs of fresh rosemary
salt and pepper
For the sauce -
6 Tablespoons balsamic vinegar
5 1/2 Tablespoons ketchup
2 Tablespoon honey
1 Tablespoon Worcestershire sauce
1 1/2 teaspoon Dijon mustard
1/8 teaspoon each:  allspice, salt, pepper, granulated sugar

Directions:
Rub both sides of the steak with a little olive oil and season a bit with pepper.  Place rosemary sprigs on the steak and press them down a bit.  Refrigerate for 2 hours.

To make the sauce, add all ingredients to a small sauce pan/pot and stir to combine.  Heat over medium heat until it comes to a boil.  Reduce heat and simmer, stirring occasionally, until sauce has thickened.  Remove from heat and allow to cool.

Preheat grill to 400 degrees F.  Clean and oil grill grates.  Remove the rosemary sprigs from the steak and season with both sides with salt.  Place on the grill and grill about 4-5 minutes per side or until the steak is done to your liking.  Remove and allow to rest for 5 minutes.  Serve with sauce.  Enjoy!

One Year Ago:  Guest Blogger- Filet Mignon with Creamy Mushroom Sauce
Two Years Ago:  Chicken & Pasta with Creamy Pesto Sauce

Monday, April 9, 2012

Dijon Tarragon Sauce

The only way you would not fall madly in love with this sauce is if you did not like Dijon or tarragon.  Simple as that :)  But...If you like those two flavors, this is the perfect sauce for you!  This can go on salmon, tilapia, shrimp, chicken..... you could use it as a dip for vegetables...  The possibilities are endless!!

Dijon Tarragon Sauce
Slightly adapted from Life's Ambrosia
Printable Recipe 
Ingredients:
3 Tablespoons mayonnaise
2 Tablespoons Dijon mustard
2 teaspoons dried tarragon
1 Tablespoon lemon juice
pinch of granulated sugar
1/4 teaspoon kosher salt
1/8 teaspoon white pepper

Directions:
Mix everything together until smooth.  Taste for seasoning.  Refrigerate for up to 1 week.  Serve with fish or chicken.  Enjoy!

One Year Ago:  Braised Beef Short Ribs in Red Wine Sauce
Two Years Ago:  Basil Pesto

Friday, April 6, 2012

Japanese Shrimp Sauce

Have you ever had that wonderful whitish, pinkish shrimp sauce they serve at some Japanese steak houses?  No?  Well, trust me... it is fantastic.  The first time I had it, I poured it on everything on the plate!  Knowing how much I love sauces, I'm sure this is no surprise, but it had to be said.. it's just that good.  And don't think this sauce is meant for just shrimp... no, oh no.. you can put this on virtually anything!  So don't run away!!!

I found a couple different versions of this sauce and thought that I had picked the one closest to what I had remembered having, but, alas, this did not hit the mark.  It was good (a bit on the vinegary side, so I cut it back in this recipe), but it wasn't as good as I remember... so I guess the search for the perfect shrimp sauce goes on....

Japanese Shrimp Sauce
Adapted from atlblogs.com
Printable Recipe 
Ingredients:
1/4 cup mayonnaise
1 teaspoon granulated sugar
1/2 Tablespoon rice vinegar
1/4 teaspoon paprika
1/8 teaspoon garlic powder
pinch of salt and white pepper
1/8 -  1/4 teaspoon cayenne pepper (optional)

Directions:
In a bowl, mix all ingredients together until well combined.  Cover and place in refrigerator until ready to use.  Can be stored in an airtight container for 1 week.  Serve with shrimp, fish or chicken.  Enjoy!

One Year Ago:  Cinnamon Rolls
Two Years Ago:  Peanut Butter Ice Cream


Thursday, April 5, 2012

Hoisin and Honey Grilled Chicken

A long time ago... on this blog... I posted a recipe for Honey & Hoisin Trout.  It was DE-LIC-OUS!  So, I thought... it worked so well on the trout, why not try it out on my beloved chicken?  Other than not getting a really good picture of it, I am very pleased with the results.  It was sweet and savory and grilled to perfection.

Hoisin and Honey Grilled Chicken
Created by Jenn's Food Journey
- Serves 2 -
Printable Recipe 
Ingredients:
2 Tablespoons hoisin
1 1/2 Tablespoon honey
1 Tablespoon soy sauce
1/2 Tablespoon lime juice
1/4 teaspoon red pepper flakes
1 large garlic clove, minced
2 large boneless, skinless chicken breasts

Directions:
In a bowl, mix together everything except the chicken until well combined.  Rinse chicken and pat dry.  Place in resealable bag or shallow dish.  Pour marinade over the chicken, seal bag, and refrigerate for 2-4 hours.

Preheat grill to 375 degrees F.  Clean and oil grill grates.  Remove chicken from marinade and place on grill.  Grill for 6-10 minutes per side or until the chicken reaches an internal temperatures of 165 degrees F.  Remove from grill and serve.  Enjoy!

One Year Ago:  Teriyaki Chicken over Fettuccine
Two Years Ago:  Sriracha Chicken Strips 


Tuesday, April 3, 2012

Pomegranate Balsamic Shrimp and Rice Casserole

This dish is not even remotely close to what I had in mind for dinner the night I made this.  I had intended to grill the shrimp with some stuffed peppers and some garlic rice... instead, I realized my shrimp were too small for the skewers I had AND I didn't really want to hassle with stuffing the peppers, AND, well... things just spiraled out of control from there :)

Actually, I'm getting better at thinking on my feet when curve balls are thrown at me in the kitchen.  You see, I couldn't change things up too much because I already had the shrimp marinating in pomegranate balsamic vinegar.... so pomegranate balsamic shrimp HAD to be the star.

I'm not saying it's my best adaptation of a recipe ever, but it really was pretty darn good.  We ate it as the main course with some bread and a salad, but you could use this as a side dish too.  It would feed more people that way too.

Pomegranate Balsamic Shrimp and Rice Casserole
Inspired by Chris at Nibble Me This
Printable Recipe 
Ingredients:
3 Tablespoons pomegranate balsamic vinegar
2 Tablespoons olive oil
1 garlic clove, minced
1/4 teaspoon red pepper flakes
1 teaspoon dried parsley
16 large frozen shrimp, thawed, tails removed
10 mini sweet peppers (or 2 regular size sweet peppers), chopped
3/4 cup uncooked rice
2 Tablespoons sour cream
salt and pepper, to taste

Directions:
Mix together the vinegar, oil, garlic, red pepper flakes, and parsley.  Pour 2 Tablespoons of the mixture over the shrimp and toss to coat.  Cover and place in refrigerator for 1 hour.

Meanwhile, cook rice according to package directions.  Five minutes before the rice is ready, add the sweet peppers to the pot and cover.  Let it sit for 5-8 minutes.  Remove lid and allow to cool for 10 minutes.

Preheat oven to 375 degree F.  Spray a baking dish with non-stick cooking spray and set aside.  Add the sour cream to the rice and stir to combine.  Season with salt and pepper to taste.  Pour into prepared baking dish and top with shrimp.  Place in oven and bake for 10 minutes or until everything is heated through.  (you could totally add cheese in this to make it melty and cheesy!!)  Remove from oven and serve immediately.  Enjoy!

One Year Ago:  Jo Jo Potatoes
Two Years Ago:  Tarragon Tilapia

Monday, April 2, 2012

Taco Pizza

I think I may have mentioned before that my mom makes a killer taco.  Yep, that's right.. my Italian mother makes THE BEST tacos on the planet.  It's a two day, labor intensive project, but, bless her heart, she made and continues to make them for every birthday request, every special occasion request, every time I visit, every time she visits....   Man, I wish I had one of her tacos right now....Mmmmmmmmmm!!!!

Anyway, this is in no way a comparison to my mom's tacos.... I mean you can't really compare pizza and tacos anyway... can you? :)  No, this is pizza was nowhere near as good as my mom's tacos, it's just that if I am going to talk about tacos, I need to only mention my mother's!!  (enough kissing her butt, i know, but it's true, you will never find a better taco!!!)

Taco pizza is not a new invention, but it's the first time I actually made one, if you can believe that.  Funny how sometimes we don't even remember to try making the simplest of things!

Taco Pizza
Created by Jenn's Food Journey
Printable Recipe 
Ingredients:
1/2 lbs ground beef
1 1/2 Tablespoons homemade taco seasoning
1 Tablespoon cream cheese, softened
1/4 cup taco sauce or salsa
1-2 cups shredded Mexican cheese blend
2-3 Tablespoons sliced black olives
1 cup cherry tomatoes, quartered
1/2-1 cup shredded lettuce
14 oz pizza dough ball

Directions:
In a skillet over medium heat, add the ground beef, breaking it up with a wooden spoon.  Cook beef until no longer pink, about 5-8 minutes.  Drain excess fat.  Add taco seasoning to beef and stir to coat.  Remove from heat.

In a small bowl, mix together cream cheese and taco sauce or salsa; set aside.

Place a pizza stone in the oven and preheat to 450 degrees F.   Stretch out pizza to desired size and shape on parchment paper.  Spread on cream cheese mixture and top with cooked beef and cheese.  Add the olives and tomatoes.  Slide pizza onto preheated stove and bake for 20-30 minutes or until the crust is golden brown and cheese and melted and bubbly.  Remove from oven and top with lettuce.  Slice and serve.  Enjoy!

One Year Ago:  Chocolate Mayonnaise Cake
Two Years Ago:  Strawberry Chicken