First - I'm going to talk The Walking Dead for a moment, so if you are only here for the food... skip to the next paragraph, please!! :) All I'm going to say is this... Sunday is the final episode of the season and if you watch it like I do, you know it's gonna be INTENSE!! I think I may have said that I read the comic, but certain things - like Andrea being with the Governor - are not in the comic book, so I really don't know how the episode is going to unravel... but OMG am I excited to see what happens!!!! Although I don't want to the weekend to be over before it starts, I sure wish it was Sunday already!!!!!
Okay.. food talk now :) This sandwich was fantastic!! All my favorite flavors in one tasty sandwich... how can that be bad? It's sort of funny, in the first 4 years that Chris and I were together, I don't think I made one sandwich (other than BLT's) for dinner, now I seem to make them about once a week. I guess I found my inner Joey and along with it, my love for the sandwich!! (okay, if you haven't ever watched Friends you will have no idea what I'm talking about, so just know I love sandwiches!! lol)
Hope everyone has a fantastic weekend and a Happy Easter!! See you all on Monday!
Grilled Asian Chicken Sandwich with Slaw
Adapted from Cooking In My Yard
- Serves 2 -
Printable Recipe
Ingredients:
2 boneless, skinless chicken breasts, flattened for even cooking
1 Tablespoon Hoisin sauce
1 Tablespoon pineapple juice
1 Tablespoon Sriracha
2 King's Hawaiian Sweet Buns
Lettuce (optional)
Sriracha mayo (optional)
For the slaw -
4 cups coleslaw mix
3/4 Tablespoon peanut butter
1 teaspoon mayonnaise
1 teaspoon soy sauce
1/2 teaspoon rice vinegar
1/4 teaspoon ground ginger
1 teaspoon garlic chili sauce (Sambal Oelek)
Directions:
Mix together the hoisin, pineapple juice and Sriracha until well combined. Place the chicken in a resealable plastic bag and pour the marinade over them. Seal the bag and place in the refrigerator for 2 hours.
To make the slaw - in a small bowl or measuring cup, mix together the peanut butter and mayonnaise until well combined. Slowly stir in the soy, rice vinegar, ginger and chili sauce. Pour coleslaw mix into a large bowl and toss with the mayo mixture. Cover and refrigerate until ready to use. (we used some of this as a side dish too, so don't be surprised if you have some left over if you only use it on your sandwiches)
Preheat grill to 375 degrees F. Clean and oil the grill grates. Remove chicken from bag and discard the marinade. Place chicken over direct heat and grill 5-8 minutes per side, or until it reaches an internal temperature of 165 degrees F. Remove from grill and allow to rest 5 minutes. Toast buns on grill if desired.
To build the sandwich, add a layer or sriracha mayo (if using) and lettuce, top with a pieces of chicken and coleslaw. Serve immediately and enjoy!
One Year Ago: Spaghetti with Shrimp and Basil Mint Pesto
Two Years Ago: Teriyaki Hoisin Sauce
Three Years Ago: Parmesan Crusted Chicken

So, why the "well, sort of..." after the title? Okay, everyone.... t's confession time again - here we go: Sometimes I don't pay attention to certain tiny little details. Let me explain... I have been wanting to make Giada's recipe for Salsa All'Amatricina for quite awhile now... nothing stopping me other than too many recipes/ideas, not enough time... I finally decided to try it and got my grocery list together and double and triple checked it to make sure I had everything. I go to the store, purchase my items, get home, put the groceries away, all is well. Fast forward to the next day, I scan the recipe, grab the ingredients and all of a sudden it hits me..... I bought prosciutto - the recipe called for pancetta!!! How in the world do you confuse the two??? Well, I'll tell you how... I WROTE prosciutto - even though I double and triple checked, I obviously didn't pay attention to that tiny little detail as I wrote down the wrong ingredient!! I couldn't let it stop me at that point, though, I was too deep into it to turn back, so I "rolled the dice" (so to speak) and went with what I had. It turned out to be a wonderful mistake! Oh sure, the pancetta probably would have been better, but this was still really fantastic! I guess it's okay to make mistakes from time to time... you might just end up with something magical!
Salsa All'Amatricina
Adapted from Giada De Laurentiis, Everyday Italian
Printable Recipe
Ingredients:
10-12 oz. ziti pasta
1 large chicken breast, cooked and roughly chopped
1 Tablespoon olive oil
1/2 sweet onion, finely chopped
2 garlic cloves, finely minced
3 oz prosciutto, diced
1/4 teaspoon red pepper flakes
1 (28oz) can tomato puree
1/2 teaspoon salt
1/2 teaspoon black pepper
2 Tablespoons dry red wine
Grated parmesan cheese (optional)
Directions:
Cook pasta according to package directions; drain and set aside.
Meanwhile, in a large, deep skillet, over medium heat, add the olive oil and allow heat up a minute or two. Add the onion and saute for 5-8 minutes, or until they start to turn translucent. Add the garlic and saute another minute. Add the prosciutto and red pepper flakes and saute another 2 minutes. Slowly stir in the tomato puree, salt, pepper, and wine. Bring sauce to a simmer and reduce heat to low. Add the cooked chicken and simmer for 10 minutes. Taste for seasoning. Toss pasta into sauce and serve with warm crusty bread. Top with parmesan cheese and enjoy!
One Year Ago: Guinness Chili
Two Years Ago: Baked Camembert Pasta
Three Years Ago: The Obsessive Chef's Tilapia Fillets
Sort of fitting that the name of this recipe is 'Lone' Star... and I only have photos of one 'lone' piece of chicken... lol.. a little sad, but sort of funny all at the same time!
Despite the lone chick photo, this rub was quite delicious... and of course, the sauce just made it that much more enjoyable!!
Lone Star Dry Rubbed Chicken
Rub recipe adapted from Whole Foods
Sauce recipe created by Jenn's Food Journey
Printable Recipe
Ingredients:
1/2 Tablespoon kosher salt
3/4 Tablespoons paprika
1/2 Tablespoon brown sugar
1/2 Tablespoon chili powder
1/2 teaspoon dry mustard
1/2 teaspoon cayenne powder
1/4 teaspoon garlic powder
1/4 teaspoon white pepper
1/4 teaspoon celery seed
2 boneless, skinless chicken breasts
olive oil
For the sauce -
1/4 cup mayonnaise
1 teaspoon Dijon mustard
2 1/2 teaspoons lemon juice
1-2 teaspoons of the dry rub mixture (or to taste)
Directions:
In a small bowl, mix together the first 9 ingredients until well combined. Remove 2 teaspoons and set aside. Drizzle olive oil on both sides of each piece of fish and sprinkle evenly with the dry rub mixture (you might have some left over, you can store it in a sealed container in a cool dry place for up to 3 months). Cover and let sit in refrigerator for at least 2 hours and up to 24 hours.
Mix together the mayonnaise, mustard and lemon juice, until just combined. Add the dry rub mix, a little at a time. Season with salt and pepper if necessary. Cover and refrigerate until ready to use.
Preheat grill to 375 degrees F. Clean and oil grill grates. Place the chicken over direct heat and grill 8-10 minutes per side, or until the chicken reaches an internal temperature of 165 degrees F. Remove and allow to rest for 3-5 minutes before serving. Serve with sauce and enjoy!
One Year Ago: Smoked Paprika & Garlic Grilled Chicken
Two Years Ago: Guest Blogger-Orzo Salad with Prawns, Petit Pois And Arugula Pasto
Three Years Ago: Hamburger & Macaroni
One of the great perks of working where I do, is that each year we close the office early and we all go to a spring training baseball game. Well, this year, not only do I get to go with the whole company, but my department, along with the public relations department took off last Thursday afternoon and went to a spring training game of our own. We had such a great time. The PR girls in our office are some of the nicest, funniest, craziest, bunch of girls I know, so I was extra excited to hear we were having an afternoon adventure with them. What's even better about the whole situation is that I have an actual department again!!! Things have been a bit off in the admin/operations department for the last year and a half, so having an actual "team" to go out and relax with, makes me hap-hap-happy!! With all of that said, I thought I would share a photo or two of our fun in the sun :)

This is a shot of the whole group (or most of it anyway) - from left to right: Amy, Kayla, Carrie, Carol, Jen, Kim, Ruben (yep, that's right.. he got to hang with all the beautiful ladies.. lucky man!!), me, and Chelsea.
Melissa (my partner in crime) was taking the picture, so here is a shot of her (on the right) and Carrie.
And of course, the whole group again.. but this time, my lovely new boss, Lorraine, who joined us just a little later, is pictured in the front row far right.
So, thanks to Carol and Lorraine for giving us such a wonderful day of fun and sun and no work!!! Makes all those crazy hours we work at times well worth it!
As for the food today.. well... it might not be as fun and exciting as a spring training baseball game, but it is pretty delicious :) This recipe is simple and packed with a ton of flavor.... But, let me warn you, this is also a pretty spicy dish. I mean, come on, you use 1/4 cup Sriracha - you know it's gonna have a little kick. Just know that you have been warned... try it at your own risk... You won't be sorry if you do :)
Spicy Grilled Shrimp with Horseradish Chili Sauce
Created by Jenn's Food Journey
Printable Recipe
Ingredients:
1/4 cup Sriracha
1 1/2 teaspoon Worcestershire sauce
2 teaspoon olive oil
1/4 teaspoon ground ginger
3/4 lbs. medium raw frozen shrimp, thawed, peeled and deveined
For the sauce -
1/4 cup mayonnaise
1 Tablespoon Sriracha
1 teaspoon horseradish
1/2 teaspoon lime juice
Directions:
In a measuring cup, mix together the Sriracha, Worcestershire, oil and ground ginger until well combined. Place the shrimp in a shallow dish and pour the marinade over it; toss to combine. Cover and place in refrigerator for at least 1 hour.
Meanwhile, in a small bowl, mix together all the ingredient for the sauce. Cover and place in refrigerator until ready to use.
Preheat grill to 375 degrees F. Place a grill pan on the grill and allow it to preheat also. (you can also put the shrimp on skewers and grill them that way.. I just wanted something that didn't take up any time) Place the shrimp in the grill pan and grill for 2-3 minutes per side or until the shrimp turns pink. Remove from grill and serve immediately with the sauce. Enjoy!
One Year Ago: Italian Goulash
Two Years Ago: Baked Fish with Sour Cream-Parmesan Sauce
Three Years Ago: Creamy Ranch Chicken Enchiladas
I refrained from saying anything on Monday, but I have to say it now... for those that do not watch the show, I apologize, but I have to say this.... OMG, can you believe there are only 2 more Walking Dead episodes left this season? Doesn't it feel like it just started? Ughhh... I hate that about a good TV show... it gets you all excited and than the season is over!! NOOOOOOOOOOOOOOOOOOOOO!!!! Anyway... we will see what happens, won't we??? And, of course, if you want to chat about it... hit me up via email .. I'm always happy to talk about it!! (jennsfoodjourney@gmail.com)
As for these burgers..... uhhhhmmm... yeah...... these were AWESOME!!! I like my burgers pretty simple... but these take the frickin' cake. I hate to break it to Chris, but we may be eating burgers like this from now on.... the plain old standby doesn't look so good any more!! lol
Feta Burgers with Roasted Red Pepper Aioli
Adapted from Grill-It!
Printable Recipe
Ingredients:
1 1/2 lbs ground beef (85/15)
1/2 teaspoon onion powder
1/4 teaspoon garlic powder
1 Tablespoon crumbled feta cheese
1/2 teaspoon pepper
4-6 hamburger buns
2-4 oz crumbed feta cheese
leafy lettuce (optional)
tomato slices/cucumber slices (optional)
For the aioli -
1/3 cup mayonnaise
1 roasted red pepper, roughly chopped
1 garlic clove, quartered
1 teaspoon olive oil
salt and pepper, to taste
Directions:
In a large bowl, add the ground beef, onion powder, garlic powder, 1 tablespoon feta cheese and pepper. Using your hands, mix everything together. Form into patties (you can decide how big and how many you make) and place on a platter. Cover and set aside. (you can make the patties in advance, just cover and place in refrigerator until about 20 minutes before you are ready to grill them.)
Add all the ingredients for the aioli into a food processor; pulse until everything is chopped and well mixed. Place in small bowl, cover and put in refrigerator until ready to use.
Preheat grill to 375-400 degrees F. Clean and oil grill grates. Place the burger patties over direct heat and grill 5-10 minutes per side (depending on desired doneness). In the last 5 minutes of grilling, top each patty with the remaining goat cheese. Remove from gill and allow to rest 3-5 minutes. Top each bun with lettuce/tomato/cucumber, place the patty on top and finally top it all with the red pepper aioli. Enjoy!!
One Year Ago: Grilled Cumin-Cayenne Tilapia
Two Years Ago: Penne with Meat Ragu
Three Years Ago: Classic Steak House Marinated Steaks
We had such a lovely weekend, weather-wise, I am truly sorry it's time to go back to work. Although all I really did outside was work (weeding and mowing the yard and washing my car), it was still so very pleasant. And trust me, I'm very much enjoying this weather as it's about to turn summer here very, very, VERY quickly!
Of course, you know any beautiful weekend will find me next to the grill...... okay, okay, almost all weekends will find me next to the grill - the fantastic thing about living where I don't have to think about digging it out from under snow!! And what better to grill than meat?? lol Any meat will do, but two weekends ago, it was pork... mmmm!!! Now, I stumbled across this recipe on my Grill-it! app and still am not quite sure why the author called it Hoisin marinated. One, there is no hoisin in his original recipe and two, I couldn't even find a definition of hoisin that would make me understand the name.... Nonetheless, it was a pretty dang good pork recipe and is definitely worth sharing with you.... the sauce recipe... well that's mine... you know you gotta have a good sauce.. I mean, what if I over cooked the chops.... (as if.... ) :)
Grilled "Hoisin" Marinated Pork Chops
Adapted from Grill-It!
- Serves 2 -
Printable Recipe
Ingredients:
2 boneless, pork loin chops
2 Tablespoons creamy peanut butter
2-3 Tablespoons soy sauce (depending on taste)
1 teaspoon Sriracha
1 teaspoon rice vinegar
drop or two of sesame oil
For the sauce - (a Jenn's Food Journey Original)
3 Tablespoons sour cream
2 teaspoons Hoisin sauce
2 teaspoon Srircha
1/2 teaspoon lime juice
Directions:
In a small bowl or measuring cup, add the peanut butter and stir it around to help loosen it up. Add the soy, a little at a time, stirring to incorporate into the peanut butter. Add the Sriracha, rice vinegar and sesame oil; stirring to combine. Place the pork in a shallow dish or resealable bag and pour the marinade over, making sure to cover both sides. Place in refrigerator for at least 2 hours.
To make the sauce - in a small bowl, add all the ingredients and stir until well combined. Cover and place in refrigerator until ready to use.
Preheat grill to 375 degrees. Remove pork from marinade and place over direct heat. Grill 4-5 minutes per side or until the pork reaches an internal temperature of 145 degrees F. Remove from grill and allow to rest for 5-8 minutes before serving. Serve with hoisin sauce and enjoy!
One Year Ago: Chicken Stir Fry with Hoisin Pineapple Sauce
Two Years Ago: Pulled Pork BBQ Pizza
Three Years Ago: Chicken Tortilla Pizza
There will be some of you, in other parts of the country, that will not believe what I am about to say... BUT... It's got to be said: It was 93 degrees yesterday!!!! I swear on everything good and holy... 93 degrees! I mean it's March - my parents, in Nebraska, received a wonderful 7" of snow on Sunday. Isn't the weather just so damn amazing??
Anywhoooooo... I should move on to the food before I anger some one :) This meal was absolutely delicious and so easy to make. If brie wasn't so expensive, I would seriously make this pasta once a week. It was heavenly!
Brie and Chicken Pasta
Inspired by The Meat and Potatoes Foodie
Printable Recipe
Ingredients:
2 small chicken breasts, cooked and cut into bite size pieces
8-10 oz penne or mostaccioli pasta
1 small zucchini squash, cut into matchsticks
7oz brie cheese with herbs, cubed and chilled
Fresh basil leaves, finely chopped
salt and pepper to taste
Directions:
Cook pasta according to package directions. Drain, reserving 1/2 cup pasta water. Place pasta back in pot and add the zucchini and chicken; toss to combine. Stir in the cheese cubes until everything starts to melt. Add pasta water if needed to thin out the cheese sauce. Stir in the basil and season with salt and pepper to taste. Enjoy!
One Year Ago: Triple Chocolate Guinness Cookies
Two Years Ago: Smoked Pork Butt
Three Years Ago: Poblano Chicken
If anyone was to look at my smart phone, they would know one specific thing about me - I like to cook. Or, if nothing else, that I like food. I find that the only apps I download are pretty much food related (oh, and at least one or two Walking Dead apps, but who's counting....). That's not a bad thing, it's just a fact. I can't say that I have a favorite, but since you all know my love for the grill, you can probably guess that a grilling app would rank towards the top. When I saw this recipe for a chicken sandwich with goat cheese and balsamic reduction - uhhhmmmm... yeah, I was all over it!!
Goat Cheese Chicken Sandwich with Balsamic Reduction
Adapted from Grill It - Grilling Companion iPhone app
- Serves 2 -
Printable Recipe
Ingredients:
1/4 cup balsamic vinegar
2 Tablespoon pomegranate balsamic vinegar
2 boneless, skinless chicken breasts
olive oil
1/4 - 1/2 teaspoon each salt, pepper, and Herbs de Provence (or to taste)
2-3 oz goat cheese
French or Steak rolls
Green leaf lettuce
Directions:
In a small saucepan, over medium-high heat, bring both balsamic vinegars to a boil. Reduce heat to low and simmer 10-20 minutes, or until the mixture becomes thickened. Make sure to stir occasionally to stop it from burning to the bottom of the pan. Remove from heat and allow to cool.
Meanwhile, rinse the chicken and pat dry with a paper towel. Drizzle both sides of each piece with olive oil and season evenly with salt, pepper, and Herbs de Provence (if you don't have this, don't worry, use any herb you like, basil, oregano, parsley, it's up to you!). Cover and place in refrigerator for at least 1 hour.
Preheat grill to 375 degrees F. Clean and oil grill grates. Place the chicken over direct heat for 8-10 minutes per side, or until it reaches an internal temperature of 165 degrees F. Place 1 to 1.5 oz of goat cheese on each piece of chicken in the last 3 minutes of grilling. It won't melt, but it will get warm, and that is what you want. Remove chicken from grill and allow to rest for just a few minutes. Place lettuce leaf on bottom of a toasted steak roll and top with chicken. Drizzle balsamic reduction and top with but top. Enjoy!
One Year Ago: Grilled Chicken with Mango Habanero Aioli
Two Years Ago: Cream Cheese Chocolate Chip Cookies
Three Years Ago: Baked Parmesan Tilapia
Our weather has been back and forth this "winter" season. Last weekend, we had two gorgeous days of sunshine and warmth. This weekend... rainy and a high in the 50's! Okay, I wouldn't change it for the blizzard conditions others are getting, but hey, it's all relative, right? It was on one of these colder weekends, that I was, of course, craving something summery. I know.. how can someone that experiences summer pretty much 9 months out of the year, crave summer in the winter? I asked myself the same thing, and when I answered, I blamed Carol from work. Sorry, Carol. It's okay though (trust me!!) .. I mean why I blame her is because of the awesome recipe she shared with me for Hawaiian pulled pork - after I had that, I thought of Hawaii and warm weather and... well.. summer!! I think everyone in the country might need a little summer on their plate to help them get through another months or so!
Grilled Pork Chops with Spicy Pineapple Salsa
Adapted from BHG Grillin' & Chillin'
- Serves 2 -
Printable Recipe
Ingredients:
2 boneless pork loin chops
Coconut rice (optional)
For the brine -
4 cups water
1 Tablespoons kosher salt
1 Tablespoon granulated sugar
1 garlic clove, minced
1 teaspoon black pepper
For the oil mixture -
1 Tablespoon olive oil
1/2 teaspoon thyme
1/2 teaspoon black pepper
1/2 teaspoon lemon juice
For the salsa -
1 8oz can pineapple chunks, slightly chopped
1 -2 Tablespoons finely chopped orange pepper
1 jalapeno, finely chopped
1 Tablespoon finely chopped parsley
1/4 teaspoon salt
1/8 teaspoon ground cumin
Directions:
Mix together the water, salt, sugar, garlic and pepper until salt and sugar has dissolved. Place the pork chops in a resealable bag and pour the brine over it. Seal and place in refrigerator for at least 2 hours. Remove from brine and thoroughly rinse under cool water.
Meanwhile, make the salsa by mixing all ingredients together in a bowl until well combined. Cover and refrigerate until ready to use.
In a small bowl, mix together the olive oil, thyme, pepper, and lemon juice. Brush both sides of each pork chop with mixture; set aside.
Preheat grill to 375 degrees F. Clean and oil grill grates. Place the pork over direct heat and grill for 4-5 minutes per side or until the pork registers an internal temperature of 145 degrees F. Remove and allow to rest for 5 minutes. Serve with salsa and coconut rice. Enjoy!
One Year Ago: Baked Lemon Breadcrumb Tilapia
Two Years Ago: Guest Blogger: Creamy Avocado Pasta
Three Years Ago: Bacon & Tomato Pasta
I think I may actually say this about every mac and cheese recipe I post... and knowing that mac and cheese is my all time favorite meal, I'm sure it does not shock anyone that I will say it once again... This Mac & Cheese was utterly AMAZING!!! I don't know what else to say about it.. it's almost too good for words.
Put it this way.............
This weekend, we had a wonderful visit from a long time friend of Chris', Sam. I had only met Sam for about 5 minutes the last time he was in town, so it was nice to finally get to spend some time with this guy who I had heard so many ... well, let's just say, interesting.....stories about. I made dinner for him and Chris on Saturday night (not this meal, but I will post about the one I did make in a week or so) and he made a comment about my food that I will now make a little more PG rated - this meal was so good, you never want to let it go :)
Sourdough-Goat Cheese Topped Mac and Cheese
Adapted from The Food Network Magazine
Printable Recipe
Ingredients:
1/2 lb chicken tenders, cooked and roughly chopped
8 oz elbow macaroni
2 Tablespoons unsalted butter, room temperature
2 eggs
1 cup evaporated milk
1/4 teaspoon dry mustard
1/4 teaspoon cayenne pepper
1 1/2 cups extra sharp cheddar cheese, shredded
1 1/2 cups monterey jack cheese, shredded
For the topping -
1 cup sourdough breadcrumbs, toasted
1/4 stock unsalted butter, melted
1/4 teaspoon salt
1/8 teaspoon pepper
1-2 Tablespoons freshly chopped parsley
3 oz crumbled goat cheese
Directions:
Cook pasta according to package directions; drain. Return pasta to pot and stir in the butter.
In a bowl or measuring cup, add the egg, evap milk, mustard and cayenne. Whisk until well combined. Place the pot with the pasta back on low heat. Slowly stir in the evap milk mixture; altering with hand fulls of shredded cheese until all cheese is melted. Stir in chicken and pour mixture into shallow dish.
In a small bowl, mix together the toasted breadcrumbs, butter, salt, pepper and parsley and goat cheese. Sprinkle evenly on top of macaroni and serve immediately. You can also put into a 350 degree F oven for 5-10 minutes or even under the broiler for 5 minutes - but it's not necessary... this is ready to go as is. Enjoy!
One Year Ago: Easy Chorizo Mac
Two Years Ago: Chipotle Guacamole Rice
Three Years Ago: Oatmeal Chocolate Chip Cookie
Uhhhhmmm... Yea..... probably not the healthiest salad out there... but I'm gonna definitely rank it up as one of the tastiest! Whew doggie ... I could eat this daily... and I just might.... I mean, it's a salad... it's not like it's chili cheese fries drizzled with a ranch aioli....
Mmmmmmmmmmmmm ranch aioli..... :)
BLT Chicken Salad
Inspired by Sunny Anderson, The Food Network
- Serves 2 -
Printable Recipe
Ingredients:
For the salad:
3-4 cups romaine or green leaf lettuce, thinly sliced or torn
1 cup chopped cherry tomatoes
1 boneless, skinless chicken breast
8 slices center cut bacon, roughly chopped
cucumber slices (optional)
sourdough bread croutons
For the dressing:
3 Tablespoons mayonnaise
2 teaspoons Dijon or whole-grain mustard
1 Tablespoon lemon juice
salt and white pepper, to taste
Directions:
Preheat grill to 375 degrees F. Clean and oil grill grates. Season chicken with salt and pepper on both sides. Place over direct heat and grill 8-10 minutes per side, or until it reaches an internal temperature of 165 degrees F. Remove and allow to cool before cutting into bite sizes pieces.
Meanwhile, cook the bacon in a skillet over medium heat, until crisp. Remove with a slotted spoon and let drain on a plate lined with a paper towel.
To make the dressing - add the mayonnaise, mustard and lemon juice to a small bowl or measuring cup. Season with salt and white pepper to taste.
To build the salad - in a bowl or on a plate, add the lettuce, tomato and cucumber. Top with chicken and croutons. Sprinkle on bacon pieces and top with dressing. Serve and enjoy!
One Year Ago: Chorizo Empanadas
Two Years Ago: Queso Blanco Chicken Enchiladas
Three Years Ago: Pasta with Sausage, Basil and Mustard
I have to laugh a little here, I ended up grabbing thin sliced chicken breasts instead of regular ones and as I looked at the picture, I noticed how sad and thin that piece of chicken really is. Now what might shock you is this... I'm ok with it. Well, I mean I would have loved to have gotten a better shot, BUT.. the sad little piece of chicken is ok.. cause the sandwich was DA BOMB! Wow, maybe I'm understanding the point of my blog a little more today... it's actually about the recipe, not necessarily about my photo taking abilities :)
I had a killer weekend..... must have done something to mature me.. HA!!
Grilled Chicken Sandwich with Avocado Mayo
Created by Jenn's Food Journey
- Serves 2 -
Printable Recipe
Ingredients:
2 boneless, skinless chicken breasts, flattened to an even thickness
olive oil
1 teaspoon Herbs de Provence (or any spice you like, really)
1/2 teaspoon garlic salt
black pepper
For the avocado mayo -
1/2 avocado
2 Tablespoons mayonnaise
1 teaspoon lime juice
1/2 teaspoon Tabasco (or Frank's)
salt and pepper
For the sandwich -
Steak or Hoagie rolls
Green leaf lettuce leaves
Cucumber slices
Directions:
Rinse chicken and pat dry with a paper towel. Drizzle olive oil over both sides of each piece of fish. Season evenly with herbs, garlic salt and pepper. Cover and place in refrigerator for 1-2 hours.
Preheat grill to 375 degrees. Clean and oil grill grates. Place chicken over direct heat and grill 5-9 minutes per side, or until the chicken reaches an internal temperature of 165 degrees F. Remove from grill and allow to rest. Place rolls on grill for 2-3 minutes per side to get them nice and toasted.
While the chicken is resting, make the mayo by adding the avocado to a small bowl and smashing it up with a spoon or fork. Stir in the mayo, lime juice and hot sauce. Season with salt and pepper to taste.
To build the sandwich, slather on the avocado mayo, top with lettuce, cucumber and chicken. Serve immediately and enjoy!
One Year Ago: Sweet Pepper Beef Stir-Fry
Two Years Ago: Applesauce Bars
Three Years Ago: Italian Style Tilapia
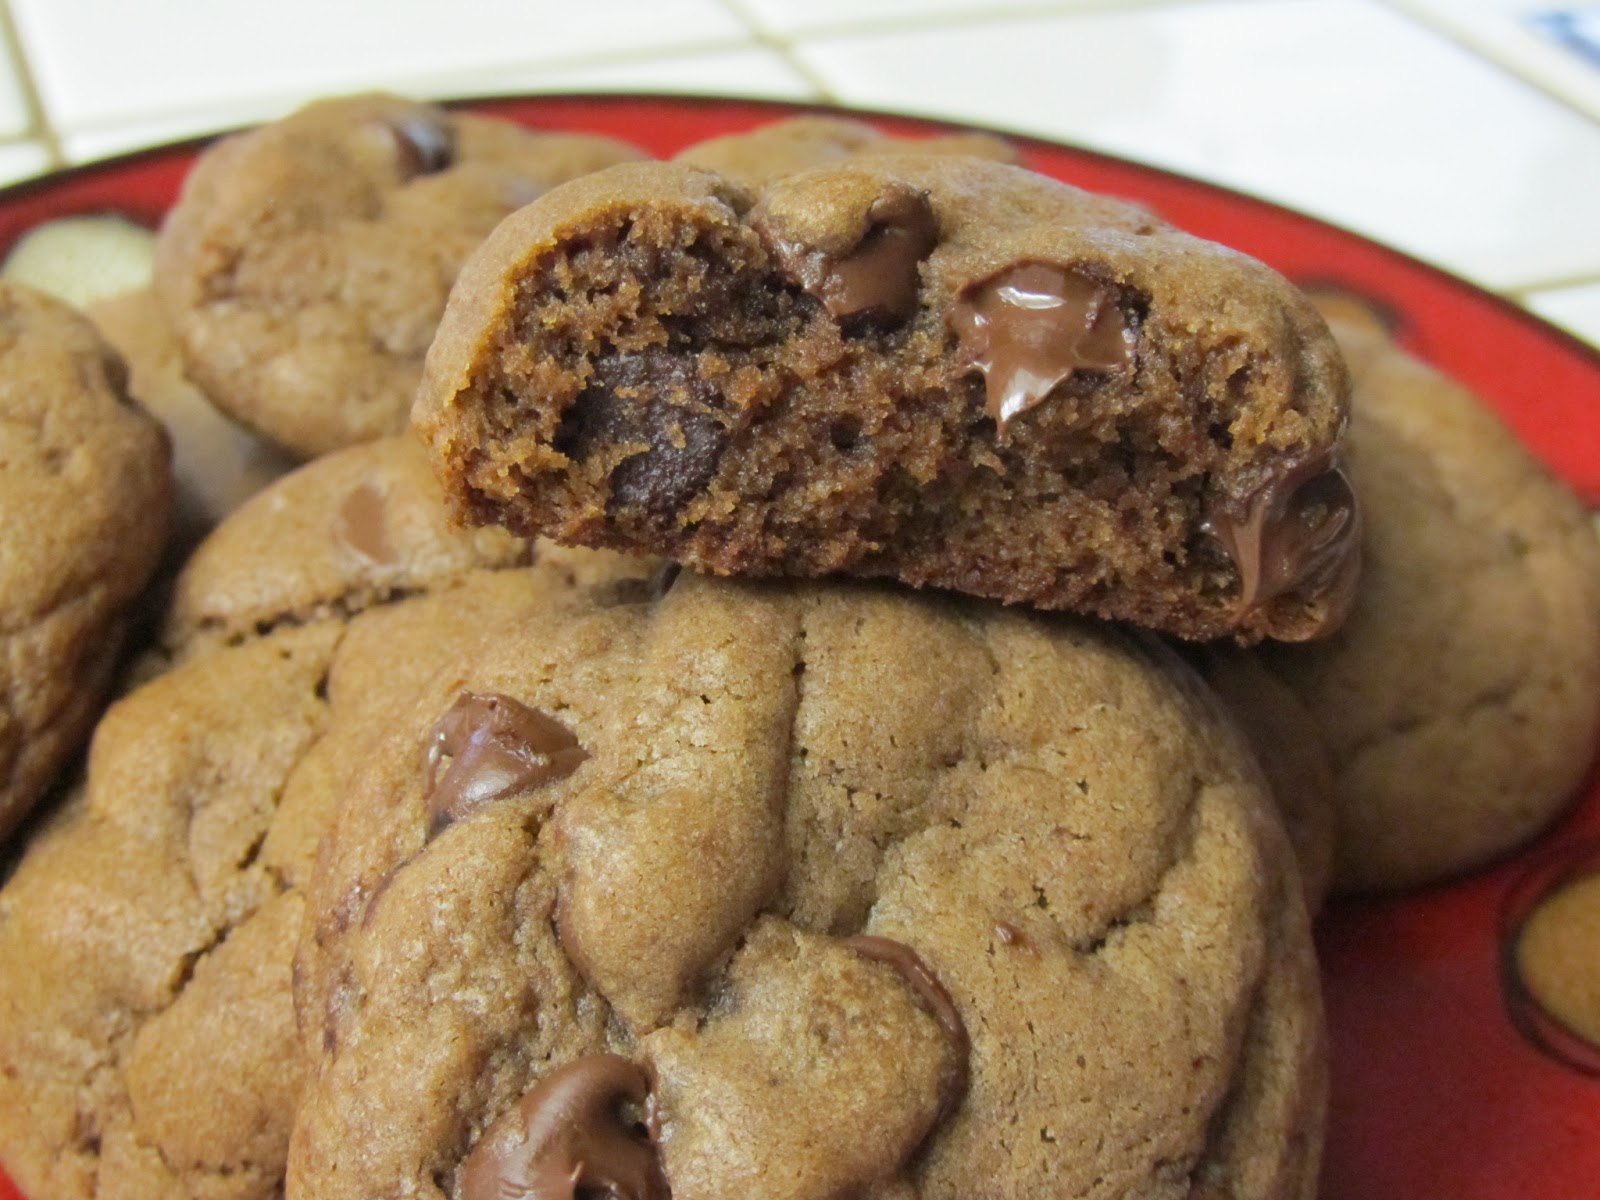
The only disappointing thing about these cookies (if you could actually say there was anything disappointing about these cookies!!!) was the lack of Kahlua flavor. Although, had I really thought about it before hand, I would have realized that I shouldn't have expected more Kahlua flavor as the recipe only calls for one tablespoon of that yummy, deliciousness. (way to use your head for more than a coat rack, Jenn)
Anywho... I think most of you know by now, I don't do a lot of baking and when I do, it usually tends to be cookies. So, the other day, when I was actually in the mood to do some baking, I looked my pantry over and saw a small bottle of Kahlua just staring at me... BEGGING me to use it... Well, as you all know, when an ingredient begs, one must never deny that ingredient..... sooooo this delicious treat was born!
Kahlua and Coffee Chocolate Chip Cookies
Adapted from Recipe Girl
Printable Recipe
Ingredients:
2 2/3 cup all purpose flour
1 teaspoon baking soda
1 teaspoon cinnamon
1/2 teaspoon salt
1/4 cup cocoa
1/2 Tablespoon instant coffee (original recipe calls for espresso powder)
1 Tablespoon Kahlua
1 cup unsalted butter, room temperature
1 cup packed brown sugar
1/2 granulated sugar
2 eggs
1 teaspoon vanilla
1-2 cups chocolate chips
Directions:
Preheat oven to 375 degrees F. In a bowl, whisk together the flour, baking soda, cinnamon, salt and cocoa; set aside.
In a small bowl or measuring cup, add the instant coffee and Kahlua; stirring to combine. Allow to sit and let the coffee granules dissolve.
In a bowl of a stand mixer with a paddle attachment, cream together the butter and both sugars until light and fluffy. Scrape down the sides and add the eggs, one at a time, beating until just incorporated. Add the vanilla and beat until just combined. With mixer on low, slowly add in the dry ingredients until just combined. Remove from stand mixer and fold in chocolate chips.
Drop by teaspoon or tablespoon full, two inches apart, onto a cookie sheet. Place in oven and bake 8-10 minutes, or until slightly browned on the edges. Remove and allow to cool for 5 minutes. Finish cooling completely on a wire rack. Store in airtight container for up to 5 days. Enjoy!
One Year Ago: Smoked Balsamic Pork Ribs
Two Years Ago: Jalapeno Cheddar Grilled Chicken
Three Years Ago: Caramelized Chicken Breasts with Garlic Rice