Jenn's Food Journey has finally come to that inevitable fork in the road. It is time for this traveler to make a decision on whether to go down this road or that road. The first road leads to continuing on as if nothing is about to change, which will bring on a ton of added stress. The second road leads to the acknowledgement that things are changing rapidly and will be different from here on out. After months and months of trying to figure out which road to actually take, I have come to the conclusion that the second road is the one I must go down. So, what does that mean for the journey? Honestly, for now, it only means some time away.... a sort of hiatus if you please. Times are definitely changing for me and blogging needs to take a backseat for the time being. This has truly been a very hard decision to make. Actually, I wasn't lying when I said it's taken me months and months. I have been toying with the idea of putting my blog on hiatus since early October, but I have just had the hardest time truly letting go. Blogging has not only been a great creative outlet for me, but it has helped me create some lasting friendships too.
It is time for me to be honest with myself though, and with a baby due in 10 weeks (or less for all I know), blogging must be put aside for now. This is truly a sad day for me and I will probably regret the decision as soon as I hit the "publish" button... but the great thing about the internet, I can always come back to it if I need/want to. And, I hope to do just that sometime in the very near future.
To all of you who have stuck by me since the very beginning and to everyone who has come on more recently... Thank you so much!!! You have been such wonderful support for me and I cannot tell you how much your comments and emails have brightened each and every one of my days.
To my close friends and family that have continued to read and support my blog... Thank you for your love and support. You all know how much you mean to me and if not, email me or call me and I'll remind you :)
And of course, to Chris.... who's love and support and help with my blog has helped make this blog what it truly has become. He is my rock and my love and I would have given up years ago without him.
I cannot truly say goodbye, as goodbye sounds too final... plus, for those of you that have blogs yourself, you know you'll see me out there because I can't wait to see what yummy new recipes you will share with the world! So for now, with a heavy heart, I say so long and that I hope to be back soon, sharing my love for food with all of you!
Love and happy cooking to you all,
Jenn
With my pregnancy, I have not been able to really eat any fish other than Salmon. Don't get me wrong, I love salmon, so this is not a bad thing. BUT, isn't it funny when you are told to stay away from certain things that those are the things you crave more than before? Ask me what I would rather be eating and I couldn't really tell you, but still, I know I would love to make a nice piece of Halibut or even my beloved tilapia right now. Okay, so there are a ton of people that would tell you I could still eat those things, but with this being my first child, I might be being a tiny bit over cautious... so judge me, it's okay :)
ANYWAY... I digress.... This simple way to prepare salmon was excellent. I mean it was so good, I didn't even have to have a sauce with it. That's right folks, you heard it straight from the self proclaimed sauce queen's mouth... no sauce is required with this recipe. It is perfect as is!! So good that while I'm writing this, I wish I had a piece baking in the oven right now!!! YUM!!!
Parmesan Baked Salmon
Created by Jenn's Food Journey
- Serves 2 -
Printable Recipe
Ingredients:
2 Tablespoons mayonnaise
1 teaspoon whole grain mustard
1 Tablespoon grated parmesan cheese
1/8 teaspoon cayenne pepper
1/4 teaspoon lemon juice
3 Tablespoons Panko breadcrumbs
olive oil
salt and pepper
2 Salmon filets
Directions:
Preheat oven to 375 degrees F.
Mix together the mayo, mustard, parmesan, cayenne and lemon juice until well combined. Mix the panko with just enough olive oil to moisten them a bit (about 1/2-1 teaspoon) and season with salt and pepper. Place the salmon on a wire rack that has been set in a sheet pan and sprayed with non-stick cooking spray. Top each filet with the mayo/mustard mixture and then top with panko. Place in oven and bake 15-20 minutes or until the fish flakes easily with a fork. Serve immediately and enjoy!
Favorite Recipe of the Day from Past Years: Sriracha Honey Cashew Chicken

We received lots of great wedding gifts... one of my favorite came from a co-worker. She gave me this really cool oil/vinegar holder with dispensers... but along with it came a Herbs de Provence olive oil, a white balsamic vinegar and ...... wait for it.... a bottle of white truffle oil!!! YUM!! So, of course, my first thought, was to make an aioli. Now, one thing I learned, you can use too much truffle oil. The first batch I made was over powered by the oil and was almost inedible.... almost :). But, never fear, I don't like to give up when it comes to sauces, so I tried again, and the next time I nailed it! I have made this sauce quite a few times since.. I mean it goes so well with the one thing I have pregnancy cravings for - FRENCH FRIES!!! Oh yes, I haven't craved too many things, but fries... oh my gosh, I can't seem to get enough of them. I have done very well with not going over board, and when I have do have the, more times than not I bake them at home, so they are a little better for me... but I guess if you are dredging them in this sauce, it sort of wipes that out, huh? Oh well... it's worth it!!
White Truffle Garlic Aioli
Created by Jenn's Food Journey
Printable Recipe
Ingredients:
1/4 cup mayonnaise (homemade or store bought)
1 Tablespoon lemon juice
1/4 teaspoon white truffle oil
1/4 teaspoon garlic powder
salt and pepper, to taste
Directions:
In a small bowl, mix together all ingredients until well combined. Season with salt and pepper to taste. Cover and refrigerate until ready to use. Can be made up to 3 days in advance. Serve with chicken, fish, shrimp or french fries!! Enjoy!
One Year Ago: Tailgating Asian Chicken Strips
Two Years Ago: Balsamic Chicken Pasta
Three Years Ago: New England Clam Chowder
So it was quite the busy weekend around our house :) Not only did Chris and I get hitched, but I turned 40 on Sunday! Feels strange to actually say that out loud, but I'm not freaked out about it at all. To me, age is nothing but a number... my number gets a little higher each year... but so does yours :) I'll talk more about the wedding and even show you some pictures in a post next week (or whenever I get the actual pictures) - so hang tight and you'll be a part of our special weekend soon enough!
As for this pizza.. it was just one of those things I threw together. There was no real recipe, I just had some ground pork and veggies I needed to use up and so... this was born. And you know what, it turned out pretty darn good if I do say so myself!!!
Seasoned Ground Pork and Veggie Pizza
Created by Jenn's Food Journey
Printable Recipe
Ingredients:
1/4 lbs ground pork
1-2 Tablespoons homemade taco seasoning (depending on taste)
1/2 red bell pepper, chopped
1/2 zucchini, chopped
1/4 sweet onion, chopped
1 Mama Mia's thin pizza crust (or 1 ball of homemade pizza dough)
1/2 cup pizza sauce
1-2 cups shredded mozzarella cheese
Directions:
In
a skillet, over medium heat, add 1 teaspoon of olive oil and the sweet
onion. Cook 5 minutes and add the pork. Cook another 5-8 minutes or
until the pork is no longer pink. Add the taco seasoning, a little at a
time, until you reach the desired flavor, stirring to combine. Add the
pepper and zucchini and cook another 2 minutes. Remove from heat.
Preheat
grill to 400 degrees. Brush olive oil over both sides of the crust and
place on grill. Grill for 4 minutes and carefully remove. Flip the
crust over and spread the sauce over the cooked side of the crust. Add
the pork and veggies and top with cheese. Place back on the grill and
continue to grill for another 4 minutes or until the cheese has melted.
(you might have to move the pizza to indirect heat to make sure the
crust does not burn) Carefully remove from grill and slice. Serve and
Enjoy!!
One Year Ago: Chicken Caesar Pasta
Two Years Ago: A Cook's Book for Cooks
Three Years Ago: Sour Cream Corn Muffins
Have you ever had Souvlaki? If not, I highly recommend next time you are in a Greek restaurant to order it. It's usually pretty darn good. Normally, Souvlaki consists of small bites of meat and veggies and placed on a skewer and served with pitas and of course a delicious little sauce, but I didn't want to deal with cutting up the chicken... and.... well.... our veggies were in a form of a nice big side salad. So, I guess you can say I simplified things :) And who doesn't like that??
Grilled Souvlaki Chicken
Created by Jenn's Food Journey
- Serves 2 -
Printable Recipe
Ingredients:
1 Tablespoon mayonnaise
2 Tablespoon olive oil
1 Tablespoon lemon juice
2 garlic cloves, quartered
2 teaspoons Italian seasoning
1 teaspoon dried dill
1/2 teaspoon salt
1/4 teaspoon pepper
2 boneless, skinless chicken breasts
For the sauce -
1/4 cup mayonnaise
1 Tablespoon lemon juice
1/4 teaspoon dill
1/4 teaspoon Italian seasoning
1/8 teaspoon garlic powder
salt and pepper to taste
Directions:
In a food processor, add the first 8 ingredients. Process until smooth. Rinse chicken and pat dry with a paper towel. Place in a resealable plastic bag and pour the marinade over. Seal and place in refrigerator for at least 2 hours, but you could go as long as overnight.
Meanwhile, in a small bowl, mix together all the ingredients for the sauce until well combined. Taste and season with salt and pepper. Cover and refrigerate until ready to use.
Preheat grill to 375 degrees F. Clean and oil grill grates. Remove chicken from bag and discard marinade. Place the chicken over direct heat and grill 6-9 minutes per side or until the chicken reaches an internal temperature of 165 degrees F. Remove from grill and allow to rest for 3-5 minutes before serving. Serve with sauce and enjoy!
One Year Ago: Last Minute Idea Pasta
Two Years Ago: Lemony Shrimp Pasta
Three Years Ago: Smoked Beef Tri-Tip
With simple being the theme of last week's posts, I thought I might stay with that theme this week too :) I mean who doesn't like simple? Okay, maybe not everyone, but most people I know do. Actually, I love to hear that there are so many people like me that feel, by the time they get home from work, that they just really don't want to make dinner. Around here, it's not a must that I make dinner, but if don't, we'll just eat junk, so I make sure to do something so we don't eat ice cream and chips every night!! And, or course, what simple meal would be complete without a simple and delicious little sauce to go along side it?
Mustard Glazed Pork Chops
Created by Jenn's Food Journey
- Serves 2 -
Printable Recipe
Ingredients:
2 boneless pork loin chops
2 Tablespoons Dijon mustard
2 Tablespoons apple juice
1/2 teaspoon dried thyme
For the sauce -
2 Tablespoons mayonnaise
1 Tablespoon sour cream
2 Tablespoon Dijon mustard
1 Tablespoon lemon juice
Directions:
Mix together the dijon, apple juice and thyme. Place the pork in a resealable bag and pour the marinade over it. Seal and place in refrigerator for 2-4 hours.
Meanwhile, mix all the ingredients for the sauce in a small bowl until well combined. Cover and refrigerate until ready to use.
Preheat grill to 375 degrees F. Clean and oil grill grates. Place the pork over direct heat and grill 4-6 minutes per side or until they reach an internal temperature of 145 degrees. Remove from grill and allow to rest 3-5 minutes. Serve with sauce and enjoy!
One Year Ago: Spicy Grilled Tilapia Sandwiches w/Chimichurri Mayo
Two Years Ago: Beef Short Ribs with Grilled Baby Bok Choy
Three Years Ago: Oven Baked Fish and Chips
This has to be one of the easiest recipes I have come up with... EVER! I mean, three ingredients? Doesn't get much easier than that!! I know I keep saying I just haven't had much motivation and/or inspiration in the kitchen lately, so I've just been going with it. And this, was just one of those go with it nights. I had something completely different planned, but just didn't feel like putting the time or effort into it... soooooo, I grabbed two of my favorite ingredients, mixed them together and came up with a pretty darn good idea, if I do say so myself :)
Grilled Chicken with Sweet and Spicy Chili Glaze
Created by Jenn's Food Journey
- Serves 2 -
Printable Recipe
Ingredients:
2 boneless, skinless chicken breasts
1/4 cup sweet chili sauce
2 Tablespoons Sriracha chili sauce
Directions:
Mix together the sweet chili sauce and Sriracha until well combined. Remove half of the mixture and set aside. Place the chicken in a resealable bag and pour the remaining marinade over it. Seal bag and refrigerate for at least two hours.
Preheat grill to 375 degrees F. Clean and oil grill grates. Remove chicken from bag and discard marinade. Place chicken over fire and brush the top side with reserved chili sauce. Grill 8-9 minutes, then flip chicken over. Brush top side with chili sauce and continue to grill another 8-10 minutes or until the chicken has reached an internal temperature of 165 degrees F. Give the chicken another brush with sauce on both sides and remove from grill. Allow to rest 3-5 minutes before serving. Enjoy!
One Year Ago: Korean Beef Stir Fry
Two Years Ago: Carolina Style Barbecue Chicken
Three Years Ago: Catfish with Curry Crumb Topping
This is yet another simple recipe. Something to remind everyone that things do not have to be complicated in the kitchen to get a delicious dinner on the table. I said last week that I was in a bit of a rut and well, it continues, but I have decided to just go with it. I mean, every recipe can't be life changing, right? :) You can make this sandwich with whatever seasoning you like... whatever cheese you like... heck, you don't even have to grill the avocado - just whatever you do.. have fun with it!!
Grilled Chicken and Avocado Sandwich
Created by Jenn's Food Journey
- Serves 2 -
Printable Recipe
Ingredients:
2 boneless, skinless chicken breasts, pounded thin and cut in half lengthwise
olive oil
Ms. Dash (or any seasoning of your choice)
1 avocado, cut in half lengthwise and pit removed
salt and pepper
sliced cheese (I used colby jack)
lettuce
cucumber slices (optional)
steak rolls or hoagie buns
Directions:
Rub olive oil on both sides of the chicken. Season liberally with Ms. Dash (or other seasonings). Cover and let sit in refrigerator for at least 1 hour.
Preheat grill to 375 degrees F. Place the chicken directly over the fire and grill 5-8 minutes or until it reaches an internal temperature of 165 degrees F. Remove and allow to rest. While chicken is resting, drizzle avocado with olive oil and season with salt and pepper. Place face down on the grill and grill 1-2 minutes. Carefully remove and thinly slice. Toast the buns on the grill at this time too if you desire.
To build the sandwich - I slathered a tiny bit of mayo on the bottom bun, then topped with lettuce, cucumber slices, the chicken, cheese and finally the sliced avocado. Serve immediately. Enjoy!
One Year Ago: Grilled Tomato & Prosciutto Pizza w/Provolone Cheese
Two Years Ago: Baked Tilapia with Sweet Chili Glaze
Three Years Ago: Honey and Spiced Grilled Chicken
Why I didn't think of this pizza sooner, I will never know. BUT, as I always like to say.. better late than never!!! If you like Sriracha and you like pizza, this is the recipe for you. Sriracha on the chicken, Sriracha in the sauce, Sriracha over top if you feel like you are lacking.... MMMMMMMMMM....... It makes my mouth water just talking about it!!!! :)
Sriracha Chicken Pizza
Created by Jenn's Food Journey
Printable Recipe
Ingredients:
1 large boneless, skinless chicken breast
2 Tablespoons Sriracha, divided, plus more for drizzling
1/2 cup Pizza Sauce
3 green onions, chopped
2 oz sliced black olives
1-2 cups shredded mozzarella cheese
1 14oz ball of pizza dough or 1 Boboli Pizza Crust
Directions:
Rub 2 tablespoons of Sriracha over both pieces of chicken (1 T per chicken). Place on a plate and cover with plastic wrap. Place in refrigerator for at least 1 hour. Preheat grill to 375 degrees F. Clean and oil grill grates. Place the chicken over direct heat and grill 8-10 minutes per side or until it reaches an internal temperature of 165 degrees F. Remove and allow to cool for 10 minutes before cutting into bite size pieces. Toss with a little drizzle of Sriracha; set aside.
Place a pizza stone on the grill and preheat to 425 degrees F. If using fresh dough, roll out and brush with olive oil. If using store bought dough, brush with olive oil also. Place dough/crust on pizza stone and allow to grill for 4-5 minutes or until the dough is golden brown on the bottom. Carefully remove from stone. Flip the dough/crust over. Mix the pizza sauce with 1 Tablespoon Sriracha and spread over cooked side of the crust. Top with chicken, black olives and cheese. Top with chopped green onions. Place back on the pizza stone (close the cover) and grill for another 4-5 minutes or until the dough is cooked through and golden brown and the cheese has melted. Carefully remove from stone and allow to cool for a few minutes before you slice. Drizzle with Sriracha if desired. Serve and enjoy!!
One Year Ago: Spaghetti al Limone with Grilled Lemon Chicken
Two Years Ago: Shrimp in Love Pasta
Three Years Ago: Sweet Pepper Olive Puree over Penne and Chicken
For those of you that do not know, I am a HUGE Shaun of the Dead fan. I have seen the movie more times than I care go admit.... Okay, in fact, I would tell you exactly how many times, had the number not been so incredibly high that I can't even remember anymore :) Well, if you too are a SotD fan, than you know that the third movie in Edgar Wright and Simon Pegg's Cornetto Trilogy came out on Friday. That's right.. the much anticipated The World's End finally hit the box office in the US. I, of course, went to see it Friday morning... there was no way I was waiting any longer!! What did I think? Don't worry, I'm not giving anything away, but I will say this. I wanted more. BUT, with that said, I laughed and had a great time with the movie and was not at all disappointed that I took a day off of work to see it :) If you have seen both Shaun of the Dead and Hot Fuzz, you definitely have to see this one..... and I promise, that is all I will say..... for now!!
As for this sandwich - I mean, what else needs to be said that the name doesn't already say for itself? Goat cheese mayo makes this already delicious sandwich a definite must try!!
Grilled Steak Sandwiches with Goat Cheese Mayo
Created by Jenn's Food Journey
Printable Recipe
Ingredients:
1/2 cup beer (I used Bud Light)
1 Tablespoon Sambal Oelek (ground chili paste)
1 Tablespoon Sriracha
dash of Worcestershire sauce
1 lbs. steak (I used petite sirloin)
lettuce leaves
cucumber slices/tomato slices
steak rolls or hoagie buns
For the mayo -
1/4 cup mayonnaise
3 Tablespoons crumbled goat cheese
1/2 teaspoon lemon juice
dash of garlic powder
1/8 teaspoon dried dill
salt and white pepper, to taste
Directions:
Mix together the beer, Sambal Oelek, Sriracha and Worcestershire until well combined. Place the steak in resealable plastic bag and pour the marinade over. Seal and place in refrigerator for at least 4 hours and up to 24.
To make the mayo - mix together all the ingredients in a small bowl. Season with salt and white pepper to taste. Cover and store in refrigerator until ready to use. Can be made up to two days in advance.
Preheat grill to 400 degrees F. Clean and oil grill grates. Remove steaks from the bag and discard marinade. Place the steaks over direct heat and grill 4-9 minutes per side or until the steak is done to your liking. Remove steak from grill and allow to rest for 8-10 minutes before thinly slicing against the grain.
To build the sandwich: (I like to toast my bun on the grill.. about 2 minutes per side) Slather mayo on both cut sides of the rolls. Top with lettuce and cucumber (tomato if you are using). Top with steak slices and serve. Enjoy!
One Year Ago: Grilled Hawaiian Pizza
Two Years Ago: Chicken in Satay Sauce
Three Years Ago: Grilled Parmesan Chicken
Once again, this is yet another sad looking photo. It's not bad, just sad. Nothing to dress it up with... no sides to give the plate a little life.... I am pretty sure I was just too hungry and said F it when I took these pictures. BUT, the recipe turned out so well, I had to share it. Plus, I know most of the time, I'm harder on myself on my photo taking skills (or lack there of) then any of you are :)
This is a spicy way to enjoy one of our favorite meals.....
Spicy Fish Tacos with Creamy Jalapeno Coleslaw
Created by Jenn's Food Journey
Printable Recipe
Ingredients:
For the fish -
1 teaspoon paprika
1/2 teaspoon brown sugar
1/4 teaspoon dried oregano
1/8 teaspoon garlic powder
1/4 teaspoon kosher salt
1/4 teaspoon cayenne pepper
1/4 teaspoon black pepper
2 tilapia fillets
flour or corn tortillas (small or medium sized)
For the coleslaw -
2 Tablespoons mayonnaise
1 Tablespoon sour cream
3/4 teaspoon white vinegar
1/4 teaspoon granulated sugar
1 jalapeno, stem and seeds removed, roughly chopped
salt and pepper
7 oz coleslaw mix (half a bag)
Directions:
In a small bowl, mix together the first 7 ingredients until well combined. Sprinkle liberally over both sides of each piece of fish. Allow to rest for at least 30 minutes.
Preheat grill to 350 degrees F. Place each piece of fish in a large square of aluminum foil sprayed with non-stick cooking spray. Pull together two sides and fold. Fold in ends to create a packet around the fish. Place directly over the heat and allow to grill for 7 minutes and then rotate 180 degrees. Continue grilling for another 5 minutes or until the fish flakes easily with a fork. Remove from grill and allow to cool for 5 minutes before cutting the fish into strips.
Meanwhile, in a food processor, add the mayo, sour cream, vinegar, sugar and jalapeno. Pulse until jalapeno has been chopped fine. Place the coleslaw mix in a bowl and toss with the dressing. Season with salt and pepper to taste.
Build the taco by placing two strips of fish on the tortilla and top with coleslaw. Serve and enjoy!
One Year Ago: Culichi Sauce a la Ruben
Two Years Ago: Grilled Pork Chops with Adobo Paste
Three Years Ago: Cinnamon Swirl Loaf
I know I posted so many salad recipes before it truly was summer for everyone else in the country - so I thought it was time to create something new, just as a reminder to all the ways you can enjoy a simple salad, no matter what time of year it may be. Like adding this delicious dressing to your menu!!! I've been on a bit of an avocado kick lately, probably because I can find really good ones right now. Okay, I still have a bit of an issue with picking the right ones at the store, but from time to time, I do pretty darn well. And this was one of those times. The avocado was perfectly ripe and it was easy to cream into this wonderful tasting dressing that would be a perfect accompaniment to any salad!!
Creamy Avocado Dressing
Created by Jenn's Food Journey
Printable Recipe
Ingredients:
1 large, ripe avocado
1 Tablespoon lemon or lime juice (I used lemon)
1 Tablespoon mayonnaise
1/4-1/2 teaspoon Worcestershire sauce (to taste)
1/4 teaspoon garlic powder
1/8 teaspoon cayenne pepper
Salt and pepper
Directions:
Carefully slice the avocado lengthwise and remove the seed. Scoop the avocado out with a spoon and place in a bowl of a food processor. Add all the remaining ingredients except the salt and pepper and pulse until smooth. Season with salt and pepper to taste. I added just 1/2 teaspoon of water to thin the dressing out just a tad bit. Serve over your favorite salad and enjoy!
One Year Ago: Grilled Tilapia with Old Bay Compound Butter
Two Years Ago: Pork Chimichurri Kabobs
Three Years Ago: Oreo Truffles
I haven't been posting a lot of sauce recipes lately. Oh, don't you worry, I've been making sauces... it's just that.... well, I haven't been making anything new. I quickly mentioned on Monday that I was having a bit of a "cookers block" (yes I made that up, whatever), and, well... it's true. I have been in a slump. I don't have much excitement about cooking lately and I really don't like the feeling. I know it will pass... it always does... but this has lasted longer than usual and none of my usual tricks are helping me creep out of my funk. It's just a bit frustrating, is all. ANYWAY... I was recently inspired to make a teriyaki balsamic sauce that I knew would work perfectly with steak. And what's great... I was right! The sauce turned out to be simple, delicious and was the perfect condiment for the steak!
Grilled Steaks with Balsamic Teriyaki Sauce
Created by Jenn's Food Journey
- Serves 2 -
Printable Recipe
Ingredients:
2 Steaks (I used rib eye)
1/3 cup beer
1 Tablespoon chili paste (Sambal Oekel)
2 teaspoons Sriracha
2 teaspoons soy sauce
1/4 cup balsamic vinegar
2 Tablespoons homemade or store bought teriyaki sauce
Directions:
Place steaks in a resealable plastic bag. In a small bowl, mix together the beer, chili paste and Sriracha until well combined. Pour over steaks. Seal bag and place in refrigerator for 2-8 hours (the long they sit, the better they will be).
Meanwhile, in a sauce pan, over medium-high heat, add the soy, balsamic and teriyaki sauce. Bring to a boil and allow to cook for 5 minutes, or just until the sauce starts to thicken. Remove from the heat and allow to cool.
Preheat grill to 400 degrees F. Clean and oil grill grates. Place the steak over direct heat and grill 5-10 minutes per side or until it's reached your desired doneness. Remove from grill and allow to rest for 5 minutes. Serve with sauce and enjoy!
One Year Ago: Grilled Spicy Garlic Shrimp with Tomatoes over Pasta
Two Years Ago: Spicy Grilled Shrimp with Creamy, Cooling Asian Sauce
Three Years Ago: The Real Chimichurri
When time is short and you want something delicious and light, this is the recipe for you! It uses minimal ingredients and the part that takes the longest is letting it marinate! That's the definition of easy in my book. I served the shrimp over a nice big salad, but you can serve it over rice or noodles or just on it's own. It's completely up to you. And... for those of you that don't like shrimp, use chicken strips instead - granted cook time is longer, but you'll still have a delicious and light dinner in no time at all!
Spicy Peanut Lime Shrimp
Created by Jenn's Food Journey
Printable Recipe
Ingredients:
1 Tablespoon creamy peanut butter
1 Tablespoon soy sauce
1 Tablespoon lime juice
drop of sesame oil
1 teaspoon Sriracha
30-40 medium shrimp, deveined and tails removed
Directions:
In a small bowl or measuring cup, mix together all the ingredients, except the chicken, until well combined. Place the shrimp in a shallow bowl and pour the marinade over top. Toss to coat. Cover and refrigerator for 1-2 hours.
Preheat grill to 375 degrees F. Place an oiled grill pan over direct heat and let sit for 1 minute. Place the shrimp on the grill pan and grill for 2-3 minutes per side or until the shrimp is pink and cooked through. Carefully remove from grill and serve immediately. Serve over salad, noodles, or rice and veggies. Enjoy!
One Year Ago: Easy Summer Veggie Pasta
Two Years Ago: Jalapeno Beef Kabobs with Roasted Garlic Aioli
Three Years Ago: Strawberry Ice Cream

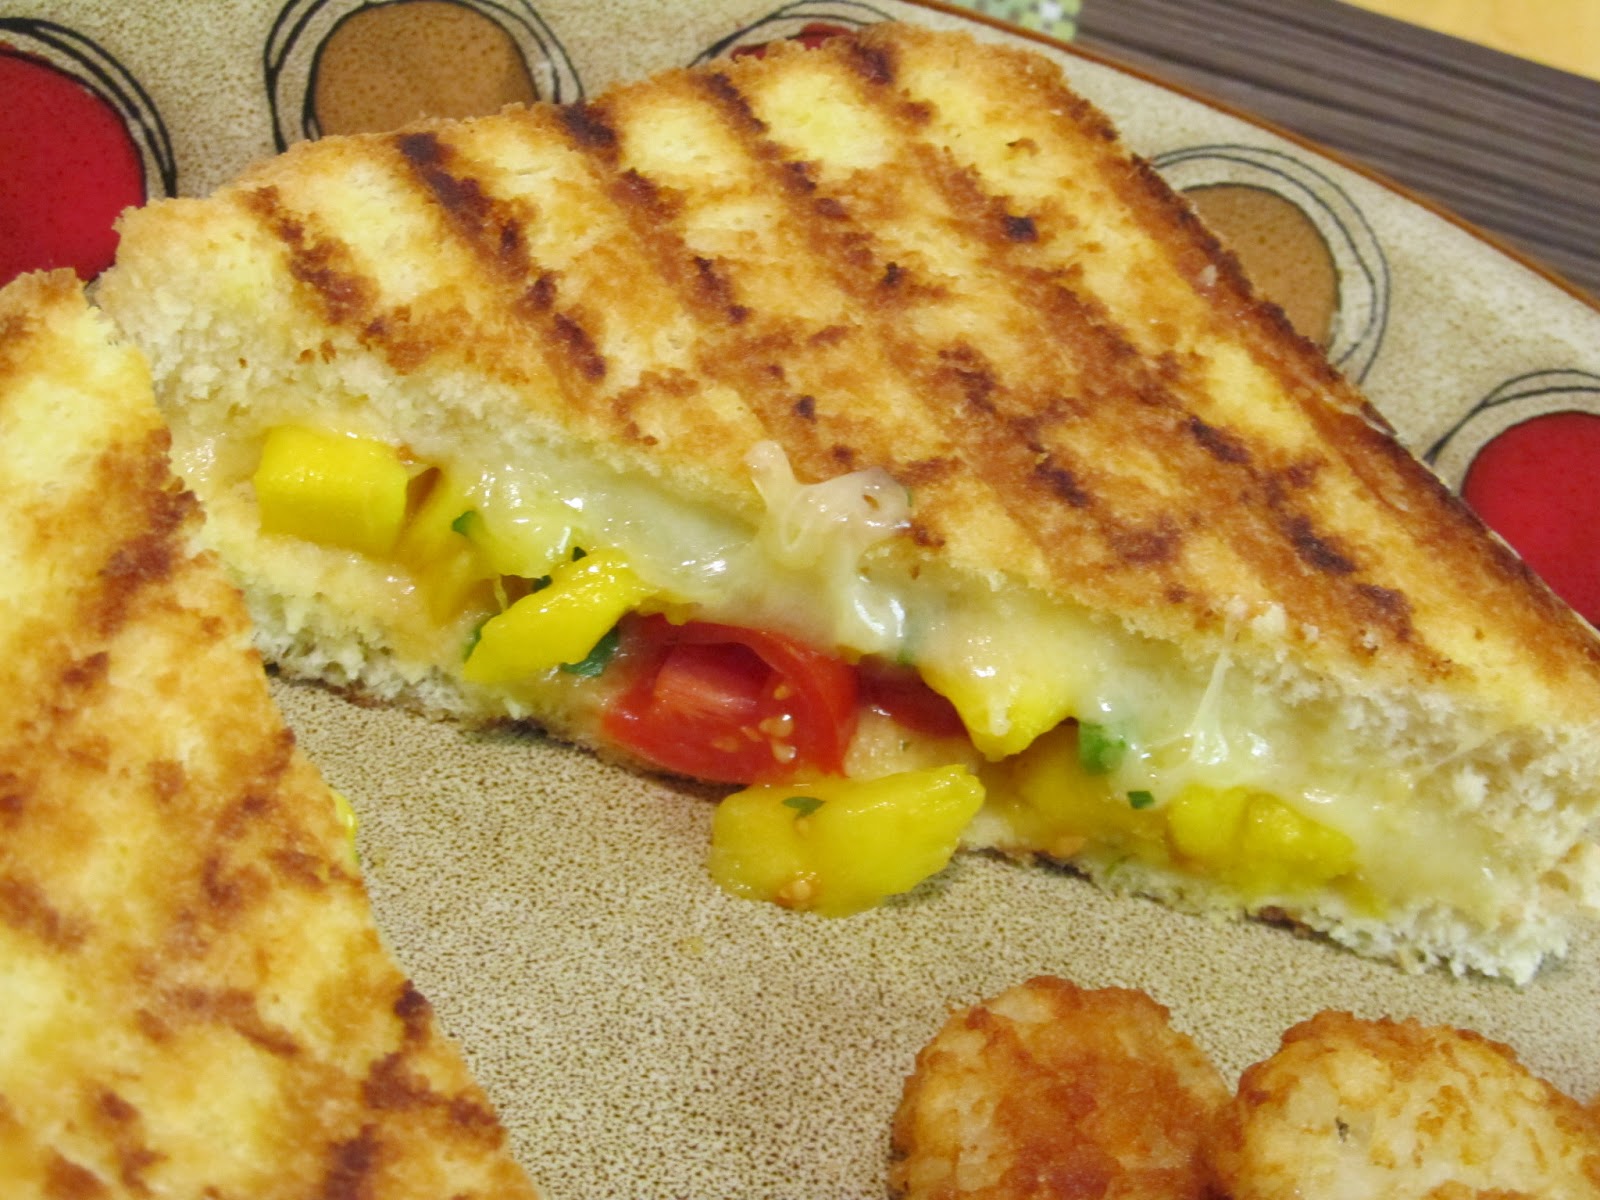
A couple weeks ago, I received a text from Chris' sister, Becky. She had just had lunch and couldn't wait to tell me about this amazing grilled cheese sandwich she had just had. Actually, she couldn't wait to tell me so that I could figure out how to make it and pass the recipe on to her so she could enjoy it again and again at home - which I was perfectly okay with and completely understood after having the sandwich!! ANYWAY - her text basically said that she had just had this amazing grilled cheese and mango salsa sandwich and would I try and recreate it for her. Loving the fact that she actually thought to ask ME what I would do.. I couldn't wait to get home and put it together!! Honestly, it didn't seem all that hard - she told me it was on Texas toast (easy) with Gruyere cheese (yum), mango salsa (double yum) and that it had been grilled on an actual grill. Now, I know what you are thinking... then why didn't you actually grill these, Jenn? Well, I'll tell you why... because I didn't want to, and that's the truth! I love to use my actual grill pan when I make grilled cheese sandwiches, so I stuck with what I knew would work the best. Other than that, I just went for it. I mean.. Gruyere cheese and mango salsa... how could I really not get this right :)
In the end, Chris and I LOVED these and I was soooo thankful that Becky sent me the request. I haven't talked to her to find out if she tried it or not, but I am confident that when she does, she'll feel like she was back at the restaurant!!
Grilled Cheese with Mango Salsa
Created by Jenn's Food Journey
Printable Recipe
Ingredients:
6-8 slices of Texas toast (depends on if you want to make 3 or 4 sandwiches)
6-8 oz Gruyere cheese, sliced (just depends on how cheesy you want each sandwich)
Butter, unsalted, room temperature (makes for easier spreading)
For the Mango Salsa -
20 Cherry tomatoes, quartered
1/2 of a large jalapeno, finely diced
1 small garlic clove, finely minced
fresh chopped cilantro (I used a little less than a Tablespoon, but only because Chris is not a huge fan)
Zest of 1 lime (no juice)
1 mango, cut into chunks
Directions:
To make the salsa - Gently toss all ingredients together in a small bowl. Season with salt and pepper to taste.
To make the sandwich - Butter one side of each piece of bread. Heat a grill pan over medium to medium high heat. Place one slice of bread on the pan (butter side down), top with cheese and then the salsa (how much is up to you). Top with remaining slice of bread (butter side out). When bread is golden brown, flip and continue to cook until the other side is golden brown. Remove from heat and carefully slice. Serve and enjoy!
One Year Ago: Teriyaki Chicken Sliders with Spicy Mayo
Two Years Ago: Chimichurri Shrimp and Rice Skillet
Three Years Ago: Sunny Side Orzo
Is anyone else a bit shocked that it's already July? Where the heck did the time go? It's hard to believe that there was ever a time when I thought time moved to slow. And trust me, there was a time (like when I was a kid in school) - but alas, those days are LONG gone! I only say this because I turn 40 this year - Yep, that's right 40 - and it's getting closer and closer and closer to that day.... not that I'm worried. I'm not going to freak out or anything, I mean it's just a number, right? The funny this is, I don't feel like I'm turning 40. I guess I've always had this idea of what I would feel like and where I would be in my life when I turned the big 4-0, but now that it's on it's way, I don't feel much different than I did when I turned 30 and that didn't feel much different than when I turned 25, which only felt different than turning 21 because ... well... it was 21!!
Anyway.. enough rambling.. let's get to the food!! I like cashew chicken, but always feel as if it's missing something. So, I put this little number together to give it some much needed oomph! This was actually inspired by the Sriracha Honey Cashew Chicken that Mary (Barefeet in the Kitchen) posted a while back (too bad mine doesn't look even half as lovely as hers does) - So thank you once again Mary!!! I highly recommend trying her recipe first, if you haven't already, that one blows this one away!!
A word of caution: if you don't like a lot of heat, don't toss the chicken with the Sriracha and cut back at least 1/2 tablespoon in the sauce...remember, start small - you can always add more - you can never take away!!
Spicy Cashew Chicken
Created by Jenn's Food Journey
Printable Recipe
Ingredients:
3 Tablespoons low sodium soy sauce
2 teaspoons fish sauce
1/4 teaspoon granulated sugar
2 teaspoons mirin
1/4 teaspoon sesame oil
1/2 teaspoon hoisin
1/2 teaspoon red pepper flakes
3 Tablespoons Sriracha, divided
2 boneless, skinless chicken breasts, cut into bite size chunks or thinly sliced
1 red pepper, thinly sliced
1 garlic clove, minced
1/4 - 1/2 cup unsalted cashews
2-3 green onions, chopped or sliced (optional - I remembered mine AFTER we had already eaten, of course!!!)
1 teaspoon vegetable oil
Directions:
Place the chicken chunks in a shallow dish and toss with 2 tablespoons Sriracha. Cover and allow to rest in the refrigerator for at least 1 hour.
In a small bowl or measuring cup, add the soy, fish sauce, sugar, mirin, sesame oil, hoisin, red pepper flakes and remaining 1 tablespoons of Sriracha; stir until well combined and sugar has dissolved.
In a wok or deep, nonstick skillet, heat 1 teaspoon vegetable oil over medium high heat. Add the chicken and quickly stir fry for 5 minutes or until the chicken is just starting to cook through. Add the red pepper and stir fry for 1 minute. Add the garlic and stir fry for one more minute. Stir in the soy mixture and stir to coat everything. As soon as the sauce thickens, remove from the heat and stir in the cashews and green onions. Serve immediately and enjoy!
One Year Ago: Pina Colada Grilled Chicken
Two Years Ago: Shrimp Lettuce Wraps with Serrano Mint Sauce
Three Years Ago: Pulled Pork Sandwiches
Although we are not doing anything that special for the 4th of July holiday (I have to work the next day.. bummer), I have decided that I'm going to take a break from blogging this week. I have a pretty busy week ahead of me and just didn't want to put added pressure on myself when it came to my blog posts. But never fear, I am leaving you with some great ideas for your 4th of July backyard barbecue... or any backyard barbecue for that matter!
Hope you all have a great week and I hope to "see" you all back here next Monday!
Happy Grilling!
Jenn
Past July 4th Posts: 4th of July Celebration, 4th of July Ideas - Part One, 4th of July Ideas - Part Two