Search This Blog

Wednesday, August 15, 2012

Simple Ground Beef Naan Pizza

This is one of those meals that was created more out of necessity and simplicity than anything else.  Well, if you think about it, most meals are, aren't there?  Well, anyway... this was a quick "throw together" meal the night before we left for Nebraska.  I hate not making dinner and eating junk if we don't really have to.. and that night, we didn't necessarily have to.  I didn't want to be spending a lot of time cooking, so I decided on something simple and something that used ingredients I had on hand and needed to use before we left anyway.

Sometimes, things just come together nicely :)

Simple Ground Beef Naan Pizza
Created by Jenn's Food Journey
- Serves 2 -
Printable Recipe 
Ingredients:
1/2 lb ground beef
1/2 teaspoon salt
1/4 teaspoon pepper
1/4 teaspoon red pepper flakes
1/4 teaspoon fennel
1 teaspoon dried oregano
1/4 teaspoon garlic powder
1 red pepper, chopped
1 jalapeno, chopped
2 Naan flatbread
1/2 cup pizza sauce
1 cup shredded pepper jack cheese

Directions:
In a skillet, over medium heat, add the ground beef.  Cook for 2 minutes.  Add the salt, pepper, red pepper flakes, fennel, oregano and garlic powder.  Stir and cook 1 minute.  Add the red pepper and jalapeno.  Cook until the meat is no longer pink and the vegetables are just starting to soften, about 3 more minutes.  Remove from heat and allow to cool a little.

Meanwhile, preheat grill to 375 degrees F.  Brush one side of each naan and place directly over the fire.  Grill about 3 minutes or just until golden.  Carefully remove from grill.  Spread pizza sauce on the grilled side of each naan.  Top with ground beef mixture and cheese.  Place back on grill over direct heat for another 3-4 minutes or until the bottom is golden brown.  Move to indirect heat and continuing grilling until the cheese has fully melted.  Remove from grill and allow to cool.  Cut in half or in quarters.  Enjoy!

One Year Ago:  White Chocolate Chip & Raspberry Swirl Ice Cream
Two Years Ago:  Parmesan Orzo with Salmon

Tuesday, August 14, 2012

Sticky Grilled Chicken

This chicken did not turn out like I had envisioned it.  It tasted WONDERFUL, so that was not the problem.  The problem is how it looks.  Oh, it looks good, but not the way I pictured it.  It was supposed to be caramelized looking.... sticky looking.....   That obviously did not happen.  A fault I cannot give to anything or anyone but myself.  Just a few amateur mistakes is all.. no biggie.  That aside, this was absolutely delicious!  Simple, easy, and if you follow the recipe that Mary (One Perfect Bite) actually posted, you'll get a much better looking result :)

Sticky Grilled Chicken
Adapted from Mary, One Perfect Bite
- Serves 2 -
Printable Recipe 
Ingredients:
1/4 cup orange marmalade
1 teaspoon cider vinegar
1 teaspoon honey
1 teaspoon Dijon mustard
1/8 teaspoon ground ginger
1/8 teaspoon Chinese five spice
2 boneless, skinless chicken breasts

Directions:
In a measuring cup, add the marmalade and microwave about 10 seconds, or until it mixes easily.  Add all remaining ingredients, except the chicken, and stir until well combined.  Remove 2 Tablespoons of mixture and set aside.  Place chicken in resealable bag and pour remaining marinade over it.  Seal bag and place in refrigerator for 4 hours.

Preheat grill to 375 degrees F.  Clean and oil grill grates.  Remove chicken from bag and discard marinade.  Place chicken over direct heat and grill for 5 minutes and then flip chicken and allow to cook another 5 minutes.  Baste the chicken with the sauce mixture, flip and grill another 3 minutes.  Baste the chicken again, flip and grill another 2 minutes or until the chicken has reached an internal temperature of 165 degrees F.  Remove from grill and allow to rest before serving.  Enjoy!

One Year Ago:  Jalapeno Hot Sauce
Two Years Ago:  Mini Meatball Subs

Monday, August 13, 2012

Grilled Tilapia with Old Bay Compound Butter

I confessed to you just the other day that I was having a love affair with compound butters.... so, of course, you will not be surprised to see this recipe.  And, it's been awhile since I've posted a tilapia recipe...I guess this is a perfect way to combine my love of both.

This is another great recipe from the Grill Grrrl, Robyn.  If you haven't visited her site, now is the time.  She has got some amazing recipes posted and, as I've told you before, she is my grilling idol.  Did you know that she was recently on the Food Network?  That's right, Robyn got to compete against some of the best grilling chefs in the country on a recent episode of Chopped Grill Masters.  She did get chopped, but hey, if you saw who and what she was up against, you know she gave it her all.  And no matter how much you give sometimes, it's just not your day.  Heck, even Micheal Symon got kicked off in the first round of Chopped All-Stars.  As the saying goes.... some days you're the bug and some days you're the windshield!  (check out her post traumatic Chopped disorder post for her story)

Grilled Tilapia with Old Bay Compound Butter
Adapted from Robyn, The Grill Grrrl
- Serves 2 -
Printable Recipe 
Ingredients:
3 Tablespoons unsalted butter, room temperature
1 teaspoon lemon juice
1/2 teaspoon Old Bay Seasoning
1/8 teaspoon white pepper
1/8 teaspoon cayenne pepper
2 tilapia fillets

Directions:
In a small bowl, mix together all of the ingredients except the tilapia, until well combined.  Cover and place in refrigerator until ready to use.

Meanwhile, preheat grill to 325 degrees F.  Tear off two squares of aluminum foil large enough to form a packet around each piece of fish.  Spray with non-stick cooking spray.  Place one piece of tilapia in the middle of each piece of aluminum foil.  Scoop out 2 teaspoons of the compound butter and place 1 teaspoon of it on each piece of fish.  Bring the long sides of the foil together and fold to seal.  Fold and seal in remaining ends to form a packet around the fish.  Place over direct heat and grill for 14-15 minutes, rotating the packet once during grilling.  Carefully remove from grill and allow to cool for 3 minutes.  Carefully open packets and place fish on place.  Top with 1 Tablespoon each compound butter and serve immediately.  Enjoy!

One Year Ago:  Pork Chimichurri Kabobs
Two Years Ago:  Oreo Truffles

Thursday, August 9, 2012

Stuffed Burgers - aka Jucy Lucy

There is true controversy surrounding this burger.  The Jucy Jucy - Who created it?  Who made the first one?  The opinions vary.  It seems that there are two places in Minneapolis, MN that lay claim to inventing this beloved burger - The 5-8 Club and Matt's Bar.  The consensus, though, is that Matt's is where a cook "first sealed American cheese between to patties and slapped it on the griddle", back in 1954. I don't know who the true creator is and honestly, I really don't care because what I do know is this... if you have ever had a jucy lucy or something similar, it's almost hard going back to a regular old burger.  How can you not fall instantly in love with a burger that is oozing with melty, creamy, wonderful cheese????

A word of caution before I share this amazingly delicious and simple recipe with you:  Wait ... yep, I said it.. WAIT before biting into the patty and it's molten core.  Allow that bad boy to cool just a tad...you really don't want to burn your mouth on molten hot cheese - no matter how wonderful it might be :)

Stuffed Burgers
Adapted from the Food Network Magazine
- Makes 3-4 burgers depending on how big you make them -
Printable Recipe 
Ingredients:
1 1/12 pounds of ground beef (I used 85% lean)
4 slices American cheese
kosher salt and freshly ground pepper
4 soft hamburger buns (I used Hawaiian Sweet hamburger buns)
Dill pickle slices, lettuce, tomato or whatever other toppings you desire

Directions:
Divide the meat into 6-8 loose balls, then form into 1/4-inch thick patties.  Fold one slice of cheese into a small square; center it on a patty, leaving a 1/2-inch border of meat around the cheese.  Top with another patty.  Crimp and smooth out the edges of the two patties together, sealing the cheese inside.  Repeat with remaining meat and cheese to make a total of 3-4 burgers.  (This will all depend on how big of patties you make)

Preheat grill to 400 degrees F.  Place the burgers on direct heat and grill for 6-7 minutes per side.  Remove from grill and allow to rest for 4-5 minutes.  Serve on buns and top as desired.  Be oh so careful with the hot, hot cheese!!  Enjoy!

One Year Ago:  Grilled Chipotle BBQ Shrimp
Two Years Ago:  Chicken Cordon Bleu....on the grill!! 

Wednesday, August 8, 2012

Simply Seasoned Grilled Steaks with Feta Compound Butter

Ok, so I'm having a love affair with compound butters at the moment.  I can't help myself.  I used to make them quite a bit, but then stopped, but now I've started again... and.... well... I just can't get enough.  Honestly, how can you go wrong with wonderfully flavored butter melting on top of a perfectly seasoned steak??  It's a bit of heaven if you ask me!

Simply Seasoned Grilled Steaks with Feta Compound Butter
Created by Jenn's Food Journey
- Serves 2 -
Printable Recipe 
Ingredients:
2 steaks (any cut will do, these were sirloins)
Olive oil
Kosher salt
Fresh cracked black pepper
Cayenne pepper
2 Tablespoons unsalted butter, softened
2 Tablespoons crumbled tomato and basil feta cheese

Directions:
Drizzle both sides of each steak with olive oil.  Season the steaks liberally with salt, pepper, and cayenne.  Let set in refrigerator for at least 30 minutes.  Take steak out and let sit at room temperature 30 minutes before grilling.

In a small bowl, mix together the butter and feta cheese.  Season with salt and pepper to taste.  Cover and place in refrigerator until ready to use.

Preheat grill to 400 degrees.  Clean and oil grill grates.  Place the steaks over direct heat and grill for 4-8 minutes per side depending on the desired doneness.  Remove from grill and allow to rest for 3 minutes.  Drop half of the compound butter on top of the steak and allow to rest another 2 minutes.  Serve immediately and enjoy!

One Year Ago:  Chicken with Mint
Two Years Ago:  Mustard Dill Fish

Tuesday, August 7, 2012

Grilled Spicy Garlic Shrimp with Tomatoes over Pasta

When I saw this recipe on Pam's site, I instantly thought to myself... I can so do this on the grill!!  I'm sure most of you have noticed that since the summer began, I have pretty much stayed out of my kitchen.  I can't help myself, I love to grill.  So pretty much any time I see a recipe that others have made in the oven or on the stove top, I think about how I can do it on the grill.  Sometimes it doesn't always work... but sometimes, it works like a charm... like this one.  It was deliciously simple and I will make it again for sure.  Don't worry if you don't have a grill, in Pam's original recipe, she did it all in a saute pan!! (Click HERE for her original recipe)

What?  You don't like shrimp.... geez, why make things so complicated??? :)

Grilled Spicy Garlic Shrimp with Tomatoes over Pasta
Adapted from Pam's Midwest Kitchen Korner
Printable Recipe 
Ingredients:
28 large shrimp, thawed, peeled and deveined
salt and pepper
cayenne pepper
3 Tablespoons olive oil
1-2 garlic cloves, minced
2 teaspoons Italian herb mix
1/2 teaspoon red pepper flakes
1 cup cherry tomatoes, quartered
1 Tablespoon red wine
1 Tablespoon tomato paste
8-10 oz ziti pasta (or pasta of your choice)

Directions:
Cook pasta according to package directions.  Drain, reserving 1/2 cup of the pasta water; set aside.

Place shrimp in a small bowl and season with salt, pepper and cayenne to taste.  Allow to sit for 10 minutes.  Add the olive oil, garlic, Italian herb mix, and red pepper flakes to the bowl.  Toss to combine.  Add the cherry tomatoes.  In a separate dish, mix together the wine and tomato past until smooth.  Pour into bowl, stir everything to coat and combine.

Preheat grill to 325 degrees.  Tear off a large square of aluminum foil and spray with non-stick cooking spray.  Pour the shrimp into the center of the foil.  Pull opposite ends together and fold to seal.  Fold ends to seal and form a packet around the shrimp.  Place over direct heat and grill for 4 minutes.  Rotate the packet and grill another 5 minutes.  Carefully remove from grill and allow to cool for 5 minutes.  Pour contents of foil packet over pasta and toss to combine.  Serve immediately with warm crusty bread.  Enjoy!

One Year Ago:  Spicy Grilled Shrimp with Creamy, Cooling Asian Sauce
Two Years Ago: The Real Chimichurri

Monday, August 6, 2012

The Reunion

I'm sure this is the moment everyone has been waiting for!  lol  Seriously, though, I did promise to share a little about my high school reunion.... so here it is.

First, let me just say thank you to Selenia for allowing me to post these pictures.  The majority of them were taken by her.  She is the wife of Tyson, who you will see a lot in these pictures - Tyson was a great sport throughout the whole weekend... there were numerous times he was the only male amongst us ladies.

(Tyson and Selenia... Thank you Selenia for all the great pictures!!)

Every year, my home town has what they call Stir-Up Days.  When I was younger, there was a rodeo and a carnival that went along with the parade and ice cream socials and watermelon socials and steak suppers - they no longer have that carnival and the rodeo is now held on a different weekend.  That was a bit of a disappointment for me.  You see, I have very fond memories of the Ashland carnival and was really looking forward to sharing that part of my childhood with Chris.  Oh, well.. at least he got to see the annual parade.  With us in it!!


Yes, that's right.. the Class of 1992 had a float in the local parade.  Yes, only a few of us showed up.  Yes, we had a blast... so that's really all that matters... because... No, we did not receive any prizes for our float! lol

We got to tour the high school too.  Wow, talk about something that has completely changed in 20 years.  So much that I would have not recognized the place at all if it wasn't for the fact that it's sitting in the exact same place it was when I went there.  The inside... COMPLETELY different.  Those kids are lucky, let me tell you.  Here's just one little tiny thing that changed - when I went to high school there, we had a weight room that was actually a closet off to the side of the stage in our gym.  It was a closet, I swear.  So you can imagine all of our surprise when they showed us the new weight room.  I wish I had pictures, but let me just say, it would make some colleges jealous!!!

After the parade and tour, we headed out to Thomas Lakes.  Our friend Kathleen's parents live out there now, so they opened up their house to us (Thank you Pat and Rosco!!!).  We hung out, ate some grilled dogs, passed around the Boone's Farm, and celebrated Tyson's birthday.

(Even Chris had a good time!!) 

Saturday evening we all met up at the American Legion in our hometown.  Very casual and very fun.  I laughed so hard for so long that by the next morning my stomach felt as if I had been doing crunches all day!  You know that is a sign of good times.

(we both agreed...at least we BOTHh had our eyes closed! lol  Sorry, Debbie, I HAD to post this, it's just too cute!!) 
(This is Melissa with me - she and I go way back.. I mean WAY back... we have known each other since preschool!!) 

The best part, of course, was seeing everyone for the first time in 20 years.  At times it was like we had never had that long of a gap.  My goal.. to not wait another 20 years to see some of these amazing people again!

One Year Ago:  Grilled BCT Sandwiches
Two Years Ago:  Greek Honey and Lemon Pork Chops

Friday, August 3, 2012

Herby Grilled Potatoes

I made these potatoes to go with the Basil-Mint Grilled Chicken I posted yesterday.  It was the perfect side dish for this chicken.  Actually, it would be the perfect side dish for just about any grilled meat.  Easy, full of flavor, and most people should have all the ingredients on hand.  Oh sure, you can use fresh herbs... if you are fortunate enough to have fresh herbs at your fingertips.  I, for now, do not, so I wanted to make this using ingredients that are easy to come by.  And, if you want to use different herbs - go for it.  I'll be honored actually :)

Herby Grilled Potatoes
Adapted from Taste of Home
- Serves 2 -
Printable Recipe 
Ingredients:
3/4 lbs. white creamer potatoes (about 16-18)
2 Tablespoons unsalted butter, melted and cooled
2 Tablespoons olive oil
1/4 teaspoon dried basil
1/4 teaspoon dried parsley
1/4 teaspoon dried rosemary, crushed
1/4 teaspoons dried thyme
1/4 teaspoon Hungarian sweet paprika
1/4 teaspoon kosher salt
1/4 teaspoons cayenne pepper

Directions:
Cut potatoes in half.  Place in bowl, add 1 tablespoon water, and cover with plastic wrap.  Microwave on high for 2 minutes.  Carefully remove bowl, shake potatoes up to move them around, return to microwave and cook another 2 minutes.  Carefully remove from microwave and even more carefully, remove the plastic wrap.  Test potatoes, they should be just fork tender - if not, cover and microwave another 1-2 minutes.  Allow to cool 5 minutes.

Preheat grill to 350 degrees F.  Add all remaining ingredients to the potatoes and toss to combine.  Pour the potatoes into the middle of a large square of aluminum foil sprayed with non-stick cooking spray.  Bring opposite sides of the foil together and fold to seal.  Fold both edges in to seal foil around the potatoes, forming a packet.  Place on grill over direct heat for 9 minutes, flip packet and cook another 9 minutes.  Carefully remove from grill and allow to cool for 5 minutes.  Carefully remove from packet, serve and enjoy!

One Year Ago:  Grilled Steaks w/Chipotle Butter and Feta Oregano Butter
Two Years Ago:  Whole Grain Penne Creamy Sausage Alfredo

Thursday, August 2, 2012

Basil-Mint Grilled Chicken

Why is it so hard to get back into the swing of things after a vacation?  Funny how fast we can slip out of routine, isn't it?  I've had a hard time wrapping my brain around work - which is not a good thing right now.  BUT, the show must go on, right?  Back to work I went and so I'll muddle through.  Since I did not win the lottery while I was away, it's about the only thing I can do :)

This recipe was wonderful.  The chicken came out flavorful and perfect.  I loved the mixture of fresh mint and basil.  Add a little aioli to go along with it... and.... well.... you know it's gonna be good!!!!!

Basil-Mint Grilled Chicken
Adapted from Taste of Home
- Serves 2 -
Printable Recipe 
Ingredients:
2 Tablespoons lemon juice
2 Tablespoons olive oil
1 Tablespoons low sodium soy sauce
1 teaspoon chili powder
1/2 teaspoon kosher salt
1/2 teaspoon pepper
1/2 cup fresh mint leaves
1/4 cup fresh basil leaves
1 garlic clove, quartered
2 boneless, skinless chicken breasts
For the aioli -
3 Tablespoon mayonnaise
2 Tablespoons fresh basil, finely chopped
2 teaspoons lemon juice
1 teaspoon Dijon mustard
1/8 teaspoon garlic powder

Directions:
Pour lemon juice, olive oil and soy sauce into a food processor or blender.  Add the next 6 ingredients (chili powder through garlic) and process until pureed.  Place the chicken in a resealable bag.  Pour the marinade over the chicken, seal and place in refrigerator for 8-12 hours.  I did this in the morning and let it marinade all day while I was at work.

To make the aioli - place all ingredients into a bowl and stir to combine.  Cover and place in refrigerator until ready to use.

Preheat grill to 375 degrees.  Remove from bag and discard marinade.  Place the chicken over direct heat and grill for 6-10 minutes per side or until the chicken reaches an internal temperature of 165 degrees.  Remove and allow to rest for at least 3-5 minutes.  Serve with aioli and enjoy!

One Year Ago:  Thai Shrimp and Chicken Stir Fry with Tomatoes and Basil
Two Years Ago:  Grilled Provencal Chicken

Wednesday, August 1, 2012

Sweetly Spiced Barbecue Pork Ribs

I'm back!!!  And what of my 20 year high school reunion?  It was a blast!!  I got to see so many people I was hoping to see.  Catching up on what's been going on since high school and reminiscing about what we did in high school was more fun then I could have even imagined.  I have pictures and stories, but I need some time to weed through it all, so hopefully by next week, I'll have a post giving you a quick run down of my time away.

For now, you'll just have to be satisfied with another yummy rib recipe.  These ribs don't look as mouthwatering as some of my others, but do not let that stop you from trying this.  It's simple and perfect and what's great, you can use any sauce you want with these - they would all be good!  I actually made some more of the Memphis BBQ sauce I made with my last set of ribs.  It was perfection!

Sweetly Spiced Barbecue Pork Ribs
Created by Jenn's Food Journey
Printable Recipe 
Ingredients:
1 1/2 teaspoons black pepper
1/2 teaspoon granulated sugar
1 teaspoon salt
1 teaspoon ancho chili powder
1/2 teaspoon onion powder
1/2 teaspoon garlic powder
1/2 teaspoon dried parsley
1/2 teaspoon dried oregano
1 slab pork back ribs
1/2 cup beer
1 Tablespoon barbecue sauce

Directions:
In a small bowl, mix together all the ingredients except the pork ribs, beer and bbq sauce until well combined.  Rub mixture over both sides of the ribs, cover with plastic wrap and place in refrigerator for 2 hours.

Preheat grill to 300 degrees F and set up for indirect grilling.  For a gas grill, turn off middle burner.  For a charcoal grill, move charcoal to one side of grill.  Remove the ribs from plastic and place on large squares of heavy duty aluminum foil.  (I cut my slab in half to make things easier)  Mix together the beer and the barbecue sauce and pour over the slab.  Pull the opposite sides of the aluminum foil together and fold to seal.  Seal up both open sides, forming a packet around the ribs.

Place the ribs over indirect heat and let grill 1 hour, turning and rotating packets at least once.  Remove packet from gill and carefully remove ribs.  Place ribs on direct heat (low) for 20-30 minutes or until the ribs are done.  Remove and let rest for 10 minutes before serving.  Enjoy as is or with your favorite sauce!

One Year Ago:  Asian Sloppy Joes
Two Years Ago:  Grilled Tilapia with Butter and Key Lime Juice

Saturday, July 28, 2012

Gone Fishing....Be Back Soon

Ok, I'm really not going fishing, but I am taking a couple days off from blogging.  I won't be gone for long though... and hopefully when I return, I'll have at least one good story to tell you about my 20 year high school class reunion!!

While I'm gone, I am sorry to say I am not leaving you with food... BUT, I will leave you with this sign...it made me laugh out loud!

(photo politely borrowed from Fly Fishing in Yellowstone)
Ciao!


One Year Ago:  Chorizo Sliders with Chipotle Mayonnaise
Two Years Ago:  Lemon Dill Tilapia

Thursday, July 26, 2012

Grilled Steaks with Garlic Herb Cheesy Butter

My 20 year high school class reunion is this weekend.  I honestly cannot believe that I have been out of high school for 20 years!  Boy have the years flown by.  Some really good ones and some really bad ones.  But all in all, I cannot complain, it could have been SOOO much worse!!  I am from a pretty small town in Nebraska, so almost everyone I graduated with, I basically grew up with.  Some of the people I graduated with, I went to preschool with!!  It's just crazy to think that I saw them almost every day of my life for 13+ years, then nothing for 20.

Listen to me babble!  lol  I sound like an old lady!!  Sorry, I just start thinking about the years and I'm shocked at how fast they have gone by.  Reminds me to cherish all the moments I can.  Like this steak.  Definitely a moment in time to cherish - especially with the cheesy butter melting on top of it!!!  YUM!

Grilled Steaks with Garlic Herb Cheesy Butter
Created by Jenn's Food Journey
- Serves 2 -
Printable Recipe 
Ingredients:
1 Tablespoon unsalted butter, softened
1 1/2 Tablespoons Boursin garlic herb cheese
2 New York Strip Steaks (or whatever cut you want)
1 teaspoon kosher salt
1/2 teaspoon black pepper
1/2 teaspoon paprika
1/4 teaspoon ancho chile powder

Directions:
In a small bowl, mix together the butter and cheese until well combined.  Cover and refrigerate until ready to use.

In another small bowl, mix together the salt, pepper, paprika and ancho until well combined.  Sprinkle evenly over both sides of the steaks.  Cover and refrigerate for 1 hour.  Remove and let sit at room temperature 30 minutes before you are ready to grill them.

Preheat grill to 400 degrees. Clean and oil grill grates.  Place the steaks directly over the fire and grill 5-10 minutes per side depending on the thickness and the doneness you desire.  Remove from grill and allow to rest for 5 minutes.  Scoop a heaping tablespoon of the butter onto each steak and enjoy!

One Year Ago:  Jalapeno Beef Kabobs with Roasted Garlic Aioli
Two Years Ago:  Strawberry Ice Cream

Wednesday, July 25, 2012

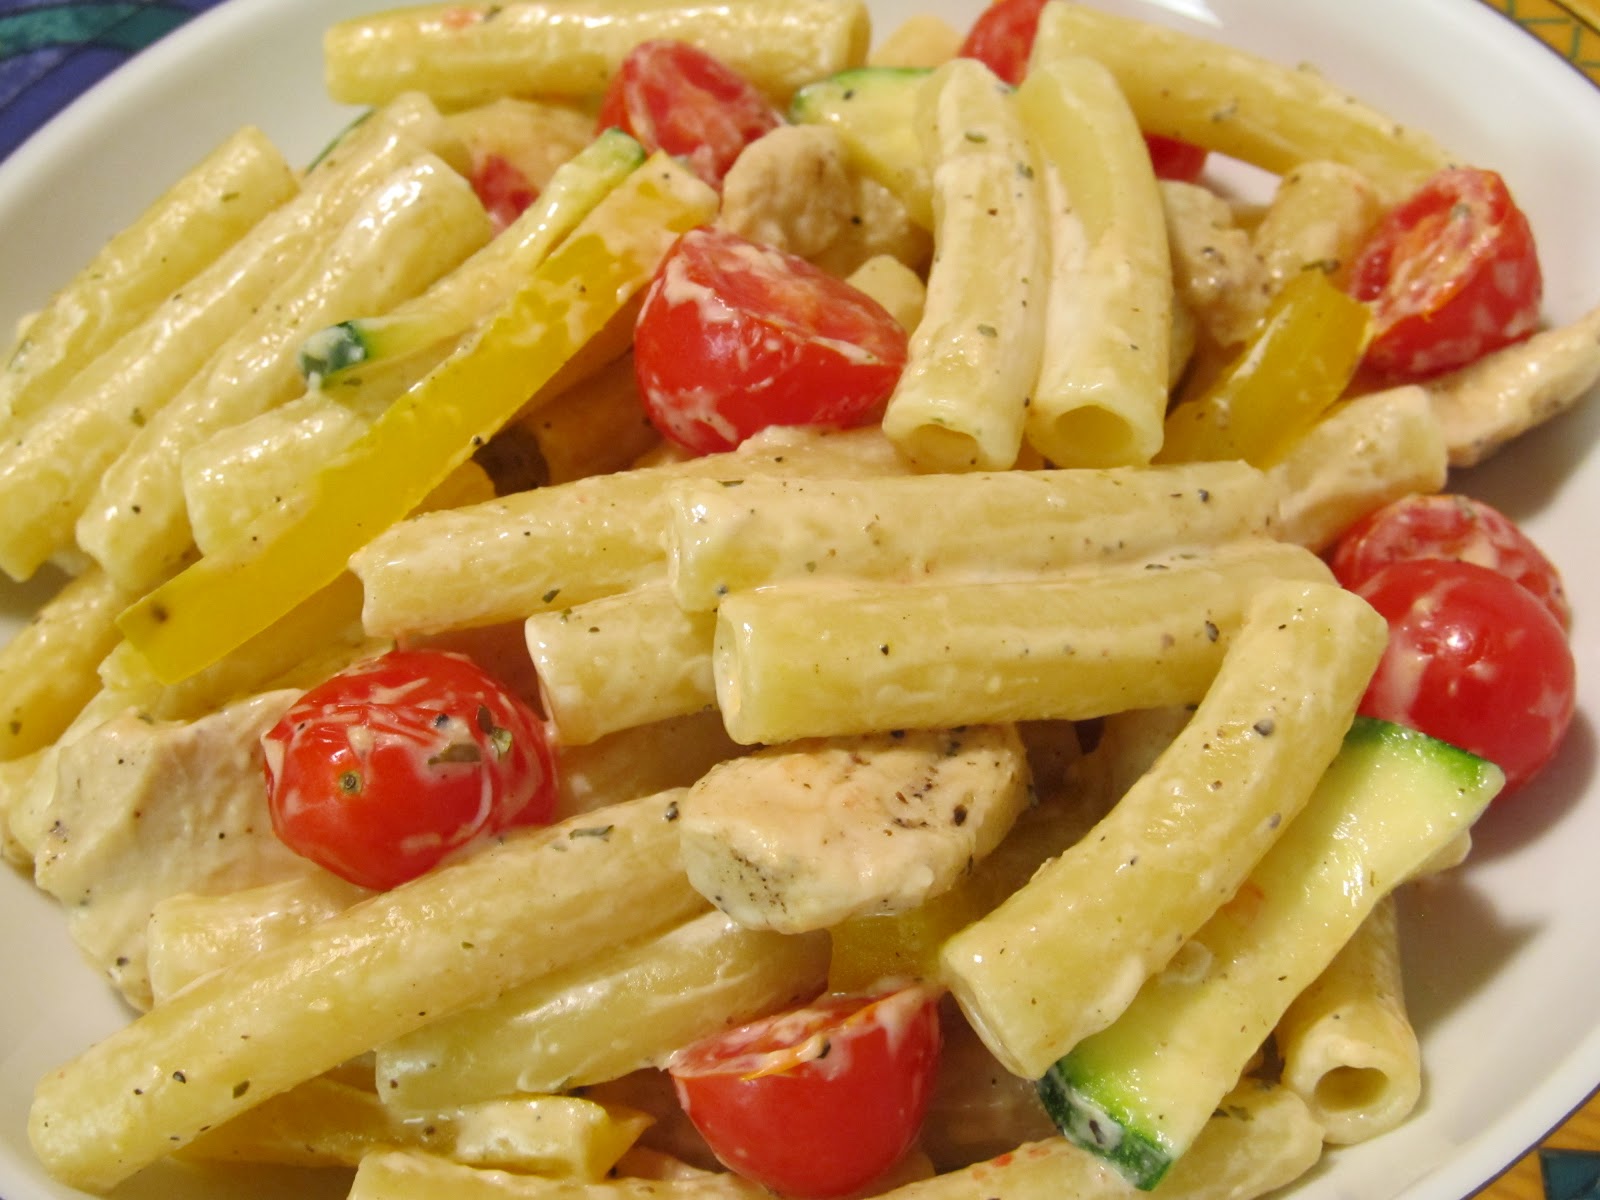
Easy Summer Veggie Pasta

Unfortunately, I think the pictures may make this pasta look a tiny bit dry.  But let me tell you... it was not.  It was perfectly tasty and wonderful.  The garlic and herb cheese spread used here just adds that perfect creaminess to the pasta without adding a lot of heaviness like a thick cheese sauce would.  This truly is a very easy summer dish.

And, just because you know I love to use the same ingredients in different dishes - I mean it saves money and you waste less food - stop by tomorrow when I help you use up some of the rest of the cheese in a completely different type of dish.

Easy Summer Veggie Pasta
Adapted from Cook's Country
Printable Recipe 
Ingredients:
10 oz ziti pasta
1 zucchini, halved lengthwise and sliced 1/4" thick
1 yellow pepper, thinly sliced
1 1/2 cups cherubs or grape tomatoes, halved or quartered
3 Tablespoons Boursin garlic and herb cheese
1 cooked chicken breast, cut into bite size pieces
salt and pepper

Directions:
Cook pasta according to package directions.  Drain, reserving 1/2 cup of pasta water; set aside.

Spray a non-stick pan with cooking spray.  Over medium (or medium low) heat, add the zucchini and saute for 2 minutes.  Add the yellow pepper and continue sauteing another 2 minutes.  Add the cherry tomatoes and let cook another 2-3 minutes or just until the tomatoes are heated through.  Remove from heat and add to cooked pasta along with the cooked chicken.  Stir in the cheese.  Toss to combine.  If pasta is too dry, add reserved pasta water.  Serve with warm crusty bread and enjoy!

One Year Ago:  Potatoes with Lima Bean Gravy
Two Years Ago:  Pork Paillards

Tuesday, July 24, 2012

Steakhouse Pizza

I've done pizza with chicken, ground beef, pepperoni, chorizo and shrimp, so I thought it was time to do one with a little steak.  Ok, ok, in all honesty, I was trying to figure out what to do with a small 5oz steak I had in the freezer, when I stumbled upon this recipe from Ree, The Pioneer Woman.  Oh, her pizza looks so much more photographically (I hope that's a word) perfect than mine.... but I can guarantee mine tasted just as good... if not better!

Steakhouse Pizza
Adapted from The Pioneer Woman
Printable Recipe 
Ingredients:
1 5-6oz steak
salt and pepper
1 Tablespoon steak sauce
1 cup pizza sauce
1 teaspoon balsamic vinegar
1/2 teaspoon Worcestershire sauce
1 Tablespoon unsalted butter
1 teaspoon balsamic vinegar
1/2 sweet onion, chopped
1 jalapeno, sliced (remove seeds for less heat)
10-12 oz ball of pizza dough
8 oz fresh mozzarella cheese, thinly sliced

Directions:
Preheat grill to 400 degrees.  Clean and oil grill grates.  Season the steak with salt and pepper and brush with steak sauce.  Place steak directly over the fire and grill for 4-5 minutes per side.  You want the steak to still be rare to medium rare - you do not want to over cook it... remember it will cook more once it's on the pizza.  Remove and allow to rest while you get everything else ready.  Once ready, thinly slice the steak against the grain.

In a measuring cup or small bowl, mix together the pizza sauce, 1 teaspoon balsamic and the Worcestershire sauce.  Cover and set aside.

In a skillet, over medium low heat, add the butter and 1 teaspoon balsamic vinegar.  When butter has melted, add the onions and slowly caramelize.  This will take about 20 minutes.  Add the jalapeno and saute for 3-4 minutes or until the jalapeno has softened.  Remove from heat.

Stretch pizza dough to desired size and shape.  I place mine on a piece of aluminum foil sprayed with cooking oil, so it makes easy going once it's on the grill.  Place on grill that is at about 350 degrees F and let one side of the dough become slightly golden brown (about 3 minutes).  Remove from grill and flip the dough over.  Spread the sauce over the cooked side of the dough.  Top with thinly sliced steak and the onion/jalapeno mixture.  Place the slices of mozzarella on top and place back on the grill for about 3-4 minutes.  Move to indirect heat and continue to grill until the cheese has melted.  Remove from grill and drizzle with more steak sauce if desired.  Serve and enjoy!

One Year Ago:  Smoked Pepper Tilapia
Two Years Ago:  Grilled Parmesan Corn on the Cob

Monday, July 23, 2012

Grilled Chicken with Spiced Red Pepper Paste

This Turkish inspired dish is not only packed full of flavor, but is so very simple, you will probably want to make it weekly!

And, because you know I couldn't resist - I paired this with a red pepper aioli that ... well... that will probably find it's way to your table weekly too!

Grilled Chicken with Spiced Red Pepper Paste
Adapted from Food and Wine
- Serves 2 -
Printable Recipe 
Ingredients:
2 roasted red peppers, roughly chopped
2 jalapenos, stems remove and quartered (remove seeds for less heat)
1 garlic clove, halved
1 Tablespoon white wine vinegar
1/2 teaspoon kosher salt
1/4 teaspoon black pepper
1/2 teaspoon cumin
1 Tablespoon olive oil
2 boneless, skinless chicken breasts
For the aioli -
1/4 cup mayonnaise
2 teaspoons champagne vinegar
2 Tablespoons roasted red pepper, finely chopped
1/8 teaspoon garlic powder
1/4 teaspoon salt
1/4 teaspoon red pepper flakes

Directions:
In a food processor, add the ingredients except the chicken.  Pulse until a loose paste forms.  Place chicken in a shallow dish or resealable bag and pour the mixture over the chicken.  Cover or seal and place in refrigerator for at least 2 hours.

For the aioli - mix all ingredients together in a small bowl until well combined.  Cover and refrigerate until ready to use.

Preheat grill to 375 degrees F.  Clean and oil grill grates.  Remove chicken from dish or bag and discard the marinade.  Place directly over the fire and grill for 8 minutes per side or until the chicken has reached an internal temperature of 165 degrees F.  Remove from grill and allow to rest for 3-5 minutes before serving.  Serve with aioli.  Enjoy!

One Year Ago:  Spice Rubbed Ribs with Chipotle-Honey Glaze
Two Years Ago:  Grilled Chicken with Yogurt, Hot Pepper and Garlic