Search This Blog

Monday, July 15, 2013

Chris' Food Journey

I am so VERY excited about today's post!!  Today, Chris (of Chris and Jenn) is going to take you through HIS food journey!!!  And what a journey it has been!!  Chris and I have talked about him doing a guest post for a while now... and today is the day!!  I don't want to say too much and I don't want to get all gushy, but I do want to say thank you to him.  He is my biggest supporter when it comes to my blog and honestly, without him, this journey of mine would never have been what is today. So, thank you, Chris...xoxoxo
And now.... without further ado............
___________________________________________________________

Greetings to you all! This is Chris (Jenn's fiancé) and today I will be taking over Jenn's Food Journey for this guest post. Why? Well mostly because I have been a lucky recipient of every single dish featured on here so I thought I should contribute something. Though I won't be posting a recipe, as you can see from the accompanying photo I don't cook, instead I will be sharing with you MY story of how I became the happiest passenger on Jenn's Food Journey.

If you're a regular visitor to Jenn's blog you know I am a lucky man. She's a talented lady in the kitchen. The truth is before being with Jenn I didn't even care about food. I was a single guy with a busy lifestyle (that's not true at all I just put that in to make myself sound active) and had almost no regard for food. When hungry I ate, that was about the extent of thought I put into any given meal. I was a connoisseur of microwavable boxed foods, frozen burritos, ham sandwiches and virtually any fast food or precious leftover from Sunday meals at my sisters'. Food just didn't matter to me. I'm a designer and musician and spend countless hours engaged in front of the computer or playing some instrument. Eating while computing or playing guitar is a no no. Food was merely sustenance necessary to keep from passing out...or dying I suppose. In fact I remember times actually being annoyed I had to stop what I was doing and eat!

(Chris and I - photo taken by a friend, Sara Meisner)

When I met Jenn I was fascinated that she was a food enthusiast. She offered to come cook me dinner one night when we first started dating. I figured that would be cool. It would certainly be the first time any actual cooking would take place in my man cave apartment. Not to mention I had never been with a woman who could cook. I remember thinking, even if she's a lousy cook it can't be worse than what I was gonna have. So indeed she came over with a bag of groceries, assessed my pathetic collection of barely used cooking utensils and proceeded to create a meal I will never forget. The smells that filled my dinky dwelling, how sexy this woman looked in my crappy kitchen cooking for me and the fineness and actual cooking skill she seemed to possess are the overwhelming first memories of that fine evening. Then we ate.

She prepared goat cheese & spinach stuffed chicken breasts with veggies; zucchini or maybe broccoli I think...might have been a baked potato? It doesn't matter the chicken is what I remember. The perfectly pan seared golden brown outer skin and creamy goat cheese made my head spin. I didn't even know I liked goat cheese! That was just the beginning of many food discoveries Jenn led me to that I can't believe I once lived without. I knew right then this girl was special. It may have been a simple meal by some standards but to me it was gourmet cooking. It isn't as if I had no taste for good food it all it was just that until this night I had forgotten the joy of eating good food at home with someone you care about. She doesn't know it but I'm pretty sure I proposed to her right then and there in my mind after taking the first bite.

Food quickly became a big part of our weekends together. Her cooking. Me eating. She introduced me to the Food Network. I knew there was a food channel but I never watched it. Who the hell could sit and watch cooking shows all day? It turned out to be a major source of entertainment in our early romance...and continues to be. I had no idea that watching food could be entertaining. I didn't even know who Bobby Flay was? I'll admit it may have been Giada that actually held my attention first but I digress.

So now after 5 plus years here I am nearly a food expert because of Jennifer! Okay not really, but I actually appreciate food and flavor again. Jenn has taught me so much about good food through simple easy dishes we enjoy nightly. I admit she does get frustrated with me from time to time because I can be picky but I will always, mostly, sometimes try anything.  I will say this, the posts she does are all eaten by me and they do taste as good as they look I promise you that.

I hope I have not bored anyone but that's the end of the story. We live happily…and enjoy Jenn's great food daily. This post is really my tribute to her. She is a woman of many talents. I'm fortunate one of those talents is skills in the kitchen. I'm actually healthier because of her! I admire her dedication to this blog and can attest to the hard work she puts into it each and every day. As I said before I don't cook...at all. So my real contribution is to clean the kitchen every night. My philosophy is and will always be; if she cooks I will clean. Many of you have your own food blogs and I hope your significant does the same, or if you have kids of course make them do it. We owe you for the love and nourishment you bring us through food. 

Thanks for reading everyone and be sure and leave a comment because my ego needs the attention and Jenn LOVES comments!!! 

PS (to the owner of this fine food blog). Thanks for letting me take over your blog today babe. I love you! xoxo 

PSS (to the readers)…if you want the recipe for the delicious dish shown I will be happy to share that as well perhaps in a future guest post….or you can read the instructions on the package. ;) 

©

(Chris and I having a little fun!!)

Two Years Ago:  Mediterranean Steaks

Friday, July 12, 2013

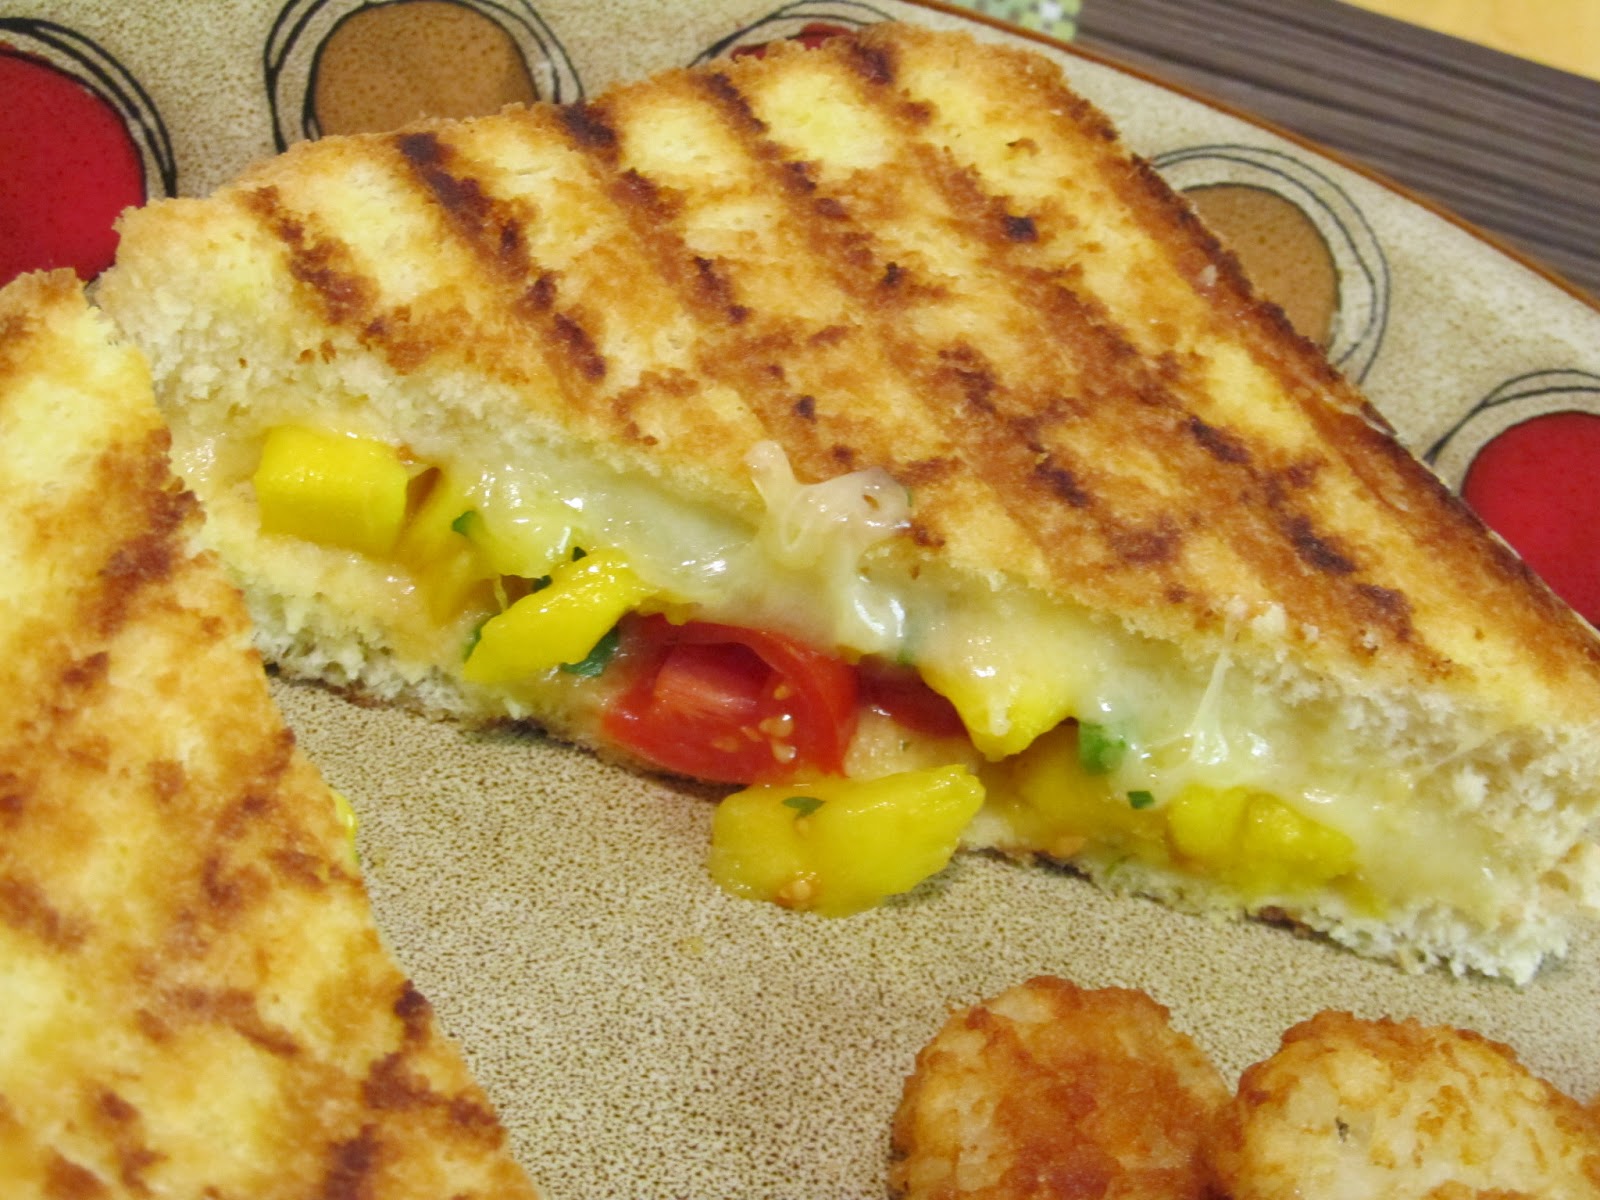
Grilled Cheese with Mango Salsa

A couple weeks ago, I received a text from Chris' sister, Becky.  She had just had lunch and couldn't wait to tell me about this amazing grilled cheese sandwich she had just had.  Actually, she couldn't wait to tell me so that I could figure out how to make it and pass the recipe on to her so she could enjoy it again and again at home - which I was perfectly okay with and completely understood after having the sandwich!!  ANYWAY - her text basically said that she had just had this amazing grilled cheese and mango salsa sandwich and would I try and recreate it for her.  Loving the fact that she actually thought to ask ME what I would do.. I couldn't wait to get home and put it together!!  Honestly, it didn't seem all that hard - she told me it was on Texas toast (easy) with Gruyere cheese (yum), mango salsa (double yum) and that it had been grilled on an actual grill.  Now, I know what you are thinking... then why didn't you actually grill these, Jenn?  Well, I'll tell you why... because I didn't want to, and that's the truth!  I love to use my actual grill pan when I make grilled cheese sandwiches, so I stuck with what I knew would work the best.  Other than that, I just went for it.  I mean.. Gruyere cheese and mango salsa... how could I really not get this right :)

In the end, Chris and I LOVED these and I was soooo thankful that Becky sent me the request.  I haven't talked to her to find out if she tried it or not, but I am confident that when she does, she'll feel like she was back at the restaurant!!

Grilled Cheese with Mango Salsa
Created by Jenn's Food Journey
Printable Recipe 
Ingredients:
6-8 slices of Texas toast (depends on if you want to make 3 or 4 sandwiches)
6-8 oz Gruyere cheese, sliced (just depends on how cheesy you want each sandwich)
Butter, unsalted, room temperature (makes for easier spreading)
For the Mango Salsa -
20 Cherry tomatoes, quartered
1/2 of a large jalapeno, finely diced
1 small garlic clove, finely minced
fresh chopped cilantro (I used a little less than a Tablespoon, but only because Chris is not a huge fan)
Zest of 1 lime (no juice)
1 mango, cut into chunks

Directions:
To make the salsa - Gently toss all ingredients together in a small bowl.  Season with salt and pepper to taste.

To make the sandwich - Butter one side of each piece of bread.  Heat a grill pan over medium to medium high heat.  Place one slice of bread on the pan (butter side down), top with cheese and then the salsa (how much is up to you).  Top with remaining slice of bread (butter side out).  When bread is golden brown, flip and continue to cook until the other side is golden brown.  Remove from heat and carefully slice.  Serve and enjoy!

One Year Ago:  Teriyaki Chicken Sliders with Spicy Mayo
Two Years Ago:  Chimichurri Shrimp and Rice Skillet
Three Years Ago:  Sunny Side Orzo

Wednesday, July 10, 2013

Spicy Cashew Chicken

 
Is anyone else a bit shocked that it's already July?  Where the heck did the time go?  It's hard to believe that there was ever a time when I thought time moved to slow.  And trust me, there was a time (like when I was a kid in school) - but alas, those days are LONG gone!  I only say this because I turn 40 this year - Yep, that's right 40 - and it's getting closer and closer and closer to that day.... not that I'm worried.  I'm not going to freak out or anything, I mean it's just a number, right?  The funny this is, I don't feel like I'm turning 40.  I guess I've always had this idea of what I would feel like and where I would be in my life when I turned the big 4-0, but now that it's on it's way, I don't feel much different than I did when I turned 30 and that didn't feel much different than when I turned 25, which only felt different than turning 21 because ... well... it was 21!!

Anyway.. enough rambling.. let's get to the food!!  I like cashew chicken, but always feel as if it's missing something.  So, I put this little number together to give it some much needed oomph!  This was actually inspired by the Sriracha Honey Cashew Chicken that Mary (Barefeet in the Kitchen) posted a while back (too bad mine doesn't look even half as lovely as hers does) - So thank you once again Mary!!!  I highly recommend trying her recipe first, if you haven't already, that one blows this one away!!

A word of caution:  if you don't like a lot of heat, don't toss the chicken with the Sriracha and cut back at least 1/2 tablespoon in the sauce...remember, start small - you can always add more - you can never take away!!

Spicy Cashew Chicken
Created by Jenn's Food Journey
Printable Recipe 
Ingredients:
3 Tablespoons low sodium soy sauce
2 teaspoons fish sauce
1/4 teaspoon granulated sugar
2 teaspoons mirin
1/4 teaspoon sesame oil
1/2 teaspoon hoisin
1/2 teaspoon red pepper flakes
3 Tablespoons Sriracha, divided
2 boneless, skinless chicken breasts, cut into bite size chunks or thinly sliced
1 red pepper, thinly sliced
1 garlic clove, minced
1/4 - 1/2 cup unsalted cashews
2-3 green onions, chopped or sliced (optional - I remembered mine AFTER we had already eaten, of course!!!)
1 teaspoon vegetable oil

Directions:
Place the chicken chunks in a shallow dish and toss with 2 tablespoons Sriracha.  Cover and allow to rest in the refrigerator for at least 1 hour.

In a small bowl or measuring cup, add the soy, fish sauce, sugar, mirin, sesame oil, hoisin, red pepper flakes and remaining 1 tablespoons of Sriracha; stir until well combined and sugar has dissolved.

In a wok or deep, nonstick skillet, heat 1 teaspoon vegetable oil over medium high heat.  Add the chicken and quickly stir fry for 5 minutes or until the chicken is just starting to cook through.  Add the red pepper and stir fry for 1 minute.  Add the garlic and stir fry for one more minute.  Stir in the soy mixture and stir to coat everything.  As soon as the sauce thickens, remove from the heat and stir in the cashews and green onions.  Serve immediately and enjoy!

One Year Ago:  Pina Colada Grilled Chicken
Two Years Ago:  Shrimp Lettuce Wraps with Serrano Mint Sauce
Three Years Ago:  Pulled Pork Sandwiches

Monday, July 8, 2013

Italian Chopped Salad with Grilled Chicken

I don't know about where you live.. but here... in the Arizona desert... it's HOT!  I mean really, really HOT!  It's cooled down just a tad over the last week... I mean it was 115 last week.. this week, only like 108... :)  Hey, we take what we can get, right?

Anyway.. with the heat comes my need for really light and very simple meals.  I can't eat a lot of heavy foods when it's hot... so, of course, I choose to make salads for dinner.  And to make it even less of a hassle, i.e. less mess and very simple, I grill the chicken, but you could easily pan sear it or bake it - that's totally up to you.  Heck, you could even buy cooked chicken and throw that on... I mean ease is nothing to stick your nose up at, that is for sure :)

Italian Chopped Salad with Grilled Chicken
Adapted from Taste of Home
- Serves 2 -
Printable Recipe 
Ingredients:
2 small grilled chicken breasts, chopped (I just drizzled a little olive oil on the chicken and seasoned with salt, pepper and Italian seasoning...grilled to perfection and chopped)
2-4 cups green leaf lettuce, chopped or torn
1 cup chopped cherry tomatoes
1/2 cup chopped cucumber
1/2 cup chopped radish
1/2 cup cubed cheese (Mozzarella or Parmesan)
Fresh basil leaves, torn
For the dressing:
2 Tablespoons pesto
1 Tablespoon mayonnaise
1 Tablespoon lemon juice
salt and pepper

Directions:
To make the dressing - mix together the pesto, mayo and lemon juice until well combined.  Season with salt and pepper.  (You can double this if you want or even triple it... this made just the perfect amount of dressing for Chris and I, though)

To build the salad - in a large bowl or plate, add the lettuce.  Top evenly with tomatoes, cucumber, radishes, cheese and basil.  Top with chicken.  Drizzle on the dressing and serve immediately.  Enjoy!

One Year Ago:  Cajun Spiced Grilled Shrimp with Remoulade
Two Years Ago:  Asian Meatball Subs with Hoisin Mayonnaise
Three Years Ago:  The Obsessive Chef's Homemade Tater Tots

Monday, July 1, 2013

A July 4th Break

Although we are not doing anything that special for the 4th of July holiday (I have to work the next day.. bummer), I have decided that I'm going to take a break from blogging this week.  I have a pretty busy week ahead of me and just didn't want to put added pressure on myself when it came to my blog posts.  But never fear, I am leaving you with some great ideas for your 4th of July backyard barbecue... or any backyard barbecue for that matter!

Hope you all have a great week and I hope to "see" you all back here next Monday!

Happy Grilling!
Jenn


Past July 4th Posts:  4th of July Celebration, 4th of July Ideas - Part One, 4th of July Ideas - Part Two


Wednesday, June 26, 2013

Carnitas

I had a hankerin' for Carnitas a while back (can't believe how long it took me to get to this post.. Yikes!), but I had never actually made it before.  I took a quick search on line for some "authentic" recipes and just couldn't bring myself to make it the classic way.  The authentic/classic way, from what I could find, is to cook the meat in lard.  Yes, you read that correctly... LARD.  Now I know it is used to make that meat succulent and unbelievably good, BUT, I knew I could probably get pretty close, without having to do something that makes me believe I will be arrested for doing.  SOOOO, with a little more searching, I found one I thought would be the perfect substitution.  This might not be authentic, but that's okay, I'm part German and Italian, no one really expected me to make authentic Mexican food properly, did they? :)

Carnitas
Adapted from The Food Network
Printable Recipe 
Ingredients:
2 1/2 lbs country style pork ribs
1 Tablespoons olive oil
salt and pepper
2 teaspoons dried Mexican oregano
1 teaspoon ground cumin
1 lime, juiced and zested
1/4 teaspoon liquid smoke
1 cup water
3 garlic cloves, quartered
1 jalapeno, roughly chopped

Directions:
Drizzle the olive oil over the ribs; rubbing it into the meat.  Season all sides with oregano, cumin and the lime zest.  Season liberally with salt and pepper.

In a crock pot, add the lime juice, liquid smoke, water, garlic cloves and jalapeno.  Place the pork on top and cover with a lid.  Cook on high for 4 hours or on low for 8 hours.  Pork should just fall apart when try to pick it out of the pot.  Remove from liquid and allow to cool before serving.  Serve with tortillas, avocado, coleslaw, lettuce, tomato, whatever you desire..... the pork is the true star to this dish!  Enjoy!

One Year Ago:  Green Sauce
Two Years Ago:  Chorizo and Shrimp Naan Pizza
Three Years Ago:  Hot Honeyed Grilled Chicken

Monday, June 24, 2013

Chorizo and Ground Beef Pizza

I am really excited, as I just recently bought a new pizza stone!!  This pizza stone is for grill use ONLY!  And what better thing to use my new pizza stone for on the grill than ... well... PIZZA!  :)  We don't get too wild and crazy with our pizzas... even when we go out, we like simple and delicious.  No need for fancy, schmancy ingredients.  We would take them, don't get me wrong, it's just, well, we have a more simple type of taste when it comes to pizza.  This is a very simple, very flavorful pizza.  And just for the fun of it, I topped my slices with a little avocado... it was the perfect way to bring the pizza to a whole new level... it was good already, but the avocado just made it that much better!  The buttery goodness of the avocado, just added that little... oomph to each and every bite!

Chorizo and Ground Beef Pizza
Created by Jenn's Food Journey
Printable Recipe 
Ingredients:
1/2 lbs Mexican chorizo
1/4 lbs ground beef
salt and pepper
Italian herb mix, to taste (my chorizo was so flavorful, I really didn't need to add anything other than salt and pepper)
1 16oz ball of pizza dough
1 cup pizza sauce
1-2 Roma tomatoes, thinly sliced
1/4 cup sliced black olives (or more if desired)
1-2 cups shredded cheese (I used Mozzarella)
1 avocado, thinly sliced (optional)

Directions:
In a skillet, over medium high heat, add the chorizo and cook for 3-4 minutes; breaking it up with a wooden spoon.  Add the ground beef (breaking that up also with a wooden spoon) and cook another 5-8 minutes, or until the beef is no longer pink; stirring occasionally.  Season with salt, pepper and Italian herb mix, to taste.  Remove from heat and allow to cool.

Preheat grill to 400-410 degrees F.  Place a pizza stone on the grill and allow to to preheat for at least 5 minutes.  (Set your stone over in direct heat) Roll your pizza dough out and brush both sides with olive oil.  Place the dough on the pizza stone and close the grill.  Allow to "bake" for about 3-4 minutes, or until the bottom is just starting to become golden.  Remove from stone and flip over (I use aluminum foil on a baking sheet to help me with this process).  Spread the pizza sauce evenly over the cooked side of the pizza.  Top with tomatoes, the chorizo mixture and black olives.  Top with the shredded cheese and place back on pizza stone and close the lid.  Allow to "bake" another 5-8 minutes or until the bottom is golden brown and the cheese is melted and bubbly.  Carefully remove from stone and allow to rest for 3-5 minutes before slicing.  Top with avocado slices if desired.  Enjoy!

One Year Ago:  Wasabi-Yogurt Marinated Chicken
Two Years Ago:  Simple Fudge Ripple Ice Cream
Three Years Ago:  Chocolate Chocolate Chip Ice Cream


Friday, June 21, 2013

Grilled Gratineed Leeks

The morning I saw Mary at One Perfect Bite post her recipe for Gratineed Leeks was a magical morning!  I thought about the recipe all day.  I even had thoughts about leaving work early, just so I could go home and make it!!  Some how, some way, I fought the urge off and made it through the day.  Actually, by the time I left work, I had talked myself into having patience and just waiting until the weekend to try out the recipe.  Silly me for waiting!  It was everything I had imagined it would be and more :)

Now, I, of course, adapted her recipe to meet my needs... i.e... I grilled these bad boys (okay, I added some really bad mayo too.. just to give it an added creaminess).  But I can pretty much guarantee that either way you make it, you're going to want to make it again... and again... and again!!  This has quickly become our favorite way to enjoy leeks!

Grilled Gratineed Leeks
Adapted from Mary, One Perfect Bite
- Serves 2 -
Printed Recipe 
Ingredients:
1 large leek, top dark green leave and root trimmed off, sliced lengthwise and rinsed under cold water (I separated the two halves to make four little "boats")
2 Tablespoons mayonnaise
1 teaspoon lemon juice
2 Tablespoons grated parmesan cheese
2 Tablespoons shredded mozzarella cheese
2 Tablespoons toasted panko breadcrumbs

Directions:
Preheat grill to 350 degrees F.  Tear off a large piece of aluminum and fold in half.  Bring the sides up just a little to form sort of a tray.  Spray with non-stick cooking spray or olive oil.

In a small bowl, mix together the mayo, lemon juice, and parmesan until well combined.  Spread evenly over top of each leek half and top with mozzarella and then the panko.  Place on the aluminum tray and place over in direct heat.  Grill until the cheese is melted and the leek has become softened.  Carefully remove and serve immediately.  Enjoy!

One Year Ago:  Aleppo Pepper Aioli
Two Years Ago:  Grilled Chinese Pork Back Ribs
Three Years Ago:  Creole Cast Iron Fish

Wednesday, June 19, 2013

BLC's with Peppered Balsamic Mayo

I know that I have mentioned this before, but I love a good BLT.  What I love even more is a good BLC (Bacon, Lettuce and Cucumber).  I became a fan of BLC's a few years ago and honestly, unless I order one when I am out or someone makes one for me, I always use cucumber instead of tomato.  My theory.. cucumbers are always fresh - tomatoes, not so much.  Of course, when I saw this recipe for peppered balsamic mayo... well, the logical choice was to try it.  I mean, my favorite sandwich made with a delicious new kind of mayo???  I would have been a fool to pass it up, right? :)

BLC's with Peppered Balsamic Mayo
Adapted from Taste of Home
Printable Recipe 
Ingredients:
1/3 cup mayonnaise
1 Tablespoon Balsamic vinegar
1/2 teaspoon black pepper
1/4 teaspoon kosher salt
8-10 slices of bacon, cut in half
8 slices of bread
green leaf lettuce
English cucumber slices

Directions:
In a large skillet, cook the bacon over medium heat until crisp.  Remove to paper towels to drain.

In a small bowl, mix the mayonnaise, balsamic, pepper and salt together until well combined.  Spread mixture evenly over 8 toasted slices of bread.  layer with bacon, lettuce and cucumbers.  Serve immediately and enjoy!

One Year Ago:  Memphis Style Grilled Pork Back Ribs
Two Years Ago:  Jalapeno Shrimp Pasta
Three Years Ago:  Grilled Green Beans

Monday, June 17, 2013

Grilled Shrimp Po'Boy with Spicy Garlic Mayo

I don't know about where you live, but here.. in the southwest desert of Arizona, summer has arrived.  We had a sweltering 102-108 degree weekend!  Granted, we are used to this... or at least we should be ready for this kind of weather, but let me just say.. even though it's a dry heat.. it's frickin' hot!  We have a pool, which was used to it's fullest this weekend, and it still didn't make much of a difference.  At one point, it was just so hot that if you weren't completely submerge in the pool, you could not be outside for long.  So, meals like this are going to be showing up on our table more and more.  Grilled... simple... light (okay it so the bun doesn't make it light, but I think you get what I'm trying to say)... perfect in every way!

Grilled Shrimp Po'Boy with Spicy Garlic Mayo
Created by Jenn's Food Journey
- makes 3-4 sandwiches -
Printable Recipe 
Ingredients:
35-40 medium shrimp, peeled, deveined and tails removed
1 Tablespoon olive oil
1 teaspoon lemon juice
1/4 teaspoon smoked paprika (you can use regular paprika if you don't have smoked)
1/4 teaspoon cayenne pepper
salt and pepper
Hoagie rolls
Lettuce/tomatoes
For the spicy garlic mayo -
1/4 cup mayonnaise
2 teaspoons lemon juice
1-2 garlic cloves, finely minced (or 1/4 teaspoon garlic powder)
1/4 teaspoon paprika
1/4 teaspoon cayenne pepper

Directions:
Place the shrimp in a bowl, drizzle with olive oil and lemon juice.  Add the smoked paprika and cayenne and toss to coat.  Season with salt and pepper.  Cover and place in refrigerator for at least 1 hour.

Meanwhile, make the mayo by placing all ingredients in a small bowl and stirring to combine.  Cover and place in refrigerator until ready to use.  (can be made up to five days in advance).

Preheat grill to 375 degrees F.  Spray a grill pan made for the grill with non-stick spray and place on grill to preheat.  Drop the shrimp onto the pan and grill 2 minutes per side or until the shrimp is pink and cooked through.  If desired, toast buns on the grill for 2-3 minutes per side.  Remove shrimp and buns from grill.  Slather each bun with mayo, top with lettuce, tomatoes (or any other toppings you desire) and shrimp.  Serve immediately and enjoy!

One Year Ago:  Grilled Chocolate Chip Cookies S'mores
Two Years Ago:  Cucumber, Tomato and Feta Salad
Three Years Ago:  Super Fudgy Brownies
 

Friday, June 14, 2013

Creamy Italian Dressing

You probably have noticed that I've been posting very simple recipes lately.  I mean really, really, REALLY simple recipes.  Some may say I'm lazy, others may say I'm unimaginative (someone actually emailed me and told me that, can you believe that??), but who the hell cares?  I mean, it's my journey.. if I want simple and easy.. so be it!!

Okay, I might be feeling just a bit feisty this week, but nonetheless... it is a pretty darn simple recipe.... which I HAVE been doing a lot of lately, not because I'm lazy (okay, maybe I have been a tiny bit lazy these last few weeks) and not because I'm unimaginative (okay, maybe I have been a tiny bit unimaginative these past two weeks, but so what..happens to everyone), but because I have been tired every single night and uninspired every other night.  And when those two things come together... well, something has to give.....

That's my story and I'm stickin' to it :)

Creamy Italian Dressing
Adapted from Food Network Magazine
Printable Recipe 
Ingredients:
1/4 cup mayonnaise
1 Tablespoon red wine vinegar
1 Tablespoon sour cream
1 Tablespoon olive oil
1 teaspoon Italian seasoning
1/4 teaspoon garlic powder
1/4 teaspoon kosher salt

Directions:
Whisk together all ingredients until well combined.  If dressing is too thick, add a bit more olive oil (but no more than 1 Tablespoon more).  Cover and refrigerate until ready to use.  Can be made up to 5 days in advance.  Serve over your favorite salad.  Enjoy!

One Year Ago:  Tomato Basil Pasta with Tuna
Two Years Ago:  Sweet Soy Garlic Sauce
Three years Ago:  Sugar Ray's Body Blow Ribs

Wednesday, June 12, 2013

Steaks with Bacon-Parmesan Butter

While the pictures might not be the best, as I was too hungry to wait for the butter to to get even more melty and beautiful, it was truly DA-BOMB recipe and could be used on just about anything and everything. I guess it's hard to go wrong withe bacon and butter, but I had to try this recipe just to be sure.  I mean who am I to go around telling people everything is better with bacon if I don't actually try all those wonderful things??  Mmmmm... wouldn't that be a great job?  A bacon taste tester.... YUM!!!  :)

Steaks with Bacon-Parmesan Butter
Slightly adapted from Weber.com
- Serves 2 -
Printable Recipe 
Ingredients:
2 steaks - any cut you choose
3 slices center cut strips of bacon
1/4 cup (1/2 stick) unsalted butter, softened
3 Tablespoons grated parmesan cheese
1/4 teaspoon salt
1/4 teaspoon pepper

Directions:
In a skillet, over medium heat, cook the bacon until it is crisp, 8-10 minutes, turning occasionally.  Transfer to paper towels to drain and let cool.  Finely crumble or chop the bacon.  In a small bowl, using a fork, combine the butter, bacon, parmesan, salt and pepper until well blended.  Cover and refrigerate until ready to use.

Preheat grill to 400 degrees F.  Clean and oil grill grates.  Drizzle some olive oil over both sides of the steaks and season liberally with salt and pepper.  Place over direct heat and grill 5-10 minutes per side or until the steaks are done to your liking.  Remove from grill and allow to rest for 3 minutes.  Top each steak with butter and allow to sit for another 2 minutes so the butter has a little time to melt.  Serve and enjoy!

One Year Ago:  My Homage to Heinz 57
Two Years Ago:  Chocolate Oatmeal Cookies
Three Years Ago:  New New Orleans Pasta

Monday, June 10, 2013

Chicken Teriyaki - Grilled

This has to be one of the easiest recipe EVER.  Three ingredients (well besides the chicken), twenty minutes, and viola... dinner is served!  Simple, delicious, perfect.... need I say more?

Okay, I will say one more thing... you do not have to grill this.  Check out the original recipe HERE for the more traditional way of serving this dish.

Oh.. and sorry about the photos.... they aren't bad, but in my eyes, they do not give justice to this dish...it was the best (and easiest) teriyaki sauce I've made :)

Chicken Teriyaki - Grilled
Adapted from Rasamalaysia.com
- Serves 2 -
Printable Recipe 
Ingredients:
1/3 cup mirin
2 Tablespoon soy sauce
1 Tablespoon granulated sugar
2 boneless, skinless chicken breasts

Directions:
Add the mirin, soy and sugar to a saucepan.  Place over medium high heat and stir until the sugar has dissolved.  Bring to a boil.  Reduce heat to low and simmer for 20 minutes, or until the sauce has thickened.  Remove from heat and allow to cool.

Preheat grill to 375 degrees F.  Clean and oil grill grates.  Remove 1 Tablespoon of the sauce and brush it over the chicken.  Place over direct heat and grill 8-10 minutes per side or until the chicken reaches and internal temperature of 165 degrees F.  Remove from heat and allow to cool for 3-5 minutes before serving.  Serve over rice or noodles and pour the sauce over the chicken.  Enjoy!

One Year Ago:  Sweet and Spicy Grilled Pork Back Ribs
Two Years Ago:  Grilled Steak Fajita Stir-Fry
Three Years Ago:  Peanut Butter Chocolate Chip Cookies