Search This Blog

Wednesday, March 31, 2010

Honey Garlic Pasta

So the night I made this, I made it as a side dish and it was sort of a spur of the moment thing.  I didn't think it through, though, because it didn't blend that well with the dish I made...BUT...this is still something I think you should try.  It's interesting to say the least.  I have never in my life (and I'm part Italian) had pasta that was sweet.  Chris thought it was too sweet, I thought it was pretty good.  I think the key to cutting the sweetness a bit is parmesan cheese.  I actually didn't add it at first, but when I realized how out of balance it was with the main dish, I added it and it turned out to taste much better with it.  If you are going to make it just as a side dish, I would recommend just grilling or pan searing chicken that's been seasoned with salt, pepper and maybe a little bit of garlic.  I don't know if I can get this one pass Chris again, so if you try it that way, let me know what you think.  I'm curious what anyone else would say about a sweet and savory dish that includes pasta :)

P.s...I cut the recipe in half because I was making it as a side dish, not a main course dish.

Honey Garlic Pasta
Recipe courtesy of Taste of Home
Ingredients:
1 package (16 ounces) angel hair pasta
2 to 3 garlic cloves, minced
1/2 cup butter, cubed
1/4 cup honey
1 teaspoon dried basil
1 teaspoon dried thyme
1/4 cup grated Parmesan cheese

Directions:
Cook pasta according to package directions.

Meanwhile, in a skillet, saute the garlic in butter for 1 minute. Stir in the honey, basil and thyme. 

Drain pasta; add to garlic mixture and toss to coat. Sprinkle with cheese. (8 servings.)  Enjoy!  
(Nutrition Facts: 1 serving (1 cup) equals 356 calories, 13 g fat (8 g saturated fat), 33 mg cholesterol, 167 mg sodium, 52 g carbohydrate, 2 g fiber, 9 g protein)

Tuesday, March 30, 2010

Parmesan Crusted Chicken

If you have read my blog for a while now, you may have noticed that I use a lot of panko bread crumbs.  Well, I have a confession to make.  I LOVE panko!  I came across panko just by chance.  I can't remember exactly which recipe was the first one to bring it to my attention, but since I've found it, I will use them over regular bread crumbs whenever I can.  Not only do I love panko, but I love parmesan cheese (ok, I like any kind of cheese). This recipe brings two of my favorite things together, now how can that be a bad thing?  This is a JFJ (Jenn's Food Journey) original.  You can use this on chicken or fish and it is scrumptious if I do say so myself (and I do)!


Parmesan Crusted Chicken
Ingredients:
2 teaspoons Dijon Mustard
2 teaspoons extra virgin olive oil
1/2 teaspoon dried thyme
4 boneless, skinless chicken breasts
1/4 cup shredded parmesan cheese
1/4 cup panko bread crumbs
salt and pepper

Directions:
Preheat oven to 425 degrees F.  Spray a baking dish with non-stick cooking spray.

In a small bowl, combine the mustard, oil, and thyme.  In another bowl, mix together the panko and parmesan cheese.  Season the chicken breast with salt and pepper, then brush them all over with the mustard mixture.  Place chicken in the baking dish and spread the panko/parm mixture on top.

Bake for 18-20 minutes or until chicken is no longer pink and the crust is golden brown.  Enjoy!

Monday, March 29, 2010

Honey & Spice Glazed Pork Chops

"What are we having for dinner tonight?" Chris inquires.   "Honey and spice glazed pork chops." I reply.

"OH! That's my favorite!!"  Chris exclaims!  "Uhm, Chris...I've never made this before."

"OH! I mean mmmmm pork chops, that's my favorite!!!"  (Damn he's so easy to please!!!)

Either way, this meal was splendid!  The sweetness of the honey was wonderful and not too sweet either, and the mixture of the cloves and cinnamon blended well with it.  It was perfect!  So, maybe now, Chris can actually say it's his favorite...and mean it!

Honey & Spice Glazed Pork Chops
Adapted from Cooking Light
Ingredients:
1/4 cup honey
2 tablespoons Dijon mustard
1/2 teaspoon ground ginger
1/4 teaspoon ground cinnamon
1/8 teaspoon ground cloves
Cooking spray
4 (4-ounce) boneless center-cut loin pork chops (about 1/2 inch thick)
salt & pepper

Directions:
Combine first 5 ingredients in a bowl.

Heat a large nonstick skillet coated with cooking spray over medium-high heat. Sprinkle pork with salt and pepper; cook 2 minutes on each side or until lightly browned.  Reduce heat to medium-low; add honey mixture. Cook 5 minutes or until done, turning pork once.  Enjoy!

(Nutritional Info - 1 piece of pork, 1 Tbls glaze: 321 calories; 12.1g fat; 18.7 carbohydrates; 34g protein; 92mg cholesterol; 557mg sodium)

Friday, March 26, 2010

The Obsessive Chef's Tilpia Fillets

Since I started this blog, I have got to get to know some really creative and informative chefs/cooks.  It's been fun trading secrets and bouncing ideas off of them.  Oh and don't forget the biggest bonus....trying their recipes!!!  So my friend, Stephen over at The Obsessive Chef, and I have been chatting it up lately.  He knows we eat a lot of of tilapia and knows I am always looking out for new ideas so he recommended a recipe from his site....simply named: Tilapia Fillets.


Simple name, but amazingly wonderful dish!!  This delicious piece of fish was crispy on the outside and moist on the inside.  And I'll let you in on a secret, I baked it!  Yep, it's not fried, but baked!  YAY!!!  Chalk one up for healthier cooking!

There are two ways of cooking this fish actually, frying or baking, I picked baking.  Though I know that it would be oh so good fried, as I get older I try hard to leave the fried foods for special treats.  The key to the crispiness of this fish is not only cooking it on wire rack set on top of a baking sheet, but heating up the baking sheet in the oven while it preheats.  Stephen came up with the idea in an email to me and I immediately knew I had to at least give it a shot.  The baking sheet gets nice and hot and helps generate that heat to crisp up the bottom of the fish.  It worked like a charm!  Thanks Stephen!

I'll give you both methods of cooking, but I recommend baking....it comes out so crispy, you'll not miss the deep frying method at all!


The Obsessive Chef's Tilapia Fillets
Slightly adapted from Stephen, The Obsessive Chef
Ingredients:
4 Tilapia fillets
Salt, pepper, and paprika
2 Tablespoons Bisquick
1 egg
1 Tablespoon milk (or water)
3/4 cup Panko bread crumbs (or you can use unflavored regular bread crumbs)

Directions:
Rinse the fillets under cold water and dry them well with paper towels.  Sprinkle the fish with salt, pepper and paprika. Use your hands to press the spices into the fish so that they stick.

Put the Bisquick in a fine-mesh strainer and shake it over the fish, coating it with a fine layer on both sides.

Lightly beat the egg with 1 tbsp water or milk.  Pour panko into another shallow dish.

Dip the fillets, one by one, into the egg, coating them completely. Let the excess drip off and coat the fillets with breadcrumbs, pressing them onto the surface.  (**)

Preheat the oven to 425 degrees.  Place baking sheet you will be using in oven as it preheats. (this will help keep the bottom of the fish crispy)

Spray a wire rack with cooking spray and place fillets on it. Bake 12-14 minutes.  Turn the broiler on and broil for another 3 minutes or until the coating is firm and lightly browned.  Remove from oven, sprinkle with salt, and serve!


(**) Method 2-Frying:  After the fish is coated in panko Place the filets on a wire rack over a plate and refrigerate for 30-60 minutes. Remove them from the fridge about 30 minutes before cooking. This is crucial to getting the coating firmly setup enough that it will not separate from the fish while frying. If you are using method 2 below, this step is not necessary. 

Coat a sauté pan, large enough to accommodate both filets in one layer, with 1/8” vegetable oil. Heat the oil over medium high heat until a spatter of water pops instantly when flicked in. Carefully lay the fish into the pan. Fry undisturbed for 4 minutes. Use 2 large spatulas, one on top and one underneath, and great care to turn the filets over. Fry on the second side for 3 minutes. Remove the filets to the wire rack which you’ve cover with a layer of paper towels. Sprinkle a bit of fine salt on them and let them rest for just a minute. Serve on hot plates and dig in immediately while the fish is still hot and very crispy.

Now I am really blushing.......

 
To Michelle at All Home Cooking. All Year Long.  and Andrea The Kitchen Witch ...Thank you from the bottom of my humbled heart!  To be recognized by fellow bloggers is an amazing feeling.  I've said this before, that I only started this thinking it would only be a place I would share my recipes with family and friends.  Little did I know all the interesting people that would visit my site and enjoy it!  I love both Andrea's and Michelle's sites and since I cannot give them this award back (or could I??) I would, in an instant tell you to check out their sites.  I love them both.. Andrea can conjure up some amazing spells...I mean recipes...in the kitchen and Michelle has some wonderful ways to save your family some money.  I love so many of their recipes and am determined to try as many as as I can.

So for receiving this award, there are a few musts...first, to learn more about this award (which is specifically for women bloggers, sorry boys...) here is the link.

Second:  The "Rules"
1. Display the Stiletto badge of honor.
2. Brag about it - post a link to the page to highlight what the award is about
3. Say thanks! Include a link to the friend who nominated you.
4. Share the love-nominate 5-10 more blogs. Leave links to their blogs and leave them a comment so they know they won!
5. Do what you do! Keep at it and keep inspiring others!

Here are my nominees for the Stiletto Award:

Alisa at The Meat and Potatoes Foodie - She's definitely not afraid to try new things...well, except frog legs :)  She's a great writer and an even more amazing cook.  Personal, I'm always drawn to her pasta dishes, but that could just be the Italian in me.

Sook at My Fabulous Recipes - Sook, per her postings, has been on a diet and is really trying to lead a healthier life style.  She has some really amazingly good healthy recipes posted, and some really yummy Korean cuisines too.

Debbie at Mocha Me -  Debbie cracks me up with her stories of her family.. plus she entices me with all those delicious home style recipes she makes.  Check out here Butterfinger cake post...mmmmm....

Georgia at Comfort of Cooking - I just happened to stumble across Georgia's site and I'm so glad I did. Her pictures all look so incredibly yummy and don't forget to check out her informative post on how to boil potatoes faster...I was surprised at the secret ingredient!

Mel at My Kitchen Cafe -I love her recipes, I love her pictures, I love her blog.  Check out her step by step on how to make a chocolate cream angel food cake.  OMG does it look delicious!

I encourage you to check out all of these sites.  I am honored to be in the same category as these fine women.  Thank you once again to Michelle and Andrea..and don't forget to check their sites out too... you will not be disappointed in any of them!  Happy Cooking Ladies!!

Thursday, March 25, 2010

Hamburger & Macaroni (aka: Chris's Goulash)

We use to have goulash when I was growing up.  It was not like this, but it was similar.  The recipe that I took this idea from is simply called hamburger and macaroni, Chris labels it goulash.  I looked up goulash on Wikipedia: Goulash is primarily a soup, also existing as stew, usually made of beef, onion, vegetables, spices and ground paprika powder. The name originates from the Hungarian word for a cattle stockman or heardsman....interesting :)  In America, it's what most people call a dish they make using miscellaneous leftovers.  No matter if you want to call this dish hamburger and mac or goulash or whatever, you'll want to try it.  It's simple, delicious, and done in under 30 minutes...perfect for a week night meal, especially if you have to feed a family.  You'll get a lot of food for not a lot of money.

Hamburger & Macaroni
Adapted from Simply Recipes
Ingredients:
1 lbs ground beef
1 small onion, finely diced
1 Tablespoon olive oil
1/2 teaspoon seasoning salt (I used Lawry's)
1/4 teaspoon red pepper flakes
1/2 teaspoon celery seed
1 large can (28 oz) of diced tomatoes
2 Tbsp Worcestershire sauce
1/4 cup chopped parsley (or 1-2 Tbls dried)
2 cups uncooked elbow macaroni

Directions:
Beginning cooking the pasta according to package directions.  Pull off the heat and drain 5 minutes before it's done cooking.  Set aside.

Meanwhile, in a large, deep skillet on medium high heat, add the olive oil and onions and cook about 5-8 minutes, or until tender and translucent.  Add the ground beef and cook another 5-6 minutes.  Lower the heat to medium and add the seasoning salt, crushed red pepper flakes, celery seed, crushed tomatoes, and Worcestershire sauce.  Bring to a simmer and let simmer for 5 minutes.  Add the cooked pasta and simmer another 5 minutes.  Add the parsley and stir to combine.  Enjoy!  

Wednesday, March 24, 2010

Creamy Ranch Chicken Enchiladas

I have been craving decadent foods lately.  This dish totally satisfies that craving.  This is not something I would recommend making too many times a month, but if you want to indulge every now and then...mmmmmmmm... take a shot at this recipe.  It is so creamy and rich and comforting.  I'll admit to you that it was so rich and heavy, I could only eat one enchilada.  Believe me, they are so good, one just doesn't cut it. (for your mouth at least..your stomach on the other hand, is well satisfied!)

The pictures might not actually do this dish justice.  I have to admit one more thing, I wanted to eat these so badly I really didn't take a lot of time with the pictures.  All I could think about was digging into them!!  These would be really good with Mexican rice, Chris isn't a fan of Mexican rice, so you just made garlic rice, which is quickly becoming my favorite way to make rice!!  MMMMMMMMMMMMM....creamy ranch...MMMMMM!!!

Creamy Ranch Chicken Enchiladas
Adapted from Annie's Eats
Ingredients:
4 boneless, skinless chicken breasts
salt & pepper
8 oz. reduced fat sour cream
8 oz. Ranch salad dressing
Flour tortillas (I used 4 large ones and stuffed them pretty good)
2 Tablespoons chopped green chilies (from a can)
1 Roma tomato, diced
Shredded Mexican blend cheese (I used about 1-2 cups)

Directions:
Cut the chicken into bite size chunks or strips.  Sprinkle with salt and pepper.  Cook the chicken in a saute pan for about 5-8 minutes, or until the chicken is no longer pink the in middle.  Set aside to cool.

While the chicken is cooking, mix the sour cream and Ranch dressing together.  Pour half of the sauce mixture into a small bowl and add the chopped green chilies.  Add the chicken to the the other bowl and mix to combine.

Preheat the oven to 375 degrees.  Spray a 9"x13" pan with non-stick cooking spray.  Take one tortilla and place some of the chicken mixture into the center of it.  Roll up the tortilla and place, seam side down, in the prepared baking dish.  Repeat until all the chicken mixture is gone.  Pour the remaining sauce mixture over all the tortillas.  Sprinkle with shredded cheese and tomatoes.  Bake for about 25 minutes.  Allow to cool a few minutes before serving.  Enjoy!  

P.S... these were still really, really good two days later for lunch!!! YUM!

Tuesday, March 23, 2010

Lemon Pasta with Chicken

First off....Thank you to Chris for making my new breast cancer widget you see to the right.  I wanted to show my support for cancer research, so I looked all over the place for a widget that would take you to either The National Breast Cancer Foundation or the Susan G. Komen for the Cure websites. Surprisingly, I came up empty handed.  Chris knew how important it was to me (my Aunt Pam was diagnosed with breast cancer recently) so he came up with a widget I could at least display here on the site.  This widget won't take you to any sites, but it's at least a reminder that the fight is still on going.  Too many people are affected by breast cancer each year.  My one hope is that they find a cure...to all cancers...and in my lifetime.  Thank you baby, I love the widget!!

Now on to the food.............I'm not a huge fan of the Neely's show on the Food Network (they are a bit too lovey-dovey for my taste), but their recipes... well, try this one and tell me what you think :)  Seriously, this is good.  I've made this a ton of times since I came across it.  Chris loves it..I love it...its probably the second favorite pasta dish in our house (Bacon & Tomato pasta being #1).  This is light, fresh, and very easy.

By the way, this works with tuna fish too.  I've wanted to make this dish before and realized I didn't have chicken thawed out, so I just substituted a can of tuna and it was amazingly good!  If you used tuna packed in oil you could cut the amount of oil by at least 1 tablespoon.  You don't even need to heat the tuna, just toss it with the pasta, it will warm up quickly.


Lemon Pasta with Chicken
Adapted from The Neelys 
Ingredients:
1 pound dried penne or ziti
2 chicken breasts, cut into bite size pieces
Salt and freshly ground black pepper
3 cloves garlic, sliced
1/4 teaspoon red pepper flakes
3 tablespoons olive oil
3 tablespoons roughly chopped fresh parsley, for garnish
2 lemons, juiced
1/2 cup grated Parmesan

Directions:
Cook the pasta according to package directions. Drain well.

Season chicken with salt and pepper. Heat a large skillet over medium high and add chicken. Cook until golden and completely cooked. Remove to a plate.

Add olive oil to the same skillet.  Add the garlic and red pepper flakes and saute until fragrant, about 1 minute. Add the cooked pasta and turn heat off. Mix all together. Remove pasta to a large bowl. Add chicken to the warm pasta and season with salt and pepper. Sprinkle in chopped parsley. Add the juice of 2 lemons and mix. Before serving top with Parmesan.  Enjoy!


Monday, March 22, 2010

Classic Steak House-Marinated Steaks w/Red Pepper Aioli

This would have to be my second favorite marinade for steak.  The steak comes out with a sweet and savory flavor.  Like the rosemary and red wine steak (my favorite marinade) I posted on the first of this month, it is fantastic by itself.  You don't need any kind of sauce, BUT, this red pepper aioli...well, it's AMAZING!  The steak might not NEED it...but it WANTS it, so I must to obey!!  You can use any type of steak you want with this marinade.  I have to tell you, I can't remember the cut..lol...I made this over a week ago and forgot to jot it down.  I know it wasn't NY strips again...it was on sale.... I cut it in half to make to separate pieces (Chris likes his steak well done, as you can tell from the pictures, I do not)...long story short, use whatever cut you can get your hands on, with this marinade it's not going to matter that much! 


Classic Steak House-Marinated Steaks w/Red Pepper Aioli
Adapted from Southern Living 
Ingredients:
1/3 cup beer (I used Bud Light)
1/4 cup Worcestershire sauce
1 tablespoon olive oil
1 tablespoon honey
1 teaspoon lemon juice
3/4 teaspoon salt, divided
1/2 teaspoon freshly ground pepper, divided
4 steaks of your choice

Directions:
Whisk together beer, next 4 ingredients, and 1/4 tsp. each salt and pepper in a small bowl. Pour marinade into a large zip-top plastic freezer bag; add steaks. Seal bag, and chill 2 hours, turning occasionally. 

Preheat grill to 350° to 400° (medium-high) heat. Remove steaks from marinade (throw marinade away). Sprinkle steaks with remaining 1/2 tsp. salt and 1/4 tsp. pepper.  Grill steaks, covered with grill lid, 5 to 6 minutes on each side or to desired degree of doneness. Remove steaks from grill, and let stand 5 minutes before serving.

Red Pepper Aioli
Adapted from Cooking Light 
2 garlic cloves, peeled
1/2 cup mayonnaise
1/2 teaspoon salt
1/4 teaspoon crushed red pepper
1 roasted red bell pepper

Drop garlic through food chute with food processor on. Process until finely minced. Add the remaining ingredients, and process until well-combined.  Serve with steaks or chicken or fish.


Saturday, March 20, 2010

Chicken Tortilla Pizza

Surprise!!  It's a special Saturday afternoon post.  I was just sitting here working on my blog and thought, why not post this simple and yet delicious little meal.  Don't feel like you have to follow this recipe exactly.  You can top these little tortilla pizzas with any topping of your choice.  We just had some chicken and cheese so that's what was on ours.  I did have a tiny bit of basil leftover so I used that on one of the pizzas.  And little secret...I completely forgot to pick up tomato sauce at the store the other day, so unfortunately, I had to use marinara sauce instead of pizza sauce.  It wasn't bad, it just was lacking that pizza taste.  But, it's a simple idea and is easy to throw together.  One of the tortillas didn't get that crispy in the center, so you may want to crank the heat up to 450 and keep on eye on it, or if you have a pizza stone, use that, by all means.  Put the stone in the oven while it's preheating to make sure it gets nice and warm.  Lay the tortilla on it and that will give you the crispiest tortilla possible.


Chicken Tortilla Pizzas
Ingredients:
4 10-inch flour tortillas
Olive oil
2 boneless, skinless chicken breasts
Salt & pepper
Garlic powder
3/4 cup pizza sauce (store bought or, for a fantastic homemade recipe click here.)
8 oz (or more) shredded mozzarella cheese


Directions:
Sprinkle each piece of chicken on both sides with salt, pepper and garlic powder to taste.  In a non-stick skillet sprayed with cooking spray, cook the chicken on each side for 5-6 minutes or until the chicken is cooked through.  Set aside to cool.

Preheat oven to 425 degrees F.

Cut or shredded the chicken once it is cooled.  Brush the tortillas with olive oil on both sides and place on cookie sheets.  Spread 3 Tbls of sauce on each tortilla, sprinkle with chicken, then cover with cheese.  Bake for 5-8 minutes or until cheese is bubbly and tortillas start to get crispy.  Allow to cool for a few minutes then enjoy!

Friday, March 19, 2010

Baked Dijon Tilapia with Crumb Crust

So last week I posted Chris's favorite fish recipe, baked parmesan tilapia, this week, I'm posting mine.  This is so incredibly good.  The crunchiness of the panko, the tang of the mustard.....mmmmmmmm.  It's soooooooo good!  Ok, it might not be much to look at, but do not judge this book by it's cover.  I mean it's pretty simple looking, but that's where it ends.  The only time I'd use the word simple when describing this dish would be when I'm speaking of the preparation of it.  There is nothing simple about the flavor!

Baked Dijon Tilapia with Crumb Crust
Adapted from Crisco.com 
Ingredients:
Non-stick cooking spray
4 (6 to 8 oz.) tilapia fillets
Salt and pepper to taste
3 tablespoons olive oil
2 tablespoons Dijon mustard
1 tablespoon fresh lemon juice
2 teaspoons Worcestershire sauce
1/2 cup Panko breadcrumbs

Directions:
Heat oven to 400°F. Spray a baking dish with non-stick cooking spray.  Place fish fillets in prepared dish. Season both sides of fish with salt and pepper.

Whisk together oil, mustard, lemon juice and Worcestershire sauce in small bowl; spoon and spread over each fillet.  Sprinkle breadcrumbs over each fillet. Bake fish until just cooked through, about 12 minutes. Enjoy!


Thursday, March 18, 2010

Pan Fried Pork Chops with Mushroom Gravy

This week has been a long one.  Yesterday morning I woke up thinking it was Thursday.  Then, last night, Chris and his friend Steve had a jam session and that normally only happens on Friday nights, so all night I kept having to remind myself that it was only WEDNESDAY night!  Ugh.. so yea, just wanted to complain, that's all.... now on to the food!!!

You may notice that I do not cook very often with mushrooms.  Chris really isn't a fan of them.  But, if you cut them to the right size and cook them properly, he will eat them.  It's a good thing too, because when I came across this recipe, I knew I was going to make it at some point.  I love mushrooms and this recipe looked so good and so simple.  In my head I thought all I needed to do was make the pieces of mushroom big enough so he could eat around them.  (That's right, sometimes it really is just about me!! lol)  That's just what I did too, and you know what, he loved it!  See, sometimes trying new things really is a good thing!

Pan Fried Pork Chops with Mushroom Gravy
Recipe created by Des at Life's Ambrosia
Ingredients:
4 boneless pork chops
1 egg
1/2 cup all purpose flour
2 teaspoons seasoning salt
1 tablespoon olive oil
1 tablespoon butter
1 cup sliced button mushrooms
1 cup chicken broth
2 tablespoons flour
1/4 cup milk
fresh cracked black pepper and kosher salt


Directions:
Place pork chops in a resealable plastic bag. Seal bag and hit the pork chops with a meat mallet until 1/4 inch thick. (I actually skipped this part)

In one bowl beat egg. In a separate bowl combine flour and seasoning salt.
Remove pork chops from plastic bag, dip in egg and then dredge in flour to coat completely. Transfer to a plate and let set for 15 minutes.


Preheat oven to warm setting.
 
In a skillet heat butter and olive oil over medium heat. Once butter has melted fry pork chops until browned and cooked through. About 3-4 minutes per side. Transfer to a ovenproof dish and place in oven to keep warm.

Reserve 1 tablespoon of the pan drippings. Add mushrooms and cook until browned, about 5 minutes. Sprinkle 2 tablespoons of flour over the top, stir. Cook for 1 minute. Whisk in broth and milk. Cook until thickened. Season to taste with salt and pepper.


Place cooked pork chops on a serving platter, spoon gravy over the top, and serve!


Wednesday, March 17, 2010

Poblano Chicken

Happy St. Patrick's Day everyone!!  I know, this is not an Irish dish, but it IS green (ok, it might look a little yellow under the lights of my kitchen, but the sauce really is green!), so I figured it was a good post for today.  I probably should have made something special for today, but, in all honesty, I sort of forgot about it...been a little preoccupied with my new job (and American Idol..ugh!!!).

Ok, it's creamy and decadent and super delicious (and don't forget green)!  It might not be the healthiest thing I've posted lately, but it's definitely one to try.  When I first saw this recipe, I wasn't that impressed with how the actual picture looked, but the ingredients intrigued me, so I tried it.  WOW!  Its like a party in your mouth, let me tell you!!  Poblano chili's are not known for their heat, but for their flavor, so if you are worried that this will be too spicy for you, don't.  The pepper jack cheese is spicier then the poblano.  If you didn't have pepper jack, or don't like pepper jack, I would use just regular monterey or a mix of monterey and cheddar.  The poblano sauce is what makes this, the cheese is only there as a compliment!


Poblano Chicken
Adapted from One Perfect Bite 
Ingredients:
4 boneless, skinless chicken breasts
1 teaspoon kosher salt + salt to taste
1/2 teaspoon freshly cracked black pepper
1 large Poblano chile
1/2 cup 2 % milk, divided
1 tablespoons unsalted butter
1 tablespoon all-purpose flour
3/4 cup light sour cream
1 lime, zest and juice
Pinch of nutmeg
6 oz. pepper Jack cheese, coarsely grated 

Directions:
Preheat oven to 350 degrees F. Coat a baking dish with oil or nonstick cooking spray. Set aside. Sprinkle both sides of chicken with salt and pepper. Set aside.

Remove stem, seeds and membranes from the chile. Place chile in a blender. Add 1/4 cup milk. Puree.

Melt butter in a small pan over medium-high heat. Add flour and stir until smooth and lightly brown. Stir in chile puree. When smooth, add reserved 1/4 cup milk, sour cream, lime juice and zest and nutmeg. Stir constantly over low heat until mixture thickens. Add salt to taste.

In a large skillet, sprayed with non stick cooking spray, saute chicken over medium heat for 2 to 3 minutes per side. Transfer to prepared baking dish.

Cover chicken with Poblano sauce, sprinkle with cheese and bake in upper-third of oven for 10 to 12 minutes or until chicken is no longer pink.  Enjoy!

Tuesday, March 16, 2010

Sloppy Joes

 
When I was growing up, there was this place called The Frosty Treat. It was a small fast food grill, basically. They made Frosty burgers.  In terms that anyone not from Ashland, NE can understand, they made loose meat sandwiches.  Not a sloppy joe, but close.  I have that recipe and plan on making it at some point...but for now, we're talking sloppy joes! (I know, why even bring it up, right?  I don't know, every time I think/see/eat sloppy joes I think of Frosty burgers.)

Most of you may be familiar with Manwich...  Well forget about it.  Sorry ConAgra/Hunts, there's somethin' better!  From here on out, if you want a sloppy joe, make it this way.  It really doesn't take any longer then the stuff that comes in the can and it really doesn't cost any more either.  So why would you consider using the can again??  Go ahead, make it, try it...tell me I'm wrong :)


Sloppy Joes
Adapted from Life's Ambrosia 
Ingredients:
1 (14.5 oz) can tomato sauce
1 Tablespoon white wine vinegar
1 Tablespoon Worcestershire sauce
1/2 teaspoon garlic powder
1/2 teaspoon ground mustard
1/4 teaspoon cayenne pepper
2 teaspoons brown sugar
1/4 teaspoon salt
1/4 teaspoon black pepper
1 lbs. ground beef
1/2 large carrot, minced
1/2 medium onion, minced
1 jalapeno pepper, minced
4-6 hamburger buns

Directions:
**Cooks Note:  place carrot, onion and jalapeno in a food processor for easy mincing**

In a bowl, whisk together the first 9 ingredients.  Set aside.

In a large, non-stick skillet, over medium high heat, cook the ground beef for 3 minutes.  Add the minced vegetables and cook until the meat is not longer pink.  Drain any excess grease.

Add tomato mixture to the pan, stir to combine.  Bring to a boil.  Reduce to medium low heat and allow to cook for 15-20 minutes, or until sauce reduces and becomes thick.  Serve on hamburger buns and enjoy!


Monday, March 15, 2010

Tuscan Chicken with Pasta Medley

Besides the fact that I was 1. lazy and 2. went over board on the spices, this dish wasn't too bad.  I found these recipes in the Taste of Home Simple & Delicious magazine.  I always find good recipes in there, but never seem to actually make too many of them.  I need to make a better effort at going through all my magazines when I'm planning my menus.

Anyway :) You may be asking, why was I lazy?  Well, honestly, I didn't want to slice up garlic.  The chicken recipe actually called for slicing the garlic and frying it in the pan with the chicken.  Not only did I not want to go through the process of slicing the garlic (yea, I know it's so hard right..lol), I'm always so worried about frying garlic too long, it can tend to get real bitter if you over cook it.  So I took the easy way out and just used garlic powder.  As for #2, over doing the seasoning, I think that one is pretty self explanatory.  I just used too much and it was a bit over powering, but that's ok, it happens to the best of us.  I won't make the same mistake twice, nor will I allow you to make it once!

 
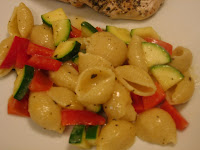
Personally, I think the pasta was the best part of the dish.  Again, there was mustard in the ingredients.  Since using it with pasta had been such a hit with the Pasta w/Sausage, Basil & Mustard recipe I posted on 3/3/10, I knew it would once again be splendid!  To sum up, the dish was good.  I don't know if I'd make this again, but that's only because there are so many more recipes out there to try!!!

Tuscan Chicken
Adapted from Taste of Home 
Ingredients:
4 boneless, skinless chicken breasts
1/4 teaspoon salt
1/4 teaspoon pepper
1 teaspoon dried rosemary
1/2 teaspoon dried basil
1/4 teaspoon dried thyme
1/2 teaspoon garlic powder
non-stick cooking spray

Directions:
In a small bowl, mix together the salt, pepper, rosemary, basil, thyme and garlic powder.  Evenly sprinkle over chicken, both sides.

Spray a little cooking spray in a large non-stick skillet.  Over medium heat, cook chicken for 5-7 minutes on each side or until chicken juices run clear.

(Nutritional Info: 1 chicken breast= 217 calories, 9g fat, 78mg cholesterol, 364mg sodium, 1g carbohydrates. 29g protein)

Pasta Medley
Adapted from Taste of Home 
Ingredients:
1 cup uncooked pasta shells
1 small zucchini, cut into bite size pieces
1/2 red bell pepper, cut into bite size pieces
1 teaspoon olive oil
3/4 cup chicken broth
3 Tablespoons unsalted butter
1 1/2 teaspoons Dijon mustard
1/2 teaspoon dried basil
1/4 teaspoon garlic powder

Directions:
Cook pasta according to package directions.

Combine the cornstarch and broth until smooth; set aside. In a large saucepan, melt butter; add the mustard, basil and garlic powder. Gradually stir in broth mixture. Bring to a boil; cook and stir for 2 minutes or until thickened. 

Meanwhile, in a small skillet, heat the olive oil over medium heat and add the red bell pepper.  Saute for 2 minutes.  Add the zucchini and saute another 2 minutes.  Remove from heat.

Drain pasta; return to pot. Add the mustard sauce and toss to coat.

(Nutrition Facts: 3/4 cup equals 157 calories, 6 g fat (4 g saturated fat), 16 mg cholesterol, 359 mg sodium, 21 g carbohydrate, 3 g fiber, 4 g protein.)