Search This Blog

Wednesday, June 30, 2010

Chipotle Fish Packets

I love love love chipotle.  I love the smokey flavor it adds.  I love the spiciness it brings to a dish.  I love it!!  But, I will confess, I have never actually cooked with it. GASP!  I know, right?  Once again, the only thing that ever stopped me from using it, was fear.  Fear because I wasn't sure what I was getting and what to do with it and what if I didn't use it all then what will I do with any leftovers.... and so on and so on!  So the other day I finally said enough.  I'm gonna get a can and I'm gonna make a recipe that calls for it!  And what better recipe then a recipe for TILAPIA :)  (my pal Stephen thinks I should start a blog just with tilapia recipes... he suggested calling it Tilapia Tootsie - among other witty names -...maybe it's not a bad idea!!)  Those of you who have visited my blog often, may be getting tired of tilapia recipes.  Why the heck doesn't she use something else..right?  My friends, I might not try another fish, but you may.  You can switch out cod or sole or catfish or even halibut with all the fish recipes I have posted here.  There are even quite a few that would work well on salmon.  So don't limit yourself just because of me.  Experiment...take a few chances..what's the worse thing that could happen?  You ruin dinner and you gotta order in Chinese or pizza?  In my book, that's not a bad thing at all.. the point is you tried :)
Anyway, this fish was simple and spicy!  Chipotle is a smoked-dried jalapeno.  That should explain one thing...heat!  If you haven't had chipotle peppers in adobo sauce, you might be a bit surprised at the bite it has...so be careful and use caution!  Don't say I didn't warn you.........

Chipotle Fish Packets
Adapted from Rick Bayless
Printable Recipe 
Ingredients: 
4 (6oz) portions of mild white fish such as tilapia, halibut, or red snapper (I know it says red, but it's considered a white fish, I swear!)
3-4 key limes
salt and pepper
1/4 cup mayonnaise
2-3 chipotle chili from a 7oz can of chipotle chili in adobo sauce, PLUS 1 Tbls of the adobo sauce (***Don't worry, I'll share a recipe with you tomorrow that will show you what you can create with the rest of the can!**)
Aluminum foil
Non-stick cooking spray

Directions:
Preheat grill to medium heat or an oven to 400 degrees.

Divide up the fish between the 4 pieces of aluminum foil sprayed with non-stick spray.  Sprinkle each packet with about 3/4 teaspoon lime juice, 1/4 teaspoon salt, and 1/8 teaspoon black pepper.

Blend mayonnaise and chipotle along with the adobo sauce in a blender or small food processor until smooth.  Divide the flavored mayonnaise between the 4 packets and spread to cover.  Close foil around fish to create a packet.  

If grilling, place direction on the grill grates and cook for 12-14 minutes.  If baking, place packets on a cookie sheet and bake for the same amount of time.  Carefully remove the packets from the grill (or oven) and the fish from the packets!  Enjoy!

Tuesday, June 29, 2010

Blushing is my new middle name...

How can I say thank you, once again, for being recognized by another blogger?  I guess the only way is to just say it, right?  Well, a tremendously large thanks goes out to Jane over at Going Jane for passing along the Blog with Substance award.  I found Jane's site like a lot of the sites I have found as of late, through Tuesday Tag-Along...a FANTASTIC site to fine new and wonderful blogs.  Jane is a self proclaimed Mac-addict...I mean, right there tells you that we are kindred spirits!  I love her posts with her kids, especially the one with them roping!  Her blog makes me laugh and, I gotta say, it makes me feel at home.  Ok, I didn't grow up on a farm, but I grew up in a small town in Nebraska surrounded by farms.  A lot of my friends grew up on farms...so, well... like I said, it makes me feel at home.  So thank you Jane...not only for the nomination, but for the comfort you bring to my days!

The Rules:
•Thank the blogger who awarded it to you.
•Sum up your blogging philosophy, motivation, and experience using five (5) words.
•Pass it on to 10 other blogs which you feel have real substance.
_______________________________________________________
My blogging philosophy, motivation, and experience using 5 words: Inspiring Creativity in the Kitchen 

There are so many wonderful blogs out there that I have a very hard time trying to pick ones I want to pass these kinds of awards on to. I mean there are just some blogs that I feel have reached celebrity level and how do you hand an award like this to them?  If your followers are in the thousands, you are a blogging celebrity in my book!! I think Alisa over at The Meat and Potatoes Foodie said it best when she said - and I quote - "Oh hey there Pioneer Woman - I know your book was a #1 New York Times bestseller and all and your entire life may soon become a Reese Witherspoon movie, but here you go... The same goes for Noble Pig and One Perfect Bite and other blogs I wish mine could grow up to be like one day." lol  I couldn't have said it better myself Alisa!

Anyway...these are the 10 blogs I feel have extreme substance and deserve to be talked about in the blogging community!

I pass this award on to you:
  1. Alisa, The Meat and Potatoes Foodie
  2. Stephen, The Obsessive Chef
  3. Andrea, The Kitchen Witch
  4. Michelle, All Home Cooking. All Year Long.
  5. Alex, Ma, What's For Dinner?
  6. Ally, Fourth Grade Nothing
  7. Siri, Siriously Delicious
  8. Jenn, Bread + Butter
  9. Yenta Mary, Food Floozie  (I know for sure you've already been giving this award once, but I so love your blog, I couldn't resist giving you the award again!)
  10. Debbie, Mocha Me
So that's it folks... make sure to check out these AMAZING sites...you will not be disappointed!!!

Thanks again Jane....the honor is greatly appreciated!!

Marinated Chuck Tender Steaks with Bar Americain Steak Sauce

I'll be honest with you...the steak, once again, did not need a sauce at all.  The marinade really made the steaks sweet and savory with just a bit of a kick.  BUT, since we all know my love for sauces, it just seemed unnatural to not make something to go along side this steak.  What better sauce then a sauce made at one of Bobby Flay's restaurant; Bar Americain.  The sauce totally delivers.  It was so good, you know I had to hold myself back from just spooning it into my mouth.  I even dipped my potatoes in it and I'm not ashamed to admit it!  So, yea, once again, I probably enjoyed the sauce so much more then the steak, but honestly, the steak was amazing too!  The combination was pretty dang fantastic if I do say so myself!

I used chuck tender steaks because it was what was on sale at the grocery store, but you could use any cut of steak you choose.  If you use a flank or skirt steak, though, make sure to marinate it for twice as long, if not longer.  You'll get a more tender, flavorful piece of meat when it's all said and done.


Marinated Chuck Tender Steaks
Printable Recipe 
Ingredients:
1/4 cup honey
2 Tablespoons reduced sodium soy sauce
2 Tablespoons olive oil
1 Tablespoon balsamic vinegar
1/2 - 1 Tablespoon Sriracha hot sauce (depends on how spicy you want it)
2 large garlic cloves, minced
1/4 teaspoon black pepper
1 lbs. chuck tender steaks (or your choice of steak)

Directions:
In a small bowl, combine all the ingredients except the steaks.  Place the steaks in a Ziploc bag and pour marinade over it.  Seal and refrigerate for 2 hours (I actually let mine sit for a little over 3 hours).

Preheat the grill to medium-high.  Place steaks on the grill and grill for 5-10 minutes per side, depending on how done you want it and how thick the steaks are, turning only once.  Remove from grill and let rest for 3-5 minutes before cutting into.  Serve with Bar Americain steak sauce (recipe follows).  Enjoy!


Bar Americain Steak Sauce
Recipe courtesy Bobby Flay, Food Network
Printable Recipe 
Ingredients:
2 Tablespoons Dijon mustard
2 Tablespoons whole-grain mustard (I actually just used coarse ground mustard)
2 Tablespoons molasses 

1 Tablespoons ketchup 
1 Tablespoons honey
3 teaspoons horseradish, drained
1/4 teaspoon kosher salt
1/4 teaspoon freshly ground pepper


Directions:
Whisk all of the ingredients in a bowl. Cover and refrigerate at least 30 minutes or up to 1 day. Bring to room temperature before serving. 


Tuesday Tag-Along

And here it is...yet another Tuesday Tag-Along!  YAY!!  I have had such a good time with TTA.  I have enjoyed the new blogs that I have found and of course, I have enjoyed the new people that I "meet" who now are visiting my site.  So, welcome new friends.  And of course, thank you, as always, to my loyal readers who are here every day.  Without any of you, this blog would be so boring!

If you are new to my site, let me give you the condensed version of what happens here.  I love to cook.  That's pretty much it.  I'm no chef.  Heck, I'm definitely not a good enough cook to make it on The Next Food Network Star- BUT - I have passion and that my friends, is really all you need sometimes.  I love to share my food findings with other people, hence why I created this site.  All I hope is that I can inspire people to get in the kitchen and create!!

If you are a returning reader...Thank you!  I cannot tell you how wonderful it is to have you here....to share with you..  to have you share with me.  YOU are what's important to my blog, so thanks for always being there....er, I mean here!!

Without further ado...
Here's how it works:
  • Create a new Tuesday Tag-Along blog post. Include the Tuesday Tag-Along button by copying and pasting the code above. (You are also welcome to copy and paste these instructions in their entirety, or any portion of this Tuesday Tag-Along blog post!)
  • Add your blog name and the URL of your TTA post to the MckLinky below.
  • Follow Twee Poppets, the hostess blog listed in the first slot. Twee Poppets will follow you back! (Note: If you want Twee Poppets to follow you back, you MUST leave her a comment saying that you are a new follower and leave a link to your blog!)
  • If you can, please follow the blogs in the three slots before you (e.g., if you're number 20, follow numbers 19, 18, and 17). This is not mandatory, but it will help ensure that everyone who signs up gets a few new followers!
  • Follow as many other blogs as you want. The more you follow, the more that will follow you back! Be sure to tell them that you're following from Tuesday Tag-Along! You may also want to leave a link to your blog so they can return your follow more easily.
  • When you get a new follower through Tuesday Tag-Along, be sure to follow them back! It's just common courtesy. :)
So, sit back...and enjoy the ride...because as it states on the header of my blog: this is a exploration of edible proportions!

Ciao!
Jenn

Monday, June 28, 2010

Hot Honeyed Grilled Chicken

The other day I was searching through old recipes that I had printed out and I stumbled across one from Sandra Lee, Hot Honeyed Spare Ribs.  My mouth instantly watered.  I remembered how wonderful those ribs tasted when I recreated her recipe.  Well, Chris and I had just had ribs over Memorial day and then I made them again for my nephew while they were here visiting, so I really didn't want to make that exact recipe.  It got me thinking... why the heck wouldn't that same sauce work on chicken?  It's sweet, it's spicy, it's fantastic... let's try it!  YAY!!! The chicken came out perfect and it was just what I wanted.   Now, most people don't have Catalina dressing on hand.  Heck, a lot of people don't even like it.  I don't even know a good substitute for it except for French dressing.  So if you really really want to make this recipe, go ahead and splurge on a bottle.  You can always make the Hot Honeyed Ribs to help use up what's left!

Oh... and even though this is grilled... I left instructions on how to bake them, for those that don't have or don't want to use their grills!

Hot Honeyed Grilled Chicken
Adapted from Sandra Lee
Printable Recipe 
Ingredients: 
1/4 cup Catalina dressing
1 Tablespoon Sriracha
1 Tablespoon soy sauce
2 Tablespoons honey
garlic salt
pepper
4 boneless, skinless chicken breasts

Directions: 
In a small bowl, combine the dressing, sriracha, soy and honey; mix well.  Season the chicken with garlic salt and pepper.  Place chicken in a Ziploc bag and pour the marinade over it.  Seal and refrigerate for 1-2 hours.

Preheat your grill to medium-high.  When grill is ready, remove chicken from bag and discard marinade.  Place chicken on grill and cook for 5-8 minutes per side or until the chicken is no longer pink in the middle.  Remove from grill and enjoy!

To Bake:
Preheat oven to 400 degrees.  Place chicken in baking dish or wire rack on a sheet pan, sprayed with non-stick cooking spray.  Bake for 16-20 minutes or until chicken is no longer pink in the middle. 
 

Saturday, June 26, 2010

Sometimes you just gotta break the rules!!!

So yesterday morning I woke up to this wonderful email from Alex over at Ma What's For Dinner?  She had some very nice things to say to me and well...she also honored me with the Beautiful Blogger award!  Thank you so much Alex, it's always amazing to me to be recognized by my fellow bloggers.  It's hard to believe sometimes that people really dig my blog.  I keep forgetting that it's not only just friends and family reading anymore.  I really never know what to say about receiving this sort of honor..I mean nothing more then thank you thank you thank you thank you!!!!!  I found Alex and her blog through Tuesday Tag-Along and am extremely happy that I did.  If you are a blogger, it's a great way to find new sites and of course to have more people check out your site.  I mean  you never know who you are gonna find right?  It just might be someone that is so impressed that they honor you with an award!! YAY!!!  Thanks again Alex...I'm deeply honored and humbled!

****I also have to thank Yenta Mary over at Food Floozie for the honor also!  She awarded me with this beautiful award this morning (Sunday).  Thank you so much!!  I am honored by your recognition too.  I am feeling very humbled yet again this morning!!!****

Now there are rules to winning this award....but because today is Saturday and because I'm a Libra and because sometimes rules are meant to be broken...I'm going to do something a bit out of the ordinary.  I've actually received this award before...not that it takes anything away from being honored again...it's just that....well... I had the hardest time picking from such wonderful sites. So instead of honoring just 10 bloggers, I'd like to honor all of you that visit my site.  Yes, yes, I know this may seem like the cheesy... oops, I mean easy way out, but it's what I want to do.  It's hard to pick from such a large selection of amazingly beautiful bloggers and blogs.

So today, my award goes out to YOU.  You are not only a beautiful blogger, but you are a beautiful person.  Thank you for your loyal following, thank you for the recipes you share with me, thank you for your inspirations.

Once again, a HUGE thanks goes out to Alex... I hope I didn't disappoint you by breaking the rules :)  And by the way, Ma, what IS for dinner??  

Ciao!
Jenn

P.S....my copy of Planet Barbecue has finally arrived!!!  Thank you Foodie Blogroll!!! I'm so excited to find and share yummy recipes from it...but be patient, It's a big book and I already have this weeks menu planned :)
Future posts will include recipes such as Grilled Chicken with Yogurt, Hot Pepper, and Garlic; The Real Jamaican Jerk Pork; Steak with Marchand de Vin Sauce; Grilled Pita Bread; Jose Andres Grilled Bread with Chocolate.....so stay tuned.....it's gonna be a grill fest summer for sure!

Friday, June 25, 2010

Chocolate Chocolate Chip Ice Cream

For some reason, my camera does not love my ice cream as much as I do!  I swear, I took 50 pictures and only these 3 came out clear.  Every other one was a blurry mess.  I had the same problem with the 2 other ice cream pictures I've posted.  They aren't bad pictures, mind you, I was just expressing some frustrations with my photographic abilities, that's all.....now on to the ice cream....... :)

This ice cream was fantastic!  I just love chocolate, but you knew that right?  The one problem I had with it, is it became a bit grainy once it started to freeze.  I BELIEVE it is because I did not blend the chocolate mixture in a blender before putting it into the refrigerator to cool.  The recipe I found said "if the chocolate does not melt completely, you might want to run it through a blender until smooth."  Well, my chocolate melted perfectly, or so I thought, and I skipped this step.  But I believe that by skipping that step, I did not have the chocolate nice and smooth as it should have been, hence the tiny chocolate pieces just hardened up as soon as it started to cool.  That's my theory at least.  Now this did not make the ice cream inedible, oh no, I would not post it if that was the case, I'm only telling you, so hopefully you'll have a smoother ice cream texture then we did.  This ice cream was not too sweet, but very rich and very chocolaty.  It was chocolate heaven in a bowl!


Chocolate Chocolate Chip Ice Cream
Adapted from The Perfect Scoop by David Lebovitz
Printable Recipe 
Ingredients:
2 1/4 cup heavy cream or half & half
6 Tablespoons unsweetened Dutch-process cocoa powder
1 cup sugar
pinch of salt
6oz unsweetened chocolate, chopped
1 cup milk
1 teaspoon vanilla extract
1/4 cup mini semi sweet chocolate chips (you could honestly leave these out if you just want plain old chocolate ice cream, it will still be SO good!!)

Directions:
In a large saucepan, whisk the cream, cocoa powder, sugar and salt together.  Whisking frequently, heat until the mixture comes to a full, rolling boil.  Remove the pan from the heat and add the chopped chocolate.  Whisk until the chocolate melts completely, then add the milk and vanilla.  Carefully transfer the mixture to a blender and blend for 30 seconds, or until smooth.

Chill the mixture thoroughly and then churn in your ice cream maker according to the manufactures instructions.  Add the chocolate chips in the last few minutes of the churning.  If you don't have an ice cream maker, check out David's site for directions on just how to do it without one!  Enjoy! 

Thursday, June 24, 2010

Black & Red Spicy Chicken

I came home from work the other day in an awful mood.  I was snippy and cranky and bitchy and unmotivated.  Really, the last thing I wanted to do was make dinner....but...I really didn't want to go out either.  My solution:  Black & Red Chicken.  Normally, I would not post a recipe where the main ingredient is a spice mix that, I'm pretty sure, very few people have in their pantry, but this gives me a chance to plug my favorite spice store AND share a pretty good (and very simple) recipe.

Penzeys Spices, my all time favorite place to buy spices.  I find that the prices are much better then at the grocery store and I can buy them in different sizes.  I'm not forced to buy a 3 oz jar (or more) of a certain spice I may only use once or twice in a matter of a few months.  If I want to buy a larger quantity of something I use a ton of, like Parsley, or garlic salt, I can do it.  There is only one store here in the valley and it's not that convenient to get to, so I either order on line or I wait until I am out of a lot of different things and make a list.  In my experience with Penzeys', I've always been happy with whatever I have purchased.  This spice...this Black and Red Spice...is no different. 


Anyway, now that I'm done pluggin' :)  If you have the chance to purchase this spice, I highly recommend it.  And, if you like the idea behind this recipe but don't want to purchase the spice, you can easily mix cayenne pepper and black pepper together to create the same flavor.

Black & Red Spicy Chicken
Printable Recipe 
Ingredients: 
2 boneless, skinless chicken breasts
garlic salt
Penzey's Black & Red spice (you could use a mixture of cayenne pepper and black pepper too)

Directions:
Preheat grill to medium high.  Sprinkle both sides of the chicken with garlic salt and black and red seasoning.  Grill 5-8 minutes on each side or until chicken is cooked through.  See, SIMPLE!


Wednesday, June 23, 2010

Creole Cast Iron Fish

I saw this recipe on Aggie's Kitchen back in October.  I kept saying I was going to try and it and well, it just kept getting shoved aside.  I don't know why exactly, but it did.  The other day I was trying to think of a new way to cook tilapia :) when I came across this recipe in my files.  I knew the original recipe called for baking, but I thought to myself.. why the heck couldn't I do the exact same thing on the grill?  A grill is like an oven and cast iron was meant for open flame cooking!  SWEET!!!  Plus, I don't use my cast iron pans nearly enough, it's about time to dig them out and get some real use out of them.  I do think that I used too much oil in the pan...I was so worried about it sticking and making a huge mess that I kept adding and adding the oil.  Otherwise, I'd say this recipe was a success.  And cooking it on the grill worked like a charm!  It was actually more rewarding then baking anyway...I could cast myself back to the old days when there was no electricity and all food was cooked on an open flame...a more simple time some would say..........but I digress...whether you bake it or grill it, this fish is spicy and flavorful...and if you don't over due it on the oil, it's even good for you too!


Creole Cast Iron Fish
Adapted from Aggie's Kitchen
Printable Recipe 
Ingredients:
4 Tilapia fillets (or any white fish)
3 Tablespoons olive oil, plus a tiny bit more for the pan
4 garlic cloves, pressed
2 Tablespoons Creole seasoning (homemade recipe to follow)
2 Tablespoons grated parmesan cheese

Directions:
Preheat your grill to medium; medium-high (about 400 degrees).  Place cast iron skillet on the grill to preheat too. (CAUTION: don't forget to get the oven mitt out, you don't want to touch the handle of the skillet once it's been on the grill!!!)

In a small bowl, mix together all other ingredients.  Brush both sides of each fillet with the mixture.  Carefully, place a teaspoon or two of oil in the cast iron skillet, then add the fillets.  Cover the grill and let the fish cook for 12-14 minutes or until the fish flakes easily with a fork, no need to flip the fish.  Carefully, with oven mitts, remove the skillet from the grill.

***To Bake: Preheat oven to 425 degrees. Place cast iron skillet in oven while preheating. (If you don’t have a cast iron skillet, just use a roasting pan, but don’t preheat the pan)
Brush the fish generously with oil mixture (directions are above) and place in hot skillet (be careful and don’t forget to use an oven mitt!!). Place skillet and fish back into oven. Cook for about 12-15 minutes, depending on thickness of fish, until fish is translucent and flaky. 

Emeril Lagasse's Creole Seasoning:
2 1/2 TB paprika
2 TB salt
2 TB garlic powder
1 TB black pepper
1 TB onion powder
1 TB cayenne
1 TB dried oregano
1 TB dried thyme

Mix all ingredients in a bowl. Store in airtight container.

Tuesday, June 22, 2010

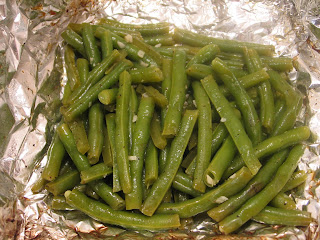
Grilled Green Beans

That's right... GRILLED green beans.  I believe you can cook just about anything on your grill and sooner or later I will prove it!  Actually, what I would like to do at some point this summer is to take 5 days and only cook on the grill.  And I'm not talking just meat that everyone else cooks on the grill... I'm talking EVERYTHING!  :)  I hear you can even make mac & cheese on the grill...you know I've got to try that one sooner or later!

Anyway.. I'll ramble all day about what I can and cannot cook on the grill.. the point is.. you have got to try cooking your green beans this way.  Fresh green beans on the grill.. there really is no better way to eat them in my book.

If you weren't in the mood to grill these wonderful delicious beans, you can follow all the same directions and then throw them in a preheated oven...I'd say about 400 for 15-20 minutes.

Grilled Green Beans
Printable Recipe 
Ingredients:
8-10 oz. green beans, trimmed
1 large garlic clove, minced
2 teaspoons water
1 teaspoon lemon juice
1 teaspoon olive oil
1 jalapeno, cut into thin strips
salt and pepper

Directions:
In a large bowl, toss together all the ingredients; set aside.  Fold a 36x18inch piece of heavy foil in half to make an 18-inch square.  Bring together 2 opposite edges of foil; seal with a double fold.  Fold remaining edges together to enclose the beans, leaving space for steam to build.

Place packet on preheated grill.  Grill for 15 minutes, turning once.  Remove from grill and enjoy!

(Nutritional information:  59 calories; 4g fat; 7g carbohydrates; 2g protein; 0mg cholesterol; 78mg sodium)

Tuesday Tag-Along

Hello loyal readers and welcome new friends!  It's Tuesday Tag-Along!!  YAY!!!

Go ahead and pull up a seat and relax.  You are about to experience the crazy world of Jenn's Food Journey.  I am definitely not a professional chef.  I am a cook and nothing else.  Sometimes I make killer dishes, sometimes I have major misses.  But, I enjoy every moment of it and hope you will too!

If you are a long time reader... thank you.  Thank you for sticking with me when even I have wanted to walk away.  I hope you have enjoyed things so far and hopefully will continue to be inspired in the kitchen by me.  Again, thank you for always coming back!
Here's how it works:

* Create a new Tuesday Tag-Along blog post. Include the Tuesday Tag-Along button by copying and pasting the code above. (You are also welcome to copy and paste these instructions in their entirety, or any portion of this Tuesday Tag-Along blog post!)
* Add your blog name and the URL of your TTA post to the MckLinky below.
* Follow Twee Poppets, the hostess blog listed in the first slot. Twee Poppets will follow you back! (Note: If you want Twee Poppets to follow you back, you MUST leave her a comment saying that you are a new follower and leave a link to your blog!)
* If you can, please follow the blogs in the three slots before you (e.g., if you're number 20, follow numbers 19, 18, and 17). This is not mandatory, but it will help ensure that everyone who signs up gets a few new followers!
* Follow as many other blogs as you want. The more you follow, the more that will follow you back! Be sure to tell them that you're following from Tuesday Tag-Along! You may also want to leave a link to your blog so they can return your follow more easily.
* When you get a new follower through Tuesday Tag-Along, be sure to follow them back! It's just common courtesy. :)

The weekly Tuesday Tag-Along MckLinky opens every Monday night at 8:59pm Pacific Standard Time (that's 11:59pm Eastern Standard Time), and the TTA blog post will be posted well in advance of that time. The MckLinky will be open to add your blog until 11:59pm Tuesday night. You then have all week long to visit blogs and return follows!

There is a new list every week. The link you enter one week will not carry over to the next week's MckLinky. Please link up again each week to join in the fun!
_______________________________________________________
Once again.. Thank you for stopping by...hope you enjoy yourself while you are here!
Ciao!

Monday, June 21, 2010

Butterflied Grilled Chicken with Rosemary, Lemon, & Garlic

First let me say, I hope all the father's out there had a fantastic day yesterday.  I got to at least talk to my dad on the phone, though I truly wish I lived closer, I would have loved to have spent the day with him.  I'm still daddy's little girl, so on days like yesterday, I truly get more home sick then normal!

Anyway...on to the food:  Butterflied Grilled Chicken...I tried it and I failed.  I can admit it to you right now.  Well, maybe failed is a bit harsh, in the end we still ate it and it was pretty damn good, so how can that be a true failure, right? I have wanted to grill a full chicken for years now and just haven't.  I'm sure it was a bit of fear that held me back, but whatever.  I finally tried it... uhm... it didn't turn out as well as I thought and now I know why I was hesitant! I grilled that bird for 50 minutes thinking it would be plenty of time, but boy was I mistaken!  I cut into it and ...yep... raw still... eewwwww!!!  (Hence the reason I said failed.)  The biggest problem I had on the grill was flare ups.  Good gravy, I could not control them even on the low setting!  I thought I'd burn the hell out of it if I left it on any longer.  I did fix the tiny failure by finishing it off in the oven, but by that time all the other sides ... grilled green beans and bread...were cold.  So huge disappointment aside, I think I can solve the problem next time I try it.  One, I needed to break the breast bone so that the chicken would lay flat on the grill, closer to the heat.  Or two, I could roast it in the oven for 30-40 minutes before throwing it on the grill, but see that seems a bit like cheating, and well, it totally takes away from my want/need of not using the oven!!  It's a shame too, I was so looking forward to telling you how much fun I had and what a wonderful outcome it was!  The chicken, once finally cooked, was splendid, that at least made it all worth while!
 
Never fear, my loyal readers, I was beaten, but not broken... I will attempt this again.  I NEED to attempt this again, put it that way.  No way will I allow this to go down as my demise :)  Actually, for the $3.99 we paid for the 4.5lb bird, why the heck wouldn't I try it again???

Butterflied Grilled Chicken with Rosemary, Lemon, & Garlic
Printable Recipe 
Ingredients:
1 (4.5 lb or less) chicken
6 garlic cloves
3 Tablespoons lemon juice
3 Tablespoons olive oil
1 Tablespoon dried Rosemary
1 Tablespoon dried Thyme
2 teaspoons lemon pepper seasoning
1/2 teaspoon sea salt
1/4 teaspoon black pepper
1 Tablespoon grated parmesan cheese

Directions:
Light a grill or set your broiler on high and give it a 15-minute head start. Cut out the chicken’s backbone with poultry shears, a cleaver or a sharp, heavy chef’s knife. (If you think you will make stock at some point, by all means tightly wrap the backbone in plastic and put it in the freezer.) Place the chicken skin side up and press firmly on the breast with the heels of your hands until it cracks and flattens (THIS IS VERY IMPORTANT...make sure the chicken breast breaks and the chicken lays flat). Position the legs so they lie flat and the drumsticks point out. Tuck the wingtips over the tops of the wings to hold them in place, or cut them off.

In a food processor, add the garlic and pulse a few times until it's minced fairly well.  Add all the other ingredients and pulse until well combined.  Brush or rub the skin side of the chicken with the mixture, reserving about 2-3 tablespoons.

Reduce the heat on the grill to medium and set the chicken skin side down on a grill or skin side up on a broiler rack positioned so the highest point of the bird is 5 or 6 inches from the flame. When the skin begins to brown after 8 or 9 minutes, flip the chicken over. (The easiest way is to grab the knobby ends of both drumsticks with several layers of paper towels if you are in the kitchen, or with clean oven mitts if you are grilling.) After about 10 minutes, when the bony side is browned, lower the heat to low or low, flip the chicken again and cook another 10 minutes, or until the skin is very crisp and brown.  Flip the chicken again and continue to grill until the thickest part of the chicken reaches 165 degrees when checked with a meat thermometer. Let it rest about 5 minutes before carving.  Since my timing was all screwed up, I can't guarantee how long it's going to take.. over and hour for sure...just keep an eye on it and use a meat thermometer.  If you are worried about under cooking it...roast it in the oven for about 30 minutes before you throw it on the grill.


Saturday, June 19, 2010

Family

That's my sister and I.  We were Luke and Leia for Halloween one year.  I loved being Luke Skywalker, but was quite bummed my mom made me wear my tennis shoes and a black belt.  Black belt?  I mean come on.. where was the white utility belt that I stole from the Storm Troopers???  Geez....... :)  Oh, what good memories of my youth.  What great memories of my sister and I growing up together.

Speaking of my sister.... she and my brother-in-law and my nephew just left.  They were here visiting from Nebraska.  I am so sad to see them go, but what a great time I had with them.  Funny how fast the week went by.  It feels like they just got here!  My nephew is growing up so fast... and boy can that kid hit the crap out of a baseball.  We went to a fun park yesterday ...which, by the way was kick ass because it was so dang hot, it was empty...we got to ride the go-karts and bumper boats and play put-put as much as we wanted because we were the only ones there!!  Then again, it was 104 yesterday too!!  They were troopers to be out in the heat and they never complained...anyway...my nephew got into the batting cages while we were there and he was hitting a medium pitch baseball...and he's only 11!!  He was smackin' that ball like a pro!!  Needless to say, Aunt Jenn was IMPRESSED!

My sister and I are completely different people and we use to fight like crazy...but growing up makes you understand each other a little better, I guess, because we didn't even annoy each other in the least bit!!  lol  Anyway...this is my rambling thought post for the month...I just needed it known that I love my family, I miss my family, and my family means the world to me.  Even though I am far away, they are never far from my heart.  I cherish every moment I have with them and am thankful that my sister and her family could have gone anywhere for their summer vacation and yet chose to spend it with me!  Life is good :)

Enjoy YOUR families today...and every day.  Make the most of every moment you have with them...oh, and don't forget to cook them up a little something because food is what brings us all together!!

Ciao!
Jenn

Friday, June 18, 2010

Super Fudgy Brownies

So now my job is going to make a liar out of me too!  This time I really did bake!!  I keep ranting about how I don't bake in the summer.. that I don't turn that damn oven on when it's 100+ degrees outside....blah blah blah she says as she now posts her 2nd baked goody recipe this summer! lol  Honestly, this time it was a must.  I volunteered to bake brownies for a surprise baby shower they were having for two of my fellow co-workers...so see, a must!  Really, the worse part about making these this time was that I started them at like 9pm... and since I forgot about the cooling time, I was up late that night.  I think I even over cooked them a tad a bit, but only because I just was too tired to pay attention...hey, at least I didn't fall asleep and burn them!!  lol  My sister fell asleep once while she was baking a cake.  You can draw your own conclusions on the outcome of that cake!! (Love you Sis!!)

Super Fudgy Brownies
Recipe courtesy of Martha Stewart 
Printable Recipe 
Ingredients:
8 tablespoons (1 stick) unsalted butter, cut into pieces, plus more for pan
1 cup all-purpose flour (spooned and leveled)
1/4 cup unsweetened cocoa powder
1/2 teaspoon baking powder
1/2 teaspoon salt
8 ounces semisweet or bittersweet chocolate, chopped
1 1/4 cups sugar
3 large eggs


Directions:
Preheat oven to 350 degrees. Brush a 9-inch square baking pan with butter. Line bottom and two sides with a strip of parchment paper, leaving a 2-inch overhang on the two sides. Butter paper, and set pan aside. In a small bowl, whisk flour, cocoa, baking powder, and salt; set aside.

Place butter and chocolate in a large heatproof bowl set over (not in) a saucepan of gently simmering water. Heat, stirring occasionally, until smooth, 2 to 3 minutes; remove bowl from pan. Add sugar; mix to combine. Add eggs, and mix to combine. Add flour mixture; mix just until moistened (do not overmix). Transfer batter to prepared pan; smooth top.

Bake until a toothpick inserted in center comes out with a few moist crumbs attached, 50 to 60 minutes (***Keep an eye on these, mine only went 45 minutes and they were a tad bit overcooked...for my taste at least). Cool in pan for 30 minutes. Using paper overhang, lift brownies out of pan; transfer to a rack to cool completely (still on paper). On a cutting board, using a dampened serrated knife, cut into 16 squares. Store in an airtight container at room temperature, up to 2 days.


Thursday, June 17, 2010

Zesty Grilled Fish

The original recipe for this was called Zesty Baked Catfish....so, one, you know you can bake this, you don't need to grill.  And two, you know that you can use a different type of fish, you don't have to follow "the same thing, the same thing, the same thing" like Chris and I.  Heck, you could even put this on chicken or pork instead of fish. Not only was this fish delicious, it was also really simple.  I'm going for simple and tasty more and more these days.  Most of the seasonings used are in your pantry as we speak..or as I write, I should say...and if they aren't, you should make a point to have these on hand.  They are all very versatile spices....and we all know how much I love versatile things :)

Zesty Grilled Fish
Adapted from Taste of Home, Simple & Delicious 
Printable Recipe 
Ingredients:
4 Tilapia fillets
1 teaspoon olive oil
1 teaspoon lemon juice
1 Tablespoon paprika
1 teaspoon dried tarragon
1 teaspoon dried basil
1 teaspoon pepper
1/2 teaspoon salt (I used kosher)
1/4 teaspoon cayenne pepper

Directions:
Combine the oil and lemon juice in a small bowl; brush over both sides of each fillet.  Combine remaining ingredients; sprinkle or rub over both sides of each fillet.  Place each fillet on a square of foil sprayed with non-stick spray.  Fold up sides to seal.  **To Bake: place fillets in a baking dish sprayed with non-stick spry.  Bake in a 400 degree preheated oven for 12-14 minutes, or until the fish flakes easily with a fork.**

Place foil packets on preheated grill (medium heat).  Grill for 12-14 minutes, turning at least once.  Carefully remove from grill and foil packets.  Enjoy!