It's getting pretty warm here. Summer is upon us and soon our evening/morning lows will only be about 90 degrees. I'm serious, once it starts registering over 105 consistently, day after day, our nights and mornings will be as warm, if not warmer, then most of your daily highs. Aaaahhhhh... it's the life of the city desert dweller, what can I say.
So, how do we beat the summer heat around here? With ice cream of course!!
I won't lie to you, not only could I eat pasta every day, but I could eat ice cream every day too. I can be bought with ice cream, by the way, just in case you are in need of something from me.
But, enough of me, let's talk ice cream. One of our favorite ice creams so far has been the Vanilla Ice Cream I posted last year. It was A-M-A-Z-I-N-G!!! But this one... I have to say, this base ice cream, was really, really, REALLY good. It gave the vanilla ice cream a run for it's money, that I can safely say. Then again, this one did rank a little higher in my book because of the Heath Bar pieces. I do love me some chocolate coated toffee in my vanilla ice cream.....put a little chocolate syrup on top and, well... I've said this before... BUT... Heaven!!!
Heath Bar Ice Cream
Adapted from Food.com
Printable Recipe
Ingredients:
1 (14oz) can sweetened condensed milk (NOT evaporated milk)
2 Tablespoons vanilla
2 cups half and half
2 cups whipping cream
30 miniature Heath candy bars, chopped
Directions:
Combine sweetened condensed milk, vanilla, half and half, and cream in a large bowl and mix well. Cover and chill for at least 2 hours.
Pour chilled cream mixture into a bowl of an ice cream maker and process according to manufactures directions. Add the chopped Heath bars in the last 5 minutes of churning. Scoop into plastic containers with a lid, seal, and freeze for a few hours before serving. Enjoy!
One Year Ago: Homemade Steak Sauce
Search This Blog
Thursday, May 19, 2011
Wednesday, May 18, 2011
Apple Butter Glazed Chicken
I think I may have told you before, but I'm not absolutely sure, so I will tell you again - I adore apple butter. When I was a kid, my mom would make her own and jar it. There was always apple butter in the fridge and my favorite thing to do with it was put it on toast. I even remember the day my mom handed me the very last jar of it. I was in college at the time and remember thinking how lucky I was to have the last of it. Then, in a short period of time, it was gone. A sad day, of course, and wouldn't you know, I couldn't find a commercially sold apple butter that could compare to my mom's.
Flash forward quite a few years to present time - Chris and I are at this small farmer's market and there, we just happen upon a booth with a gentleman selling ..... yep, you guessed it.... apple butter!! And not only was he selling apple butter, but, after properly taste testing it, he was selling an apple butter that could actually compare to mom's!!! (I said compare, not out do!!) Of course, I did the only thing I could do: I purchased a jar!!
Although I still love it on toast, I thought that I would try and incorporate it into some of my cooking too. What better way to use it then on wonderfully grilled chicken! This is a simple glaze that might sound a little odd, but trust me, it's tangy and sweet and delightful to the palate. A must try in my book!
Apple Butter Glazed Chicken
Created by Jenn's Food Journey
- Serves 2 -
Printable Recipe
Ingredients:
2 boneless, skinless chicken breasts
2 Tablespoons apple butter
1 teaspoon Dijon mustard
1/2 teaspoon low sodium soy sauce
garlic salt
pepper
Directions:
Rinse chicken and pat dry with paper towel and season with garlic salt and pepper on both sides. In a small bowl, mix together the apple butter, mustard and soy sauce until well combined. Evenly spread mixture over both sides of each piece of chicken. Place in refrigerator and let marinate for at least one hour (recommend 4).
Preheat grill to 375 degrees. Oil the grill grates. Place the chicken directly over the fire and grill 7-10 minutes per side (depending on thickness) or until the chicken registers 165 degrees F. Remove from grill and allow to rest for 3 minutes. Enjoy!
One Year Ago: Garlic Cheese Bread
Flash forward quite a few years to present time - Chris and I are at this small farmer's market and there, we just happen upon a booth with a gentleman selling ..... yep, you guessed it.... apple butter!! And not only was he selling apple butter, but, after properly taste testing it, he was selling an apple butter that could actually compare to mom's!!! (I said compare, not out do!!) Of course, I did the only thing I could do: I purchased a jar!!
Although I still love it on toast, I thought that I would try and incorporate it into some of my cooking too. What better way to use it then on wonderfully grilled chicken! This is a simple glaze that might sound a little odd, but trust me, it's tangy and sweet and delightful to the palate. A must try in my book!
Apple Butter Glazed Chicken
Created by Jenn's Food Journey
- Serves 2 -
Printable Recipe
Ingredients:
2 boneless, skinless chicken breasts
2 Tablespoons apple butter
1 teaspoon Dijon mustard
1/2 teaspoon low sodium soy sauce
garlic salt
pepper
Directions:
Rinse chicken and pat dry with paper towel and season with garlic salt and pepper on both sides. In a small bowl, mix together the apple butter, mustard and soy sauce until well combined. Evenly spread mixture over both sides of each piece of chicken. Place in refrigerator and let marinate for at least one hour (recommend 4).
Preheat grill to 375 degrees. Oil the grill grates. Place the chicken directly over the fire and grill 7-10 minutes per side (depending on thickness) or until the chicken registers 165 degrees F. Remove from grill and allow to rest for 3 minutes. Enjoy!
One Year Ago: Garlic Cheese Bread
Tuesday, May 17, 2011
Spaghetti with Red Pepper Almond Pesto and Grilled Chicken
As most of you know, I just recently went through a boss change. I wish I could tell you everything was going superbly, but alas, they are not and unfortunately, I am to blame for most of that. I can't stop myself. I can't stop myself from comparing him to my last boss. It's not fair to him, I know this. It's not fair to me, I know this. I feel like a petty little child. Like a kid who just got introduced to a step parent and immediately dislikes that person for no other reason then it's not their real parent. He's not my real boss!! But he is and I need to get over it. I'm hoping that announcing it out loud to you and everyone else that is reading this, that I will see how ridiculous I am being and I will snap out of this child-like state. This is not a pretty side of me, I will admit. I mean, it's not like I'm mean to the guy or anything, but I'm not my helpful outgoing self around him either. So, my pledge to me today is: I will NOT compare my new boss to my old boss....not even once.....today! There...it's been said.......on to the better side of me: Food!
I could tell you this was such a wonderful dish...and it was....but I say that about all pasta dishes. I love them all. I do not lie when I say I could eat pasta morning, noon, and night, seven days a week. Red sauce, white sauce, pestos, vinaigrettes. Top it however you feel fit. Eat it plain with butter and salt and pepper. Does not matter to me, I will eat it all day, thank you very much. So for me to tell you how wonderful this dish was, would sort of be a repeat of the last pasta recipe I shared with you. What I will tell you is this - Chris normally does not like "nuts" in his food, even crushed, but he did love this pesto. He claimed that the nuts made the dish, gave it depth and texture - think that sums it up nicely!
Spaghetti with Red Pepper Almond Pesto with Grilled Chicken
Adapted from America's Test Kitchen 30-Minute Suppers
Printable Recipe
Ingredients:
1 large chicken breast, grilled and sliced thin or cut into bite size pieces
1/4 cup almonds
1 garlic clove, skin removed and quartered
1 red bell pepper, roasted, skin, stem and seeds removed
1/3 cup shredded parmesan cheese
1/4 cup fresh basil
1 teaspoon lemon juice
6 Tablespoons extra-virgin olive oil
salt and pepper
1 pound spaghetti
Directions:
Cook pasta according to package directions. Drain, reserving 1/2 cup of the pasta water.
While the pasta cooks, add the almonds and garlic to the bowl of a food processor. Pulse until roughly chopped. Add the roasted red pepper and pulse until pepper is roughly chopped. Add the parmesan cheese, basil, and lemon juice. Pulse a few times. Now, with the processor running, slowly add the olive oil until incorporated. Season with salt and pepper. Add the chicken and pesto to the drained pasta and toss to combine. Add reserved pasta water as needed to thin out the sauce. Season again with salt and pepper and serve warm. Enjoy!
One Year Ago: Pasta Carbonara
I could tell you this was such a wonderful dish...and it was....but I say that about all pasta dishes. I love them all. I do not lie when I say I could eat pasta morning, noon, and night, seven days a week. Red sauce, white sauce, pestos, vinaigrettes. Top it however you feel fit. Eat it plain with butter and salt and pepper. Does not matter to me, I will eat it all day, thank you very much. So for me to tell you how wonderful this dish was, would sort of be a repeat of the last pasta recipe I shared with you. What I will tell you is this - Chris normally does not like "nuts" in his food, even crushed, but he did love this pesto. He claimed that the nuts made the dish, gave it depth and texture - think that sums it up nicely!
Spaghetti with Red Pepper Almond Pesto with Grilled Chicken
Adapted from America's Test Kitchen 30-Minute Suppers
Printable Recipe
Ingredients:
1 large chicken breast, grilled and sliced thin or cut into bite size pieces
1/4 cup almonds
1 garlic clove, skin removed and quartered
1 red bell pepper, roasted, skin, stem and seeds removed
1/3 cup shredded parmesan cheese
1/4 cup fresh basil
1 teaspoon lemon juice
6 Tablespoons extra-virgin olive oil
salt and pepper
1 pound spaghetti
Directions:
Cook pasta according to package directions. Drain, reserving 1/2 cup of the pasta water.
While the pasta cooks, add the almonds and garlic to the bowl of a food processor. Pulse until roughly chopped. Add the roasted red pepper and pulse until pepper is roughly chopped. Add the parmesan cheese, basil, and lemon juice. Pulse a few times. Now, with the processor running, slowly add the olive oil until incorporated. Season with salt and pepper. Add the chicken and pesto to the drained pasta and toss to combine. Add reserved pasta water as needed to thin out the sauce. Season again with salt and pepper and serve warm. Enjoy!
One Year Ago: Pasta Carbonara
Monday, May 16, 2011
General Tso's Chicken - My Way
So here's something you should know about me, I love Asian foods. What? That surprises you? Well it shouldn't....ok so here's another surprise - I secretly love fast food Chinese cuisines. Ok, it's not a secret really, but it is true! Now I know I told you just recently that I adore orange chicken. I also love, love, love kung pao chicken. Another of my top picks...General Tso's Chicken. I try very hard not to order it when I go out as it's usually just deep friend chunks of chicken and that is it. Well, folks, you know I've got to find a way to enjoy that flavor at home but without all those extra (yet oh so wonderful) fried fat calories, so I found a recipe for General Tso's chicken and tweaked it ever so slightly.
I wouldn't say that this was the best duplication of this delicious dish, but it is still really good. Frickin' delicious if you ask me. Yes, it would have been better if the chunks of chicken had a nice breading for the sauce to stick to, but honestly, I didn't miss it at all.
General Tso's Chicken - My Way
Adapted from America's Test Kitchen Best-Ever Recipes
Printable Recipe
Ingredients:
Velveting Marinade -
1/4 teaspoon kosher salt
1 Tablespoon chicken stock or white wine
1 egg white
1 Tablespoon cornstarch
1 Tablespoon oil
For the Sauce -
1/2 cup Hoisin sauce
1/4 cup white vinegar
3 Tablespoons low sodium soy sauce
3 Tablespoons granulated sugar
2 Tablespoons cornstarch
1/2 cup water or chicken broth (plus any additional for thinning out the sauce if needed)
1 garlic clove, minced
1/4 teaspoon ground ginger
1/2 teaspoon red pepper flakes
1 lbs chicken (I used boneless, skinless breasts), cut into 1-inch pieces
Directions:
Place the cut up meat in a large bowl. Sprinkle with salt and add chicken stock, stirring to combine. Add the egg white and gently mix to coat each piece of chicken making sure not to froth the egg. Sprinkle in the cornstarch and toss to coat. Add the oil and stir one last time. Let the meat marinate for 30 minutes.
In a small bowl, mix together all the ingredients except the chicken; set aside.
When the chicken is done marinating; bring a pot of water with one tablespoon of oil to a boil. Once it starts to boil, lower the heat to maintain a very gentle simmer. Scatter in the marinated chicken, stir to separate and keep stirring gently until the coating turns white. Remove the chicken pieces quickly, with a slotted spoon or strainer. Set chicken aside.
In a wok or large, deep skillet, heat 1 Tablespoon of oil over medium high heat. Add the chicken and cook, stirring every 15-20 seconds, until chicken is no longer pink. Add the sauce and turn the heat down to medium. Simmer until sauce thickens, stirring to coat chicken in sauce. Serve over steamed rice and vegetables. Enjoy!
One Year Ago: Pork Chops with Carolina Rub
I wouldn't say that this was the best duplication of this delicious dish, but it is still really good. Frickin' delicious if you ask me. Yes, it would have been better if the chunks of chicken had a nice breading for the sauce to stick to, but honestly, I didn't miss it at all.
General Tso's Chicken - My Way
Adapted from America's Test Kitchen Best-Ever Recipes
Printable Recipe
Ingredients:
Velveting Marinade -
1/4 teaspoon kosher salt
1 Tablespoon chicken stock or white wine
1 egg white
1 Tablespoon cornstarch
1 Tablespoon oil
For the Sauce -
1/2 cup Hoisin sauce
1/4 cup white vinegar
3 Tablespoons low sodium soy sauce
3 Tablespoons granulated sugar
2 Tablespoons cornstarch
1/2 cup water or chicken broth (plus any additional for thinning out the sauce if needed)
1 garlic clove, minced
1/4 teaspoon ground ginger
1/2 teaspoon red pepper flakes
1 lbs chicken (I used boneless, skinless breasts), cut into 1-inch pieces
Directions:
Place the cut up meat in a large bowl. Sprinkle with salt and add chicken stock, stirring to combine. Add the egg white and gently mix to coat each piece of chicken making sure not to froth the egg. Sprinkle in the cornstarch and toss to coat. Add the oil and stir one last time. Let the meat marinate for 30 minutes.
In a small bowl, mix together all the ingredients except the chicken; set aside.
When the chicken is done marinating; bring a pot of water with one tablespoon of oil to a boil. Once it starts to boil, lower the heat to maintain a very gentle simmer. Scatter in the marinated chicken, stir to separate and keep stirring gently until the coating turns white. Remove the chicken pieces quickly, with a slotted spoon or strainer. Set chicken aside.
In a wok or large, deep skillet, heat 1 Tablespoon of oil over medium high heat. Add the chicken and cook, stirring every 15-20 seconds, until chicken is no longer pink. Add the sauce and turn the heat down to medium. Simmer until sauce thickens, stirring to coat chicken in sauce. Serve over steamed rice and vegetables. Enjoy!
One Year Ago: Pork Chops with Carolina Rub
Friday, May 13, 2011
Chinese Barbecued Pork
When I first moved to Arizona, a group of friends and I would go to this Asian noodle place every other Sunday. One of my favorite things to order was the Barbecued Pork. It was a simple dish...consisting of only the barbecued pork and rice. But this pork was no ordinary pork. No, not even close. It was tender, it was chewy, it was sweet, it was sticky, it was AMAZING! When I happened to stumble across this recipe from America's Test Kitchen, I knew I had to try it. I have not always had the best of luck with ATK recipes in the past, but lately, they have really been spot on. This one was no different. This was the perfect recreation of the dish I so fondly remember. It was tender, it was sweet, it was sticky, it was AMAZING! So even if you have never experienced barbecued pork from an Asian restaurant like I have, I believe you will still completely fall in love with this recipe. This was one of those dinners where no words were spoken as the food was just so good, nothing really needed to be said :)
Chinese Barbecued Pork
Adapted from America's Test Kitchen Best-Ever Recipes Collection
Printable Recipe
Ingredients:
2 lbs boneless pork shoulder roast cut into strips and excess fat removed
1/4 cup granulated sugar
1/4 cup low sodium soy sauce
3 Tablespoons Hoisin sauce
2 Tablespoons rice vinegar
1/4 teaspoon pepper
1/2 teaspoon five-spice powder
1 teaspoon sesame oil
1/4 teaspoon ground ginger
1 garlic clover, finely minced
2 Tablespoons ketchup
3 Tablespoons honey
Directions:
Prick the pork with a fork about 10 to 12 times on each side. Place the pork in a large zipper lock bag. Combine the sugar, soy, hoisin, rice vinegar, pepper, five-spice, sesame oil, ginger and garlic in a medium bowl. Measure out 1/4 cup of the marinade and set aside. Pour the remaining marinade into the bag with the pork. Press out as much air as possible; seal the bag. Refrigerate for at 30 minutes or up to 4 hours (recommend 4 or more for best results).
Meanwhile, combine the ketchup and hone with the reserved marinade in a small saucepan. Cook the glaze over medium heat until thickened, about 4 to 6 minutes.
Adjust an oven rack to the middle position and heat the oven to 300 degrees. Line a rimmed baking sheet with foil and set a wire rack in the pan; spray the foil and the rack with nonstick cooking spray.
Remove the pork from the marinade, letting any excess drip off, and place it on the wire rack. Pour 1/4 cup water into the bottom of the pan. Cover the pan with heavy-duty foil, crimping the edges tightly to seal. Cook the pork for 20 minutes. Remove the foil and continue to cook until the edges of the pork begin to brown, 40 to 45 minutes.
Turn on the broiler. Broil the pork until evenly caramelized, 7 to 9 minutes. Remove the pan from the oven and brush the pork with half of the glaze; broil until deep mahogany color, 3 to 5 minutes. Flip the meat and broil until the other side caramelizes, 7 to 9 minutes. Brush the meat with the remaining glaze and continue to broil until the second side is deep mahogany, 3 to 5 minutes. Cool for at least 8 minutes then cut into thin strips and serve. Enjoy!
One Year Ago: Vanilla Ice Cream
Chinese Barbecued Pork
Adapted from America's Test Kitchen Best-Ever Recipes Collection
Printable Recipe
Ingredients:
2 lbs boneless pork shoulder roast cut into strips and excess fat removed
1/4 cup granulated sugar
1/4 cup low sodium soy sauce
3 Tablespoons Hoisin sauce
2 Tablespoons rice vinegar
1/4 teaspoon pepper
1/2 teaspoon five-spice powder
1 teaspoon sesame oil
1/4 teaspoon ground ginger
1 garlic clover, finely minced
2 Tablespoons ketchup
3 Tablespoons honey
Directions:
Prick the pork with a fork about 10 to 12 times on each side. Place the pork in a large zipper lock bag. Combine the sugar, soy, hoisin, rice vinegar, pepper, five-spice, sesame oil, ginger and garlic in a medium bowl. Measure out 1/4 cup of the marinade and set aside. Pour the remaining marinade into the bag with the pork. Press out as much air as possible; seal the bag. Refrigerate for at 30 minutes or up to 4 hours (recommend 4 or more for best results).
Meanwhile, combine the ketchup and hone with the reserved marinade in a small saucepan. Cook the glaze over medium heat until thickened, about 4 to 6 minutes.
Adjust an oven rack to the middle position and heat the oven to 300 degrees. Line a rimmed baking sheet with foil and set a wire rack in the pan; spray the foil and the rack with nonstick cooking spray.
Remove the pork from the marinade, letting any excess drip off, and place it on the wire rack. Pour 1/4 cup water into the bottom of the pan. Cover the pan with heavy-duty foil, crimping the edges tightly to seal. Cook the pork for 20 minutes. Remove the foil and continue to cook until the edges of the pork begin to brown, 40 to 45 minutes.
Turn on the broiler. Broil the pork until evenly caramelized, 7 to 9 minutes. Remove the pan from the oven and brush the pork with half of the glaze; broil until deep mahogany color, 3 to 5 minutes. Flip the meat and broil until the other side caramelizes, 7 to 9 minutes. Brush the meat with the remaining glaze and continue to broil until the second side is deep mahogany, 3 to 5 minutes. Cool for at least 8 minutes then cut into thin strips and serve. Enjoy!
One Year Ago: Vanilla Ice Cream
Thursday, May 12, 2011
Tilapia Dynomite
Ma, what's for dinner? Well, let me tell you.. this KICK AS....err.....butt fish is what's for dinner. But seriously, have you visited Ma What's for Dinner? website? If not, go there....especially if you have children. Alex will give you all sorts of pointers on how to get your picky eaters to not only eat different foods, but to help you in the cooking process. I love her picky eater pointers... some of them even work with my picky eater :)
Alex claims she has an unhealthy addiction to sushi. I think I could safely say the same thing. Other than price, the biggest thing that keeps me from eating it more than I do is the fact that Chris does not like it. And, although, he always says we can go have sushi anytime, it's hard to take someone to a restaurant when you know they are not going to enjoy it. I'd rather just wait and go with my friends who enjoy it as much as I do. So, when I saw Alex's recipe for Salmon Dynomite, I thought.. YES! I can have the same flavors as one of my favorite sushi items and still please Chris with something he will enjoy just as much! Sometimes compromise is good :)
Tilapia Dynomite
Adapted from Alex aka Ma, What's for Dinner?
Printable Recipe
Ingredients:
1/4 cup mayonnaise
1/4 teaspoon sesame oil
1/2 Tablespoon mirin (Japanese rice wine)
1 Tablespoon Sriracha
4 tilapia fillets
Directions:
Preheat your oven to 400 degrees. Spray a baking dish with non-stick cooking spray. Rinse the tilapia and pat dry; place in prepared pan.
In a small bowl mix together the mayo, sesame oil, mirin, and Sriracha until smooth. Spread half of the mixture evenly over each fillet. Place baking dish in oven and cook for 6 minutes. Remove from oven and carefully spread remaining mixture over each fillet. Returned to oven and continue to bake another 7 minutes or until the fish flakes easily with a fork. Enjoy!
One Year Ago: Tilapia in Olive Oil and Garlic
Alex claims she has an unhealthy addiction to sushi. I think I could safely say the same thing. Other than price, the biggest thing that keeps me from eating it more than I do is the fact that Chris does not like it. And, although, he always says we can go have sushi anytime, it's hard to take someone to a restaurant when you know they are not going to enjoy it. I'd rather just wait and go with my friends who enjoy it as much as I do. So, when I saw Alex's recipe for Salmon Dynomite, I thought.. YES! I can have the same flavors as one of my favorite sushi items and still please Chris with something he will enjoy just as much! Sometimes compromise is good :)
Tilapia Dynomite
Adapted from Alex aka Ma, What's for Dinner?
Printable Recipe
Ingredients:
1/4 cup mayonnaise
1/4 teaspoon sesame oil
1/2 Tablespoon mirin (Japanese rice wine)
1 Tablespoon Sriracha
4 tilapia fillets
Directions:
Preheat your oven to 400 degrees. Spray a baking dish with non-stick cooking spray. Rinse the tilapia and pat dry; place in prepared pan.
In a small bowl mix together the mayo, sesame oil, mirin, and Sriracha until smooth. Spread half of the mixture evenly over each fillet. Place baking dish in oven and cook for 6 minutes. Remove from oven and carefully spread remaining mixture over each fillet. Returned to oven and continue to bake another 7 minutes or until the fish flakes easily with a fork. Enjoy!
One Year Ago: Tilapia in Olive Oil and Garlic
Wednesday, May 11, 2011
Super Spicy Chili Mac
I don't know if I would call this SUPER spicy, but it definitely was spicy! Now I say that knowing that I have a pretty high tolerance for heat. My mouth was a tiny bit fiery by the time we were done, but not so much that I couldn't enjoy it. So if you make this, I'm giving you the warning now...if you don't like super spicy, stay away from this recipe... well, no, that's not right....just don't add any chipotles to the dish and you'll be just fine!
This recipe reminds me a lot of one of Chris and I's favorite dishes, Hamburger Buddy. It's made in almost the same way, but believe me, they are definitely different. Believe me also when I say, both are worth trying.......you will not be sorry!
Super Spicy Chili Mac
Adapted from America's Test Kitchen 30-Minute Suppers
Printable Recipe
Ingredients:
1 lbs 93% lean ground beef
1/2 sweet onion, finely chopped
1 red bell pepper, seeded and finely chopped
2 garlic cloves, finely minced
2 chipotle peppers packed in adobo sauce, finely chopped - Plus 1 Tablespoon adobo sauce
2 cups elbow macaroni (I used whole grain)
2 cups beef broth
1 cup water
4 Roma tomatoes, seeded and chopped
1 cup shredded pepper jack cheese
salt and pepper to taste
Directions:
Cook beef over medium-high heat in a Dutch oven or large, deep skillet with a lid, about 3 minutes. Add the onion and cook another 3 minutes. Add the bell pepper and cook until softened, about 5 more minutes. Stir in garlic and chipotles and cook until fragrant, about 30 seconds.
Add the broth, water, adobo sauce, and macaroni to the pot and bring to a boil. Reduce heat to low, cover, and allow to simmer for 8-10 minutes or until the pasta is cooked through, stirring occasionally. Add the cheese and stir until melted and incorporated. Stir in the tomatoes and season with salt and pepper. Serve with warm crusty bread and enjoy!
One Year Ago: Grilled Chicken and Veggie Pasta
This recipe reminds me a lot of one of Chris and I's favorite dishes, Hamburger Buddy. It's made in almost the same way, but believe me, they are definitely different. Believe me also when I say, both are worth trying.......you will not be sorry!
Super Spicy Chili Mac
Adapted from America's Test Kitchen 30-Minute Suppers
Printable Recipe
Ingredients:
1 lbs 93% lean ground beef
1/2 sweet onion, finely chopped
1 red bell pepper, seeded and finely chopped
2 garlic cloves, finely minced
2 chipotle peppers packed in adobo sauce, finely chopped - Plus 1 Tablespoon adobo sauce
2 cups elbow macaroni (I used whole grain)
2 cups beef broth
1 cup water
4 Roma tomatoes, seeded and chopped
1 cup shredded pepper jack cheese
salt and pepper to taste
Directions:
Cook beef over medium-high heat in a Dutch oven or large, deep skillet with a lid, about 3 minutes. Add the onion and cook another 3 minutes. Add the bell pepper and cook until softened, about 5 more minutes. Stir in garlic and chipotles and cook until fragrant, about 30 seconds.
Add the broth, water, adobo sauce, and macaroni to the pot and bring to a boil. Reduce heat to low, cover, and allow to simmer for 8-10 minutes or until the pasta is cooked through, stirring occasionally. Add the cheese and stir until melted and incorporated. Stir in the tomatoes and season with salt and pepper. Serve with warm crusty bread and enjoy!
One Year Ago: Grilled Chicken and Veggie Pasta
Tuesday, May 10, 2011
Mustard and Herb Rubbed Sirloin Tip Roast
I must first say HAPPY BIRTHDAY to my nephew Connor!! I hope you have a fantastic day. Wish I could be there to help you celebrate, but know that I love and miss you dearly!! Enjoy your day kiddo!!! xoxoxoxo
Chris and I didn't have plans for Easter, but I still wanted to make special/different. I'm not a huge ham fan.. I like it, but I really have to be in the mood for it, and I of course, was not in the mood for it. Chris is not a fan of lamb, he wants it cooked until it's dead and then he wants it cooked for about 10 minutes more. It's tough and not very good when it's cooked that way, so he won't eat lamb. My next idea was a herb crusted beef tenderloin, but than I got to the store and that idea was squashed due to no beef tenderloins. What's a girl to do? Well, in this case, this girl grab what she thought might be the next best thing - a sirloin tip roast. Why not? It was cheap, it was there, I needed something for dinner... SOLD!
I will admit, this was a bit too done for me, but I wanted to try grilling it as a full roast and unfortunately, Chris likes his beef done much more then I do. The great thing was, even at a medium well to well done, the roast was fantastic. It was still tender and very flavorful. It was the perfect Easter dinner for the two of us :)
Mustard and Herb Rubbed Sirloin Tip Roast
Created by Jenn's Food Journey
Printable Recipe
Ingredients:
5 garlic cloves
1/4 cup fresh parsley
3 sprigs rosemary, leaves removed
2 Tablespoons Dijon mustard
2 Tablespoons olive oil
1 Tablespoon lemon juice
1 1/2 - 2 lbs boneless sirloin tip roast
Directions:
Place the garlic cloves into a bowl of a food processor. Pulse a few times to break up the garlic. Add the parsley, rosemary leaves, Dijon, olive oil and lemon juice. Pulse until smooth. Rub the mixture all over the roast. Place on a plate and loosely cover with plastic wrap. Let marinate in the refrigerator for at least 4-6 hours.
Preheat the grill to 400 degrees. Place the roast directly over the flame and allow to cook for 30-40 minutes - flipping every 10 minutes to get all sides of the roast crusted. Remove from grill and wrap in foil. Place back on the grill and use the indirect heat method. For a propane grill turn on the side burners only and keep the temp in the grill about 325 degrees. For a charcoal grill, move the coals to one side of the grill and place the foil on the opposite side. Allow to cook with indirect heat for another 15-30 minutes depending on how done you want it. I let mine go 30 minutes and you can see how done it is. Remove from the grill, allow to rest for 5 minutes, slicing against the grain. (the sauce you see in the picture is some left over white bbq sauce from the Alabama Barbecue Chicken I made.) Enjoy!
One Year Ago: Bloody Mary Steaks and The Winner!!
Chris and I didn't have plans for Easter, but I still wanted to make special/different. I'm not a huge ham fan.. I like it, but I really have to be in the mood for it, and I of course, was not in the mood for it. Chris is not a fan of lamb, he wants it cooked until it's dead and then he wants it cooked for about 10 minutes more. It's tough and not very good when it's cooked that way, so he won't eat lamb. My next idea was a herb crusted beef tenderloin, but than I got to the store and that idea was squashed due to no beef tenderloins. What's a girl to do? Well, in this case, this girl grab what she thought might be the next best thing - a sirloin tip roast. Why not? It was cheap, it was there, I needed something for dinner... SOLD!
I will admit, this was a bit too done for me, but I wanted to try grilling it as a full roast and unfortunately, Chris likes his beef done much more then I do. The great thing was, even at a medium well to well done, the roast was fantastic. It was still tender and very flavorful. It was the perfect Easter dinner for the two of us :)
Mustard and Herb Rubbed Sirloin Tip Roast
Created by Jenn's Food Journey
Printable Recipe
Ingredients:
5 garlic cloves
1/4 cup fresh parsley
3 sprigs rosemary, leaves removed
2 Tablespoons Dijon mustard
2 Tablespoons olive oil
1 Tablespoon lemon juice
1 1/2 - 2 lbs boneless sirloin tip roast
Directions:
Place the garlic cloves into a bowl of a food processor. Pulse a few times to break up the garlic. Add the parsley, rosemary leaves, Dijon, olive oil and lemon juice. Pulse until smooth. Rub the mixture all over the roast. Place on a plate and loosely cover with plastic wrap. Let marinate in the refrigerator for at least 4-6 hours.
Preheat the grill to 400 degrees. Place the roast directly over the flame and allow to cook for 30-40 minutes - flipping every 10 minutes to get all sides of the roast crusted. Remove from grill and wrap in foil. Place back on the grill and use the indirect heat method. For a propane grill turn on the side burners only and keep the temp in the grill about 325 degrees. For a charcoal grill, move the coals to one side of the grill and place the foil on the opposite side. Allow to cook with indirect heat for another 15-30 minutes depending on how done you want it. I let mine go 30 minutes and you can see how done it is. Remove from the grill, allow to rest for 5 minutes, slicing against the grain. (the sauce you see in the picture is some left over white bbq sauce from the Alabama Barbecue Chicken I made.) Enjoy!
One Year Ago: Bloody Mary Steaks and The Winner!!
Monday, May 9, 2011
Orange Honey Grilled Chicken
YAY! I made it through last week! It was touch and go there for a little while, but I made it. I worked a ton of extra hours, had some emotional ups and downs, but alas... here I am, another week and I'm ready to go :) One good thing that did happen - they hired a replacement for my boss. How do I feel about my new boss? I don't know. It's hard to tell until we actually start working together and that will happen today......so I'll keep you updated. I'm hoping for only the best, but of course am still worried. I mean, what if he's an ass?? I wonder if I can sweet talk him with some homemade goodies? Hmmmm... sucking up... now that's a thought :)
Anyway, on with the food!!!
Simple. I hate to keep using that word over and over again, but I can't help myself. I love sharing recipes with you that take little to no time in the kitchen. Even though I love to cook there are nights where the task seems incredibly daunting. This is a meal you can make in under 30 minutes if you marinated the chicken the night before. Add a wonderful side salad and some bread and you have the perfect light weeknight meal.
Orange Honey Grilled Chicken
Created by Jenn's Food Journey
Printable Recipe
Ingredients:
1 lbs chicken - breasts, thighs - skin on, skin off - bone in, no bone - it's your choice
1/2 cup orange marmalade
1/4 cup honey
1 Tablespoon low sodium soy sauce
1 Tablespoon orange juice
1 teaspoon red pepper flakes
Directions:
In a bowl, mix together all the ingredients except the chicken. Rinse the chicken and pat dry. Place chicken in a shallow dish or a resealable bag and pour the marinade over it. Seal and place in fridge over night (minimum hours to marinate = 4).
When ready to grill chicken. Preheat grill to 375 degrees F. Oil grill grates. Place the chicken directly on the grates and cook for 6-8 minutes per side or until the chicken is cooked through. Remove from grill and allow to rest for 3-5 minutes before cutting into. Enjoy!
One Year Ago: Grilled Potato Rounds
Anyway, on with the food!!!
Simple. I hate to keep using that word over and over again, but I can't help myself. I love sharing recipes with you that take little to no time in the kitchen. Even though I love to cook there are nights where the task seems incredibly daunting. This is a meal you can make in under 30 minutes if you marinated the chicken the night before. Add a wonderful side salad and some bread and you have the perfect light weeknight meal.
Orange Honey Grilled Chicken
Created by Jenn's Food Journey
Printable Recipe
Ingredients:
1 lbs chicken - breasts, thighs - skin on, skin off - bone in, no bone - it's your choice
1/2 cup orange marmalade
1/4 cup honey
1 Tablespoon low sodium soy sauce
1 Tablespoon orange juice
1 teaspoon red pepper flakes
Directions:
In a bowl, mix together all the ingredients except the chicken. Rinse the chicken and pat dry. Place chicken in a shallow dish or a resealable bag and pour the marinade over it. Seal and place in fridge over night (minimum hours to marinate = 4).
When ready to grill chicken. Preheat grill to 375 degrees F. Oil grill grates. Place the chicken directly on the grates and cook for 6-8 minutes per side or until the chicken is cooked through. Remove from grill and allow to rest for 3-5 minutes before cutting into. Enjoy!
One Year Ago: Grilled Potato Rounds
Saturday, May 7, 2011
A Tribute to My Mom
"Mother is the word for God on the hearts and lips of all little children" - William Makepeace Thackeray
I first heard that quote in the movie, The Crow, with Brandon Lee. Well it wasn't that exact quote, they switched some words around and left out little, but the meaning was still the same. To most children, our mother is truly what we believe God to be: All caring, all knowing. My mother was that to me.
As I got older, I can't say that I always felt that way. But those were times when I was a stupid kid who thought she knew everything. How could my mother possibly understand what it was like to be a teenager? I mean really....who did she think she was, right? lol Good thing for me, I have greatly matured since those days. Today, I can honestly say that I am proud to call my mother my friend.
So, for the woman who took care of all of us when we were sick, even though she was just as sick. For the woman who rode backwards in a car (ugh, she does not like that all), on the curvy roads of Needles highway, holding coffee cans while her two daughters let their motion sickness get the better of them. For the woman who, still to this day, slaves for two days to make her most amazing homemade taco shells because she knows it's a family favorite. For the woman who taught me to be proud of who I am. For the woman who allowed me to live through those pesky teenage (and a little beyond, let's be honest) years. For the woman who taught me all about unconditional love....
I give you all I can give from so far away.....my love and my gratitude for all that you have done and continue to do for me. Thank you from the bottom of my heart, without you I would not be the woman I am today.
I first heard that quote in the movie, The Crow, with Brandon Lee. Well it wasn't that exact quote, they switched some words around and left out little, but the meaning was still the same. To most children, our mother is truly what we believe God to be: All caring, all knowing. My mother was that to me.
As I got older, I can't say that I always felt that way. But those were times when I was a stupid kid who thought she knew everything. How could my mother possibly understand what it was like to be a teenager? I mean really....who did she think she was, right? lol Good thing for me, I have greatly matured since those days. Today, I can honestly say that I am proud to call my mother my friend.
So, for the woman who took care of all of us when we were sick, even though she was just as sick. For the woman who rode backwards in a car (ugh, she does not like that all), on the curvy roads of Needles highway, holding coffee cans while her two daughters let their motion sickness get the better of them. For the woman who, still to this day, slaves for two days to make her most amazing homemade taco shells because she knows it's a family favorite. For the woman who taught me to be proud of who I am. For the woman who allowed me to live through those pesky teenage (and a little beyond, let's be honest) years. For the woman who taught me all about unconditional love....
I give you all I can give from so far away.....my love and my gratitude for all that you have done and continue to do for me. Thank you from the bottom of my heart, without you I would not be the woman I am today.
Happy Mother's Day, Mom! Love and miss you bunches! xoxoxo
Friday, May 6, 2011
Guest Blogger: Smoked Tri Tip and Brisket
Once again, I'm truly honored to introduce today's guest blogger. There are definitely blogs out there that make me go....wow, I wish I would be daring enough to do stuff like that! And Larry's blog, Big Dude's Electric Ramblings, is one of those for sure. He just recently posted instructional recipes on how to make (I'm talking stuffing people!!) your own sausage. See, it's things like that, that make me go, dang, I need to be more adventurous in my kitchen!! But alas, my fears hold me back, but I do get to live vicariously through others, thanks to the internet...and I'm ok with that! AND, he has one of the most beautiful yards/grounds I've seen!
So, let's let Larry take us on a wonderful instructional journey on how to smoke tri tip and brisket... YUM!!! And of course, since I have a guest, you know where I am... so make sure you come check out my Fire Day Friday post. Today's recipe: Steak Sandwiches with Chimichurri Mayo
Let me begin by saying how flattered I am that Jenn would invite me to do a guest post on her terrific blog. She is a serious grill-meister and great all around cook. Right after she asked me, it was my normal BBQ day and I thought a post about smoking would work well - I BBQ at least once a month and cook for friends and family as well as myself.
I really enjoyed reading about Kingsford's Barbecue University on the blogs of Chris at Nibble me This and Robyn at Grill Grrrl. One that really stuck out on Robyn's blog was Chris Lily's brisket recipe.
My normal method is to brush on a coat of Worcestershire sauce then rub with Billy Bones Beefmaster, but I was out of it and wanted to give Lily's a try. I tripled everything and used it on two whole briskets.
This is as posted by Robyn
Ingredients:
1 beef brisket FLAT (5-6 pounds)
1 Tablespoon beef bullion base (look in your soup stock aisle at the grocery store)
1 cup bee broth
Dry Rub Recipe:
1/2 tblsp salt
1/2 tblsp paprika
1/2 tblsp black pepper
1/2 tblsp sugar
1/2 teaspoon garlic
1/2 teaspoon onion powder
1/4 teaspoon oregano
1/8 teaspoon ground coriander
Directions:
I mixed the beef base with a little hot water to make it easier to run on the meat and I did it the night before the cook. On cooking day, I removed the briskets from the fridge an hour before cooking while the smoker was coming up to temp. About 30 minutes prior to cooking I added the dry rub then put them into the cooker at 225 degrees (forgot to take a photo - it was 5:30AM after all).
I cooked them to an internal temp of 170 degrees, then put them in a foil pan, poured over a cup of homemade beef broth, covered it with foil, and returned to the smoker.
When they got to 190 degrees, I removed them from the foil pan, wrapped tightly with foil and rested for about 30 minutes. One cooked in 10 hours and the other took a little over 11 hours.
For the Tri Tip, I once again used the basic process from John over at Patio Daddio.
Ingredients:
1 Tri-tip roast (2-3 pounds)
2 Tbsp Worcestershire Sauce
2 Tbsp Montreal Steak Seasoning
1 Tbsp Plain yellow mustard
2 tsp Chili powder
2 tsp Beef base
1/2 tsp Garlic salt
Method:
I combined all of the ingredients, except the Montreal Steak Seasoning, in a small mixing bowl, mixed it well, rubbed it all over the pre-trimmed roast, and put in a plastic bag to get happy for 8 hours.
I removed it from the fridge an hour prior to cooking and just prior to putting it in the smoker, I added a medium coating of the steak seasoning -it was a little salty so I'll go lighter next time.
I cooked it to an internal temp of 125 degrees, removed it from the smoker and since it was done too early, I stuck it in a preheated cooler - I gave it 2 1/2 hours to cook, but it only took 1 1/2 hours.
When ready to eat, I took it to the grill and cooked it over high heat for about 5 minutes per side to add a crust - since it had been resting for an hour, no need to rest again.
Here's both pieces of meat before and after carving.
And my plate which included a salad, mostly from our garden, and some sauteed cremini mushrooms that need to be used.
The brisket was moist, tender, and tasty and I definitely prefer this cooking method, but without a side by side taste test, I couldn't say I preferred it to my normal. I cooked the tri tip 5 degrees more than normal and it came out closer to medium than medium rare - perfect for Bev, but a little too done for me. It was also moist, tender and the flavor was excellent - I think using the grill for crust addition worked out very well. This was only the third time I'd cooked tri tip and the first time to smoke then grill, but it's just the reverse sear I used for other beef cuts.
I'd say a pretty darn good meal and I would have gladly served it to special company with perhaps the addition of a carb. Have a great day and please stop by my blog at http://bigdudesramblings.blospot.com/ sometime. Larry.
One Year Ago: Penne with Beef & Bell Pepper
So, let's let Larry take us on a wonderful instructional journey on how to smoke tri tip and brisket... YUM!!! And of course, since I have a guest, you know where I am... so make sure you come check out my Fire Day Friday post. Today's recipe: Steak Sandwiches with Chimichurri Mayo
Let me begin by saying how flattered I am that Jenn would invite me to do a guest post on her terrific blog. She is a serious grill-meister and great all around cook. Right after she asked me, it was my normal BBQ day and I thought a post about smoking would work well - I BBQ at least once a month and cook for friends and family as well as myself.
I really enjoyed reading about Kingsford's Barbecue University on the blogs of Chris at Nibble me This and Robyn at Grill Grrrl. One that really stuck out on Robyn's blog was Chris Lily's brisket recipe.
My normal method is to brush on a coat of Worcestershire sauce then rub with Billy Bones Beefmaster, but I was out of it and wanted to give Lily's a try. I tripled everything and used it on two whole briskets.
This is as posted by Robyn
Ingredients:
1 beef brisket FLAT (5-6 pounds)
1 Tablespoon beef bullion base (look in your soup stock aisle at the grocery store)
1 cup bee broth
Dry Rub Recipe:
1/2 tblsp salt
1/2 tblsp paprika
1/2 tblsp black pepper
1/2 tblsp sugar
1/2 teaspoon garlic
1/2 teaspoon onion powder
1/4 teaspoon oregano
1/8 teaspoon ground coriander
Directions:
I mixed the beef base with a little hot water to make it easier to run on the meat and I did it the night before the cook. On cooking day, I removed the briskets from the fridge an hour before cooking while the smoker was coming up to temp. About 30 minutes prior to cooking I added the dry rub then put them into the cooker at 225 degrees (forgot to take a photo - it was 5:30AM after all).
I cooked them to an internal temp of 170 degrees, then put them in a foil pan, poured over a cup of homemade beef broth, covered it with foil, and returned to the smoker.
When they got to 190 degrees, I removed them from the foil pan, wrapped tightly with foil and rested for about 30 minutes. One cooked in 10 hours and the other took a little over 11 hours.
For the Tri Tip, I once again used the basic process from John over at Patio Daddio.
Ingredients:
1 Tri-tip roast (2-3 pounds)
2 Tbsp Worcestershire Sauce
2 Tbsp Montreal Steak Seasoning
1 Tbsp Plain yellow mustard
2 tsp Chili powder
2 tsp Beef base
1/2 tsp Garlic salt
Method:
I combined all of the ingredients, except the Montreal Steak Seasoning, in a small mixing bowl, mixed it well, rubbed it all over the pre-trimmed roast, and put in a plastic bag to get happy for 8 hours.
I removed it from the fridge an hour prior to cooking and just prior to putting it in the smoker, I added a medium coating of the steak seasoning -it was a little salty so I'll go lighter next time.
I cooked it to an internal temp of 125 degrees, removed it from the smoker and since it was done too early, I stuck it in a preheated cooler - I gave it 2 1/2 hours to cook, but it only took 1 1/2 hours.
When ready to eat, I took it to the grill and cooked it over high heat for about 5 minutes per side to add a crust - since it had been resting for an hour, no need to rest again.
Here's both pieces of meat before and after carving.
And my plate which included a salad, mostly from our garden, and some sauteed cremini mushrooms that need to be used.
The brisket was moist, tender, and tasty and I definitely prefer this cooking method, but without a side by side taste test, I couldn't say I preferred it to my normal. I cooked the tri tip 5 degrees more than normal and it came out closer to medium than medium rare - perfect for Bev, but a little too done for me. It was also moist, tender and the flavor was excellent - I think using the grill for crust addition worked out very well. This was only the third time I'd cooked tri tip and the first time to smoke then grill, but it's just the reverse sear I used for other beef cuts.
I'd say a pretty darn good meal and I would have gladly served it to special company with perhaps the addition of a carb. Have a great day and please stop by my blog at http://bigdudesramblings.blospot.com/ sometime. Larry.
One Year Ago: Penne with Beef & Bell Pepper
Thursday, May 5, 2011
Sweet and Sour Grilled Chicken
I do love a good bowl/plate of sweet and sour chicken. When I was going to college, there was a fast food Chinese restaurant that I would visit (frequently) called, The Egg Roll King. The one dish I would order over and over and over was there sweet and sour chicken. The reason I loved it so much at the time was because all it included was battered, deep fried chunks of chicken with a sweet and sour sauce. No veggies, just deep fried chunks of goodness. I tend to over look it nowadays when I'm at a Chinese restaurant - once I branched out and tried new things, I swore I'd never go back to it - but sometimes, you need to set aside silly little statements like that and just do it! And I'm glad I did, this was DE-LIC-OUS! And, if you wanted to use the marinade as a sauce for a stir fry, well, by all means... just do it!! (actually, that was what the original recipe was for...hehe)
Sweet and Sour Grilled Chicken
Adapted from the Food Network Kitchens
Printable Recipe
Ingredients:
2 Tablespoons honey
2 teaspoons chili garlic sauce (such as Sambal Oelek)
2 Tablespoons rice vinegar
1 Tablespoon low sodium soy sauce
1/4 teaspoon ground ginger
1/4 cup orange juice
2 teaspoon cornstarch
1 lb chicken (I used boneless, skinless breasts)
Directions:
In a saucepan, add all ingredients except the chicken. Bring to a boil and reduce heat to low. Stir until sauce has thickened, this should take only a few minutes. Once sauce has thickened, remove from heat and allow to cool.
Rinse chicken and pat dry with paper towels. Place the chicken in a shallow dish or resealable bag. Reserve 2 tablespoons of the sauce. Pour the remaining cooled sauce over the chicken and refrigerate for at least 4 hours.
Preheat grill to 375 degrees and oil the grill grates. Remove the chicken and discard the marinade. Place chicken directly on the grill grates and allow to cook for 7-10 minutes per side or until chicken reaches an internal temperature of 160 degrees F. Remove from grill and allow to sit for 3 minutes before slicing into. Enjoy!
One Year Ago: Hoisin Barbecued Chicken + 100th Post = Giveaway!!!
Sweet and Sour Grilled Chicken
Adapted from the Food Network Kitchens
Printable Recipe
Ingredients:
2 Tablespoons honey
2 teaspoons chili garlic sauce (such as Sambal Oelek)
2 Tablespoons rice vinegar
1 Tablespoon low sodium soy sauce
1/4 teaspoon ground ginger
1/4 cup orange juice
2 teaspoon cornstarch
1 lb chicken (I used boneless, skinless breasts)
Directions:
In a saucepan, add all ingredients except the chicken. Bring to a boil and reduce heat to low. Stir until sauce has thickened, this should take only a few minutes. Once sauce has thickened, remove from heat and allow to cool.
Rinse chicken and pat dry with paper towels. Place the chicken in a shallow dish or resealable bag. Reserve 2 tablespoons of the sauce. Pour the remaining cooled sauce over the chicken and refrigerate for at least 4 hours.
Preheat grill to 375 degrees and oil the grill grates. Remove the chicken and discard the marinade. Place chicken directly on the grill grates and allow to cook for 7-10 minutes per side or until chicken reaches an internal temperature of 160 degrees F. Remove from grill and allow to sit for 3 minutes before slicing into. Enjoy!
One Year Ago: Hoisin Barbecued Chicken + 100th Post = Giveaway!!!
Wednesday, May 4, 2011
Hummus Topped Tilapia
I have a secret: I put hummus on top of tilapia and Chris LOVED it!! Sometimes, if you don't tell your picky eaters what's on the plate, they find that they love things they never thought they would love! It's sort of like when I was growing up and my parents took us to a Rocky Mountain Oyster feed. I had no idea what I was eating, but I loved it! Ok, I loved it until my dad whispered "you're eating cows balls" in my ear....then I pretend I did like them, but honestly, I loved them. I couldn't wait for the next time we had them!! lol
This is a very simple and healthy week night meal. If you really felt inclined, you could make your own hummus, but I'm not ashamed to admit that I used store bought. It was convenient and it was perfect!
Hummus Topped Tilapia
Created by Jenn's Food Journey
Printable Recipe
Ingredients:
4 tilapia fillets
1-2 Tablespoons red pepper hummus (or any flavor you want - the amount you use is up to you, depends on how thick you want the layer of hummus to be)
3 Tablespoons panko
salt and pepper
Directions:
Preheat oven to 400 degrees F. Spray a baking dish with non-stick spray. Rinse the fish, pat dry with paper towel, and place in prepared dish. Spread an even amount of hummus on top of each piece of fish. Sprinkle with panko and season with salt and pepper. Bake for 12-14 minutes or until the fish flakes easily with a fork. Enjoy!
One Year Ago: Creamy Pesto Dip
This is a very simple and healthy week night meal. If you really felt inclined, you could make your own hummus, but I'm not ashamed to admit that I used store bought. It was convenient and it was perfect!
Hummus Topped Tilapia
Created by Jenn's Food Journey
Printable Recipe
Ingredients:
4 tilapia fillets
1-2 Tablespoons red pepper hummus (or any flavor you want - the amount you use is up to you, depends on how thick you want the layer of hummus to be)
3 Tablespoons panko
salt and pepper
Directions:
Preheat oven to 400 degrees F. Spray a baking dish with non-stick spray. Rinse the fish, pat dry with paper towel, and place in prepared dish. Spread an even amount of hummus on top of each piece of fish. Sprinkle with panko and season with salt and pepper. Bake for 12-14 minutes or until the fish flakes easily with a fork. Enjoy!
One Year Ago: Creamy Pesto Dip
Tuesday, May 3, 2011
Soy and Honey Glazed Chicken
Looking for something fast and easy for dinner tonight? Well, look no further. It doesn't get much faster or easier than this. What's nice about this recipe is that you can put the marinade together the night before or right before you are ready to leave for work, that way, when you get home, everything is ready, just heat up the grill and viola! dinner is served! Now tell me that wasn't easy :)
Soy and Honey Glazed Chicken
Created by Jenn's Food Journey
Printable Recipe
Ingredients:
1/4 cup low sodium soy sauce
2 Tablespoons honey
2 Tablespoons rice vinegar
1/4 teaspoon garlic powder
1/4 teaspoon ground ginger
dash of sesame oil
4 boneless, skinless chicken breasts
Directions:
In a bowl, mix together all ingredients except for the chicken. Rinse the chicken and place in a resealable bag. Pour the marinade over the chicken and seal bag. Let marinate 8 hours or up over night (minimum time to marinate is 2 hours) in the refrigerator.
Preheat grill to 350 degrees and oil grill grates. Remove the chicken from the bag and discard the marinade. Place the chicken directly on the grill grates and grill for 7-10 minutes per side or until the chicken has reached an internal temperature of 160 degrees F. Enjoy!
One Year Ago: Lemon Pepper Chicken
Soy and Honey Glazed Chicken
Created by Jenn's Food Journey
Printable Recipe
Ingredients:
1/4 cup low sodium soy sauce
2 Tablespoons honey
2 Tablespoons rice vinegar
1/4 teaspoon garlic powder
1/4 teaspoon ground ginger
dash of sesame oil
4 boneless, skinless chicken breasts
Directions:
In a bowl, mix together all ingredients except for the chicken. Rinse the chicken and place in a resealable bag. Pour the marinade over the chicken and seal bag. Let marinate 8 hours or up over night (minimum time to marinate is 2 hours) in the refrigerator.
Preheat grill to 350 degrees and oil grill grates. Remove the chicken from the bag and discard the marinade. Place the chicken directly on the grill grates and grill for 7-10 minutes per side or until the chicken has reached an internal temperature of 160 degrees F. Enjoy!
One Year Ago: Lemon Pepper Chicken
Monday, May 2, 2011
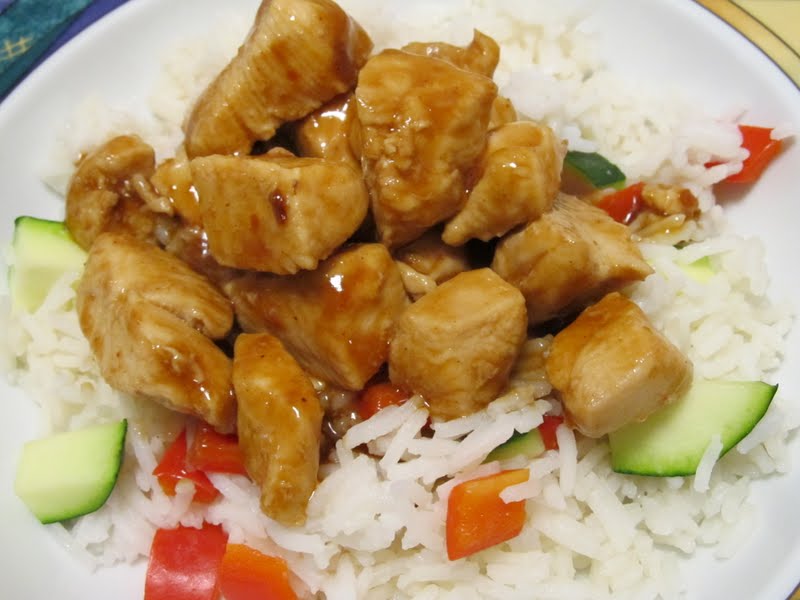
Hoisin Chicken Stir Fry
I mentioned last week that I've been working pretty long hours, so by the time I get home, the last thing I want to do is sit in front of my computer. Some nights I get home so late, I don't even want to cook dinner. And the night I made this, was one of those nights. I was trying to get my post for that day written and was having a major mental/creative block, but once the words started flowing, it was hard to stop them, so it was very late when I looked up and thought about making dinner. Not wanting to put any thought or effort into dinner, I decided to scratch what I had planned and to just throw together something fast and fairly light. When I think of fast and light, I always go right to stir fries. This stir fry has all the usual ingredients I have on hand, so feel free to change it up a bit if you prefer different flavors/ingredients. This is one of those canvas recipes I always talk about :)
Hoisin Chicken Stir Fry
Created by Jenn's Food Journey
Printable Recipe
Ingredients:
1 lb boneless, skinless chicken (breasts or thighs), cut into bite size pieces
1 small zucchini, slice thin
1 red pepper, stem and seeds removed, thinly sliced
2 teaspoon vegetable oil
1/4 cup hoisin
1 Tablespoon rice vinegar
1 Tablespoon Sriracha (you can use less if you want it to be less spicy)
2 teaspoons low sodium soy sauce
1/4 teaspoon sesame oil
Directions:
In a small bowl, mix together the hoisin, rice vinegar, sriracha, soy and sesame oil; set aside.
In a wok or a deep skillet, heat the vegetable oil over medium high heat. When the wok/skillet is hot, add the chicken and stir fry for 5 minutes. Add the red pepper and continue to stir fry for 3-4 minutes. Add the zucchini and stir fry for 2 minutes. Add the sauce mixture and stir to coat everything. Once the sauce starts to boil and thicken, remove from the heat and toss, again, to coat. Serve over rice. Enjoy!
One Year Ago: Pass it On Week 4: Chicken Pesto Pizza
Hoisin Chicken Stir Fry
Created by Jenn's Food Journey
Printable Recipe
Ingredients:
1 lb boneless, skinless chicken (breasts or thighs), cut into bite size pieces
1 small zucchini, slice thin
1 red pepper, stem and seeds removed, thinly sliced
2 teaspoon vegetable oil
1/4 cup hoisin
1 Tablespoon rice vinegar
1 Tablespoon Sriracha (you can use less if you want it to be less spicy)
2 teaspoons low sodium soy sauce
1/4 teaspoon sesame oil
Directions:
In a small bowl, mix together the hoisin, rice vinegar, sriracha, soy and sesame oil; set aside.
In a wok or a deep skillet, heat the vegetable oil over medium high heat. When the wok/skillet is hot, add the chicken and stir fry for 5 minutes. Add the red pepper and continue to stir fry for 3-4 minutes. Add the zucchini and stir fry for 2 minutes. Add the sauce mixture and stir to coat everything. Once the sauce starts to boil and thicken, remove from the heat and toss, again, to coat. Serve over rice. Enjoy!
One Year Ago: Pass it On Week 4: Chicken Pesto Pizza
Subscribe to:
Posts (Atom)