Search This Blog

Thursday, December 20, 2012

A Short Break and A Very Merry Christmas

This has been a bit of a frantic year for me - a lot has happened, both good and bad, but nothing that was life threatening, so I call that a very good year.  I have to admit, though, I have worked myself into a bit of a burnout.  Luckily for me, we get the week between Christmas and New Year's off, so I'm going to take that time to relax and get my shit together. Unfortunately, that means taking a break from blogging too.  I really want to take the next week or so and just concentrate on getting myself back to where I need to be.  I REALLY want to take this time to find my joy for blogging again.  AND, I REALLY, REALLY want to cook whatever I want and not have to feel like I HAVE to snap a picture of it.....

I know you will all understand and I thank you in advance for that!  (I'd say that is one of the best Christmas gifts I could get this year!)

I hope you all have a magnificent holiday with lots of love and even more good food!

I'll be back at the start of the new year refreshed and ready to tackle the world again, until then, Happy Cooking!!!


Merry Christmas and Happy New Year!!
Jenn


One Year Ago:  Sopapilla Cheesecake Bars
Two Years Ago:  Lemon Parmesan Sauce

Wednesday, December 19, 2012

Potato and Cheddar Cheese Soup

I'm looking forward to next week.  Our office is closed for the week and I'm looking forward to the much needed break.  Since flights are outrageous to Nebraska right now, I'm unfortunately, not going to get home for Christmas either.  So this year, Chris and I have decided to make our own little tradition for Christmas.  We decided soup was in order for that day.  Something simple and warming.  Nothing outrageous, nothing fancy, nothing time consuming, just simple and perfect.  Now this is not the soup I'll be serving on Christmas.  We actually decided on one I have made before - Creamy White Chicken Chili - But I thought that story would be a nice lead into this recipe :)

I really liked this soup.  I would have loved it had I not been stingy with the cheese.  I don't think I measured right and even if I did, I should have tasted it first and realized it wasn't cheesy enough for me.  Other than that... simple and delicious... perfect for the holidays!

Potato and Cheddar Cheese Soup
Adapted from Cooking.com
Printable Recipe 
Ingredients:
4 slices of bacon
1/2 sweet onion, chopped
4 baking potatoes, peeled and cut into 1-inch cubes or smaller
1 cup water
4 cups chicken broth
3/4 cup milk
2-3 cups shredded cheddar cheese
salt & pepper

Directions:
In a Dutch oven, cook the bacon until crisp; crumble and set aside.  Remove from pat and place on paper towel liked plate.  In the same pan with the bacon grease, over medium low heat, add the onions and cook until tender, about 8-10 minutes.  Add the potatoes, water and chicken broth and turn the heat up to medium high.  Bring to a boil and cook potatoes until they start to fall about, about 10 minutes.  Remove from heat and with an immersible blender, puree the potatoes until smooth.   Stir in the milk.  Place over low heat and stir in the cheese, a little at a time, until it's all melted.  Season with salt and pepper to taste.  Ladle into bowls and top with crumbled bacon.  Enjoy!

One Year Ago:  Lasagna Roll Ups
Two Years Ago:  Christmas Pasta
 

Tuesday, December 18, 2012

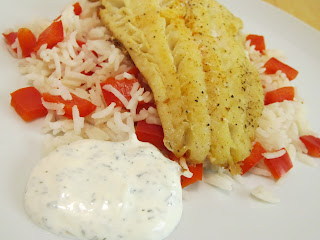
Smoked Paprika Tilapia with Ailoi

I know fish is not on many people's list of foods they will be making for Christmas dinner.... especially tilapia.  But, who knows, maybe this will spark something of a new tradition for someone looking for an unusual twist to the normal every day after Christmas dinner ideas.  OR, maybe your family is looking for something different for their Christmas Eve or New Year's Eve meal.  OR, just maybe you are planning dinner for yourself tonight and were thinking to yourself "man, I wish someone would post a simple and yet delicious fish recipe today".  Either way, this IS a simple fish recipe that is deliciously light and packed with a lot of flavor - definitely worth trying today, tomorrow, or even in the future.

Oh, and don't forget the sauce.....      as if you could :)

Smoked Paprika Tilapia with Ailoi
Created by Jenn's Food Journey
- Serves 2 -
Printable Recipe 
Ingredients:
2 tilapia fillets
1 teaspoon olive oil
1/2 teaspoon smoked paprika
1/8 teaspoon garlic powder
1/8 teaspoon salt
1/8 teaspoon pepper
For the aioli -
3 Tablespoons mayonnaise
1 Tablespoon lemon juice
1/2 teaspoon Dijon mustard
1/8 teaspoon garlic powder
1/4 teaspoon smoked paprika
1/4 teaspoon Hungarian sweet paprika

Directions:
Preheat oven to 375 degrees F.  Drizzle the olive oil evenly over each piece of fish.  Mix together the smoked paprika, garlic powder, salt and pepper.  Sprinkle evenly over both sides of each fillet.  Place in a baking dish that has been sprayed with non-stick cooking spray.  Place in the oven and bake for 15-20 minutes, or until the fish flakes evenly with a fork.

Meanwhile, mix together all the ingredients for the ailoi, until well combined.  Cover and place in refrigerator until ready to use.  Can be made up to three days in advance.  Serve with baked fish and enjoy!

One Year Ago:  Thick and Hearty Beer Cheese Soup
Two Years Ago:  Fish Sandwiches with Jalapeno Slaw

Monday, December 17, 2012

Death by Chocolate Cookies

Just like last year, this Christmas baking season got away from me.  Working 50+ hour weeks can do that to a person, though.  I barely have time to make dinner any more, never mind making the time to do anything special on the weekends, I'm usually far too burned out.  So my apologies for, once again, not having any goodies to share with you.  If you are interested in seeing Christmas goody posts, CLICK HERE for some past recipes.  Otherwise, I can at least share with you a fantastic cookie recipe I did end up trying this weekend.  I actually ended up with just a little extra time and I was surprisingly in the mood to bake, so I reached deep into my "must try" cookie file and found this delicious little concoction from Andrea the Kitchen Witch.  These cookies were extremely simple to make and, ooooh my woooooord, were they ever decadent!!!  I can't believe it took me almost two years to finally make these!

Death by chocolate?  Is there truly any better way to go???

Death by Chocolate Cookies
Very slightly adapted from Andrea the Kitchen Witch
- Makes about 3 dozen -
Printable Recipe 
Ingredients:
1 stick (1/2 cup) unsalted butter, softened
3 Tablespoons vegetable oil
1/2 cup packed brown sugar
1/2 cup granulated sugar
1/2 cup cocoa powder (I used natural unsweetened)
1 egg
1 Tablespoon vanilla extract
1 1/2 - 2 cups all purpose flour
1 teaspoon baking soda
1/2 teaspoon kosher salt
1/2 cup milk chocolate chips
1/2 cup semi-sweet chocolate chips

Directions:
Preheat oven to 350 degrees F.

In a bowl of a standing mixer, with the paddle attachment, cream together the butter and vegetable oil until light and fluffy.  Add both sugars and cream again until light and fluffy.  Add the cocoa powder and mix until just blended together.  Scrape down the sides of the bowl and add the egg and vanilla.  Mix until blended together, scraping down the sides at least once.  Add the flour (start with 1 cup and add until the batter is no longer wet), baking soda and salt.  Slowly mix until well combined.  Remove bowl from stand mixer and fold in the chocolate chips with a spatula.

Scoop batter onto cookie sheet and bake for 10-11 minutes.  You want the bottom and edges to be slightly crispy.  It's hard to tell when they are done due to the dark color, so use your timer.  Allow to cool slightly before moving to a wire rack to cool completely.  Enjoy!

One Year Ago:  Christmas Goodies
Two Years Ago:  Guest Post - Crab Delights

Thursday, December 13, 2012

Hot Wing Soup

In the time that I have been a food blogger, I have learned that some recipes just aren't meant to be adapted.  Some recipes are just perfect the way they are.  Or in this case, sometimes the amount of the ingredients are perfect just the way they are.  Let me explain:

I'm pretty sure I've talked about the fact that Chris is very sensitive to textures. So, when I saw this recipe that Chris at Nibble Me posted (and what a genius idea by the way), I was a bit hesitant to make it.  Why, you ask?  Because the thickening ingredient in this soup is bread.  Yep, as strange as it might sound to some of you, it's true.  I convinced myself that I could keep Chris from finding out and he'd eat the soup and love it.  While at the store that day, I needed to pick up extra bread just for this soup, so while standing next to the bread in the bakery department, I blurt out .. "well, I need one loaf to use in the soup".  I immediately realized what I had said and wished more than anything to be able to take it back.  Chris gives me a puzzled look and says.. "bread IN the soup?"  The puzzled look turns to disgust and now I know I'm in trouble.  By the time we got home, I had once again convinced myself I was still going to make this soup, I would just use less bread, that way it wouldn't be so obvious and Chris would hopefully eat it.  Well, I'm hear to say, even slimming the amount of bread down by a cup changed the whole entire thing. Oh sure, the flavors were still there, but the consistency was not and that is what I was looking for - something a little thicker, heartier... something with substance!

In the end, the flavor was so kick-ass that Chris agreed to let me try and make the soup as it should have been made.......    neither of us were disappointed this time!

Hot Wing Soup
Slightly adapted from Chris at Nibble Me This
Printable Recipe 
Ingredients:
6 Tablespoons unsalted butter
5 cups Italian bread cubes, no crust
1/2 cup finely diced carrot
1/4 cup finely diced celery
salt
1/2 Tablespoon paprika
4 cups chicken broth
12 oz beer (Chris used dark beer, I used a light beer)
2 Tablespoons hot sauce (I used Frank's - but be careful, this adds a lot of heat to the soup)
1/4 cup crumbled goat cheese (because I'm not a huge fan of blue cheese)
**Garnish:  chicken wing meat, celery leaves, goat cheese or blue cheese crumbles

Directions:
Preheat a heavy bottom stock pan or Dutch oven over medium high heat.  Add 3 Tablespoons of butter.  Once butter is bubbling hot, add the bread cubes and quickly toss to coat evenly.  Season with a bit of salt and pepper and cook until golden brown on all sides, about 5-7 minutes.  Remove from pan.

Reduce heat to medium and add remaining 3 tablespoons of butter to the now empty pot.  Saute the celery and carrot until tender, about 8 minutes.  Season with salt and pepper.  Add the chicken broth, beer, paprika, hot sauce, goat cheese and the croutons you just made.  Bring to a simmer and cook until the bread begins to bread apart - about 5-6 minutes.  Use an immersion blender to blend to a smooth consistency.  Bring soup back to a simmer for 3 more minutes, season with salt and pepper to taste and serve.  Garnish with chicken wing meat, more goat cheese, and celery leaves if desired.  Enjoy!

One Year Ago:  Creamy White Chicken Chili
Two Years Ago:  Every Chip Cookie

Wednesday, December 12, 2012

Grilled Chicken Athena

The original recipe for this was for pan fried chicken... well, you know me, I long for the grill, so I thought I would adapt this to work on my favorite cooking device.  Now I'm not sure why it's called chicken Athena, though.  Athena, to me, is Greek, and these are definitely not Greek flavors, but it's what the original recipe called it, so I'm sticking with it.

On the downside.. for the first time in a very long time, I forgot to write down the exact amounts of the ingredients I used in the sauce.  WHAT??  I know, right?  All I remember is I used mayo, Dijon, lemon juice and Worcestershire... same ingredients I used to marinate the chicken with... I just can't remember the quantities!!  Soooooo.. unfortunately, this time, you are all on your own... I gave you the tools, you'll just have to build the house yourself... sorry!!!! :)

Grilled Chicken Athena
Adapted from Taste of Home
- Serves 2 -
Printable Recipe 
Ingredients:
2 boneless, skinless chicken breasts
2 Tablespoons lemon juice
2 Tablespoons Worcestershire sauce
1 Tablespoon Dijon mustard
1/4 teaspoon pepper
1 teaspoon dried parsley flakes

Directions:
Rinse the chicken and pat dry with a paper towel.  Place in resealable plastic bag.  In a measuring cup, mix together all remaining ingredients until well combined.  Pour over the chicken, seal bag and place in refrigerator for 2 hours.

Preheat grill to 375 degrees F.  Clean and oil grill grates.  Remove chicken from bag and discard the marinade.  Place the chicken over direct heat and grill for 8-10 minutes per side or until the chicken reaches an internal temperature of 165 degrees F.  Remove from grill and allow to rest for 5 minutes.  Serve and enjoy!!

One Year Ago:  Penne with Braised Beef Ribs
Two Years Ago:  Baked Tilapia with Horseradish Dill Sauce

Monday, December 10, 2012

Cornflake Crusted Tilapia

You may remember my post on Cheese Frenchees back in November, if not, I highly recommend checking that recipe out.. it's a heart clogging one, but it's an oh so good heart clogging one :)  ANYWAY... with that recipe, I had an abundance of crushed Corn Flakes on hand, so I've been trying to find ways to use it up (I hate to waste food!!).  The weather here is getting cooler, so the thought of baking dinner actually sounded like a fun thing to do.  With that idea in mind, I came up with this very simple, yet very tasty meal.  For those that aren't fish fans, this would work extremely well on chicken too.

Cornflake Crusted Tilapia
Created by Jenn's Food Journey
- Serves 2 -
Printable Recipe 
Ingredients:
2 Tilapia fillets
salt and pepper
2-3 teaspoons mayonnaise
3 Tablespoons Corn Flakes
1 Tablespoons Panko breadcrumbs
1 garlic clove, finely minced
For the sauce - (optional)
1 teaspoon honey
1 teaspoon Dijon mustard
3 Tablespoons mayonnaise
pinch of white pepper and salt

Directions:
Preheat oven to 400 degrees.  Season the tilapia on both sides with salt and pepper and place in a baking dish that has been sprayed with non-stick cooking spray.  Mix together the Corn Flakes, Panko and garlic.  Evenly spread the mayo over the top of both fillets and top with the Corn Flakes mixture.  Bake for 15-20 minutes or until the fish flakes easily with a fork.  Remove from oven and allow to cool for 3 minutes before serving.

Meanwhile, in a small bowl, mix together all ingredients for the sauce until well combined.  Serve with fish and enjoy!

One Year Ago:  Sweet and Spicy Sauce
Two Years Ago:  Adobo Chicken

Thursday, December 6, 2012

Reese's Pieces Peanut Butter Cookies

Reese's Pieces have to be one of my favorite candies!  I have loved them since the first time I tried them... which, by the way.... and this is totally going to date me... was right after I saw the preview for E.T. - Oh, I may have had them before that, but honestly, that is when I really remember loving them.  That love affair has lasted a number of years.... sooooo, when I just happened to grab a large bag of Reese's Pieces at the store (how the heck did those end up in the basket???) I wanted to do something other than completely devour them in one sitting.... so I decided on cookies that I could completely devour in one sitting instead :)  These ....   were....  AWESOME!!!!!

Reese's Pieces Peanut Butter Cookies
Recipe from Hersheys.com
Printable Recipe 
Ingredients:
1 stick (1/2 cup) unsalted butter, room temperature
1/2 cup granulated sugar
1/2 cup packed light brown sugar
1/2 cup creamy peanut butter
1 egg
1 teaspoon vanilla extract
1 cup all purpose flour
1/2 teaspoon baking soda
1/4 teaspoon salt
1 cup Reese's Pieces candies

Directions:
Preheat oven to 350 degrees F.

Beet butter, both sugars, peanut butter, egg and vanilla in a bowl of a stand mixer (using the paddle attachment) until light and fluffy.  In another bowl, stir together the flour, baking soda and salt; gradually add to peanut butter mixture, beating until well blended.  Remove from stand mixer and fold in candies. Drop by tablespoon onto ungreased cookie sheets.

Bake 10 to 12 minutes, or until the edges are lightly browned; remove from oven.  Cool slightly; remove from pan to wire rack to cool completely.  Makes 2 dozen cookies.

One Year Ago:  Chili Glazed Pork Ribs
Two Years Ago:  Grilled Pork Chops with Chipotle Honey Sauce

Wednesday, December 5, 2012

A Birthday Wish

I wasn't planning on posting anything today... with all the extra hours I've been working over the last few months, my creativity in the kitchen has died down a bit, so my postings are a bit more sporadic.  Now it's not that I'm not cooking.... it's just that, well, I sat down to type out a post just now and I am soooooo not feeling it.

So, instead, today I'm going to do what I have done every year on this day and wish my lovely sister, Tracy, a very happy birthday!  I won't get into another sappy post about how wonderful she is, because that was done back in 2010.  But I will say this ...

My sister - my opposite and my mirror - I've laughed with her, I've cried with her, I've fought with her.  We've been friends and we have been foes, but through all the ups and all the downs, I wouldn't change her for the world.

Happy birthday, Tracy! I wish I could be there to celebrate with you, just know that I'm thinking of you and will toast you tonight over a nice glass of wine :)  Love and miss you bunches!!  xoxo

(Yep, that's right.. that's my sister trying to give me a can of Schlitz beer.. she was such a bad influence! lol)

Tuesday, December 4, 2012

Tailgating Asian Chicken Strips

Everybody can make chicken wings when tailgating... but I thought I would go against the norm and make chicken strips instead.  Still a finger food and still great for tailgating... or any time really!  What pulled me to this recipe was that it was for Asian chicken but it used cumin and oregano... two spices I really do not associate with Asian cuisines.  I don't think it was enough of each ingredient to really notice that it made a difference, but I had to try it anyway.  The verdict?  I loved these... simple and delicious.. you know that's my favorite combination!!

Tailgating Asian Chicken Strips
Adapted from Guy Fieri
Printable Recipe 
Ingredients:
1 Tablespoon soy sauce
2 Tablespoons honey
1 1/2 Tablespoons lime juice
2 Tablespoons orange juice
1 teaspoon chili garlic paste
1/2 teaspoon sesame oil
1/4 teaspoon dried oregano
1/4 teaspoon ground cumin
1/4 teaspoon garlic powder
1 teaspoon fish sauce
1 lbs. chicken tenders

Directions:
In a measuring cup or bowl, mix together the soy, honey, lime and orange juice, chili paste, sesame oil, oregano, cumin, garlic and fish sauce until well combined.  Place the chicken tenders in a resealable plastic bag and pour in the marinade.  Seal and place in refrigerator for 2-4 hours.

Meanwhile, make the sauce by adding equal parts mayonnaise, chili garlic paste and Sriracha.  Cover and place in refrigerator (or cooler) until ready to use.

Preheat grill to 350 degrees F.  Clean and oil grill grates.  Remove tenders from bag and discard marinade.  Place tenders over direct heat and grill 4-5 minutes per side or until the chicken reaches an internal temperature of 165 degrees F.  Remove and allow to rest for 3-5 minutes.  Serve with sauce and enjoy!

One Year Ago:  Peanut Butter Pie with Vanilla Bean Whipped Cream
Two Years Ago:  Pots de Creme
 

Monday, December 3, 2012

Pan Seared Cod with Garlic Dill Sauce

Are you a bit shocked that you aren't seeing a recipe for tilapia?  I know, I know, we eat a lot of it... but I thought cod would be a good change of pace.  A nice light white fish that isn't too thick and that Chris should enjoy.....   as long as I don't over cook it.... which I, unfortunately, did.  But that is ok, because there was sauce.  And it was a good sauce... sooooo.... all was well and definitely worth trying... just don't over cook the fish :)

Pan Seared Cod with Garlic Dill Sauce
Adapted from Angie's Recipes
- Serves 2 -
Printable Recipe 
Ingredients:
2 cod fillets
lemon juice
salt and pepper
cayenne pepper
For the sauce -
2 Tablespoons sour cream
2 Tablespoons mayonnaise
1/2 teaspoon minced garlic
1/2 teaspoon dried dill
1 teaspoon lemon juice

Directions:
Drizzle a little lemon juice over both fillets.  Season both sides with salt, pepper and cayenne.

In a small bowl, mix together all the ingredients for the sauce until well combined.  Cover and set aside.

Spray a non-stick skillet with cooking spray and play over medium heat.  Once heated, add the cod and cover.  Allow to cook for 5 minutes.  Remove cover, once the fish is slightly browned, flip and continue to cook until the fish flakes easily with a fork, another 5-10 minutes (depending on how thick your pieces are).  Remove from skillet immediately.  Serve with sauce and enjoy.

One Year Ago:  Orange Vanilla Grilled Chicken
Two Years Ago:  Baked Coconut Tilapia
 

Thursday, November 29, 2012

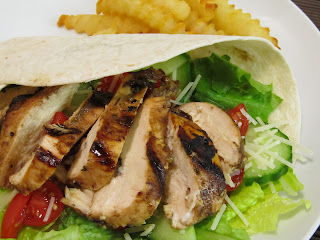
Rustic Balsamic Chicken Wraps

Here's a nice light meal that works as dinner or even lunch.  You can easily make the chicken the night before and slice it up and make this wrap right at work.  You don't even need to heat the chicken, if you want to be completely honest... just throw everything into the tortilla and eat away!  Dinner or lunch, either way, this is a definite must try.

Rustic Balsamic Chicken Wraps
Adapted from Better Homes and Gardens
Printable Recipe 
Ingredients:
2 boneless, skinless chicken breasts
2 Tablespoons olive oil
2 Tablespoons balsamic vinegar
1/4 teaspoon kosher salt
1 teaspoon Italian seasoning
1 garlic clove, finely minced
1 teaspoon fresh chopped parsley
2 cups greens (green leaf lettuce, spring mix, whatever you want)
1/2 cup tomatoes, chopped
1/4 English cucumber, sliced
2 Tablespoons shredded parmesan cheese
4 large flour tortillas

Directions:
Mix together the olive oil, balsamic vinegar, salt, Italian seasoning, garlic and parsley until well combined.  Remove 1 Tablespoon of the mixture and set aside.  Place the chicken breasts in a resealable plastic bag and pour the marinade over.  Seal and place in refrigerator for at least 2 hour.

Preheat grill to 375 degrees F.  Clean and oil grill grates.  Remove chicken from bag and discard marinade.  Place chicken over direct heat and grill 8-10 minutes per side or until the chicken reaches an internal temperature of 165 degrees F.  Remove and allow to cool at least 10 minutes before thinly slicing.

Toss the greens with the reserved balsamic mixture and place evenly amount the tortillas.  Top with tomatoes, cucumber, sliced chicken and parmesan cheese.  Serve and enjoy!

One Year Ago:  Vanilla Balsamic Chicken over Pasta with Garlic Vanilla Cream Sauce
Two Years Ago:  Mac & Texas Cheese with Chicken and Roasted Chiles

Wednesday, November 28, 2012

Mayan Cocoa Mini Cakes with Vanilla Bean Frosting

The other day I was craving something chocolatey.  Oh, we had chocolate candy in the house, but I wanted something more cake like.  I searched the pantry for a few items, made sure I had some cream cheese and decided I'm make a couple of delicious little mini cakes.  I found some Mayan cocoa that was just screaming to be used and this wonderful little treat was invented.  Mayan cocoa has a hint of cinnamon and cayenne pepper in it, so these little cakes had a bit of a kick to them... hence the frosting... I mean it only made sense to add the frosting to help "cool" them off :)

Mayan Cocoa Mini Cakes with Vanilla Bean Frosting
Created by Jenn's Food Journey
- Makes 6 mini cakes -
Printable Recipe 
Ingredients:
1/4 cup Mayan Cocoa powder
1/2 cup hot water
1/2 cup plus 2 1/2 Tablespoons all purpose flour
1 teaspoon baking powder
1/8 teaspoon salt
1/4 cup unsalted butter, room temperature
1/2 cup granulated sugar
1 egg
1 teaspoon vanilla extract
Vanilla Bean Frosting -
2 Tablespoons cream cheese, room temperature
1/4 - 1/2 cup powdered sugar
1 vanilla bean, split and scrapped
1/2 teaspoon vanilla extract

Directions:
In a measuring cup or bowl, add the cocoa powder and hot water.  Stir to combine and set aside.  In another bowl, sift together 1/2 cup of flour, baking powder and salt; set aside.

Preheat oven to 375 degrees F.  Spray 6 muffin tins with non-stick cooking spray.  In a bowl of a stand mixer, using the paddle attachment, add the butter and sugar.  Cream together on low to medium low setting until light and fluffy.  Scrape down the sides and add the egg and vanilla extract.  Mix together until just combined.  Slowly add in the cooled chocolate mixture and mix until everything is combined.  Pour into the prepared muffin tins and place in oven.  Bake 15-20 minutes or until a toothpick inserted in the center of the cakes comes out clean.  Remove and allow cool.

To make the frosting - with a hand mixer, mix together the cream cheese, vanilla bean and vanilla extract.  Add the powdered sugar a little at a time until you achieve your desired thickness and sweetness (I wanted mine to be sort of a glaze instead of a thick frosting).  Once cakes are cooled, frost and enjoy!

One Year Ago:  Beef Roast
Two Years Ago:  Grilled Chicken with Bacon and Balsamic Glaze

Tuesday, November 27, 2012

Honey-Balsamic Beef Stir Fry

Ok.. I'm back.. and things SEEM to be working again.... nothing like starting the week off with blogger issues :)

Well, I hope everyone had a wonderful Thanksgiving and an even better weekend!  I had a couple extra days off of work and am ready to face the world again.... I think :)  Either way, the show must go on, right, so here we are ... Monday has arrived and with it, a new tasty recipe.  This stir fry was simple and delicious.  My two favorites things to come out of the kitchen!  The only thing I was disappointed in was the fact that I cut the steak funny.  Not so funny enough that it was tough, it's just not as pretty as it would have been had the slices been thinner.  Oh well.. if that's the worse of it, I think I did pretty well... don't you?

Honey-Balsamic Beef Stir Fry
Adapted from Better Homes and Gardens
Printable Recipe 
Ingredients:
1 lbs beef sirloin or top round steak, thinly sliced against the grain
1/2 cup beef broth
2 Tablespoons soy sauce
1 Tablespoons balsamic vinegar
1 Tablespoons honey
2 teaspoons cornstarch
1/4 teaspoon crushed red pepper
1/4 teaspoon ground ginger
1 teaspoon vegetable oil
1 red sweet pepper, seeded and cut into thin strips
1/2 sweet onion, thinly sliced
1 cup tightly packed baby spinach leaves

Directions:
In a measuring cup, mix together the beef broth, soy sauce, balsamic vinegar, honey, cornstarch, red pepper flakes, and ginger until well combined.

In a wok or non-stick deep skillet, over medium-high heat, add the vegetable oil.  Add beef and quickly stir fry for 1 minute.  Add the onion and pepper and continue to stir fry another 4-5 minutes or until the beef is cooked through.  Add the spinach and stir to combine.  Pour in the broth mixture and stir to combine.  As soon as the mixture starts to bubble, remove from heat, stirring to combine.  Serve over rice or noodles.  Enjoy!

One Year Ago:  Guest Blogger - Cheesy Cornbread
Two Years Ago:  Chocolate Sugar Cookies

Monday, November 26, 2012

Having some difficulties

I'm having issues with blogger right at the moment... for some reason, no matter how many pictures I remove from Picasa Web, blogger is still telling me that I'm out of space for storing photos... it's quite frustrating... sooooooooo, I won't have anything new for you until I can figure this out.... Hopefully, I'll be back up and running again by tomorrow..........

Tuesday, November 20, 2012

Grilled Fish with Chinese BBQ Sauce

I apologize for no Thanksgiving recipe ideas again this year.  With it just being Chris and I, I really don't get too much in to the big meals.  Heck, it's the Sunday before Thanksgiving, as I write this post, and I still don't have a clue what we are doing!

So, instead I've brought you a healthy alternative meal for AFTER the holiday's.  See.. I knew I could keep your interest :)

And for those that don't like fish.. no worries, this would be great on chicken too!

Grilled Fish with Chinese BBQ Sauce
Adapted from The Neely's, The Food Network
- Serves 2 -
Printable Recipe 
Ingredients:
2 tilapia fillets
1 Tablespoon orange juice
1 Tablespoon hoisin sauce
1 1/2 Tablespoons soy sauce
3/4 Tablespoon honey
1/4 teaspoon red pepper flakes
1/8 teaspoon ground ginger
drop or two of sesame oil

Directions:
In a small bowl or measuring cup, mix together the orange juice, hoisin, soy, honey, pepper flakes, ginger and sesame oil until well combined.

Preheat grill to 325 degrees F.  Tear off two squares of aluminum foil large enough to form packets around each piece of fish.  Spray with non stick cooking spray.  Season both sides of the fish with salt and pepper and place in the middle of each piece of foil.  Drizzle half of the sauce, evenly, over both pieces of fish.  Enclose the fish by pull the two long sides together and folding to seal.  Now fold over each end to seal - leave a little room for air.  Place directly over the fire and grill for 14-18 minutes, or until the fish flakes easily with a fork.  Carefully remove from gill and be even more careful opening the packet - it will release steam.  Serve with remaining sauce.  Enjoy!

One Year Ago:  Peruvian Grilled Chicken
Two Years Ago:  Creamy Taco Mac

Monday, November 19, 2012

Buffalo Chicken Salad with Homemade Ranch Dressing

The weather is getting quite cold here... Ok, ok, cold might be too much. It's getting cooler here.  Our days have actually been lovely... high's in the 70's... but the nights/mornings are getting cold for me... in the 40's and 50's... Heck, one morning I woke up and it was 37!!  When you live in the southwest desert.. that's cold!!!

Anyway...with the changing of the weather, my food wants/needs will change too.  This will more than likely be my last salad for a while.  But, that's ok, salads and I had a very good run over the last few months, so I don't feel like I will be neglecting them.. at least for awhile :)

This salad is simple and delicious! I made homemade ranch this time, which I found on Mary's site, Barefeet in the Kitchen.  I've been wanting to try it for a while, as Chris is a ranch addict.  I ended up using a bit too much dill, but other than that, it was really good!  The perfect addition to this tasty little meal.

Buffalo Chicken Salad with Homemade Ranch Dressing
Salad recipe created by Jenn's Food Journey
Dressing recipe adapted from Barefeet in the Kitchen
- Serves 2 -
Printable Recipe 
Ingredients:
2 boneless, skinless chicken breasts
1/4-1/2 cup Frank's Hot Sauce (or any hot sauce you would use for buffalo chicken)
4-5 cups green leaf lettuce, shredded or chopped
1 medium to large carrot, peeled and cut into matchsticks
1/2 English cucumber, cut into rounds than cut in half
1 cup cherry or grape tomatoes, halved
For the dressing -
2 Tablespoons mayonnaise
2 Tablespoons sour cream
2 Tablespoons buttermilk
1/2 teaspoon dried dill
1/4 teaspoon dried parsley
1/8 teaspoon onion powder
1/8 teaspoon garlic powder
1/2 - 1 teaspoon white wine vinegar

Directions:
Rinse off chicken and pat dry with a paper towel.  Place in resealable plastic bag.  Pour the hot sauce over the chicken, seal bag and refrigerator for at least 1 hour.

Meanwhile, make the dressing by adding all ingredients together in a measuring cup or jar with lid.  Stir or shake until everything is well combined.  Taste for seasoning.  Place in refrigerator until ready to use.

Preheat grill to 375 degrees.  Clean and oil grill grates.  Remove chicken from bag and discard any remaining sauce.  Place the chicken over direct heat and grill for 8-10 minutes per side or until the chicken reaches an internal temperature of 165 degrees F.  Remove from grill - I poured a little more hot sauce on the chicken as it came off the grill, just for some added flavor - and allow to cool.  Once cooled, cut into thin slices or bite sizes pieces.

Build the salad by placing the lettuce on a plate or in a large bowl.  Top with carrots, tomatoes and cucumbers.  Add the chicken and drizzle on the dressing.  Serve and enjoy!

One Year Ago:  Grilled Romaine Lettuce with Creamy Herb Dressing
Two Years Ago:  Tilapia with Hash Browns