Search This Blog

Friday, January 29, 2010

Tomato Walnut Tilapia


Oh yes, that's right.. more walnuts!  Last time I needed walnuts for a recipe, I had to buy a large bag of them, so now I'm trying to use them so they don't go to waste.  Did you know that you can store walnuts in the freezer and they will keep longer?  Good little tip if you happen to have more then you actually need for a recipe.

So I have made this recipe before and loved it.  It's crunchy and light and amazingly simple.  What's that you say?  You say you still won't give fish a chance?  Well then, go ahead and use chicken instead.  Don't you love how most of these recipes will work for fish AND chicken?  I do that for my aunts.. they are not fish fans :)

Tomato Walnut Tilapia
Adapted from Taste of Home
Ingredients:
4 Tilapia fillets (about 4 oz each)
salt and pepper
lemon juice
1 small tomato, thinly sliced (enough slices to cover each fillet)
1/2 cup panko bread crumbs (you can use regular bread crumbs)
1/4 cup chopped walnuts
1/4 teaspoon garlic powder
1 Tablespoon lemon juice
1/2 teaspoon olive oil

Directions:
Preheat oven to 400 degrees and prepare a baking dish with non stick cooking spray.

In a small bowl, combine the panko, walnuts, garlic powder, 1 Tbls lemon juice, and olive oil.  Set aside.

Place the fillets in the prepared dish.  Drizzle with lemon juice.  Season with salt and pepper.  Bake for 10 minutes.  Remove fish from oven and top the fillets with tomato slices and then cover with the panko mixture.  Set oven to broil and broil the fish for 2-3 minutes or until the topping is golden brown.  Enjoy!

(Nutritional information: 205 calories, 10g fat, 7g carbohydrates, 24g protein, 265mg sodium, 67mg cholesterol)

Extremely Honored

What?  An award?  For me?  You must be mistaken.....No?  Really???  WOW.. I am extremely honored!  A huge thanks goes to Michelle over at All Home Cooking. All Year Long. for nominating me for this award.  I can't tell you how amazing it feels to have a fellow blogger honor me in this way!  This award actually came to me yesterday and it just so happened that yesterday was my one month blogiversary!  Talk about being on cloud 9!!! When I first started this blog, I really did not think that it would amount to much.  I thought I'd get friends and family to check it out, but that would be about it.  Knowing that other bloggers are visiting my site and that they actually like what they see, is a huge boost for me.  Thank you so much Michelle...I hope you continue to visit my blog!

There are two things that I am suppose to do after receiving this honor... The first is to tell you seven interesting things about myself.... so get ready, here's seven things you may or may not want to know about me :)

Seven Interesting Facts About Me:
     1. I am a fire spinner.  I picked this skill up in 2005.  I was honored to spin with some amazingly talented people.  We once performed in front of 30,000 people.  And yes, I have been burned, but not bad enough where I ever wanted to stop.
     2. I use to own my own personal chef business, In Your Kitchen. I unfortunately started this at a bad time in my life so I was only able to keep it running for a year.  The hope is to maybe someday start it back up again.
     3. I have watched the movie Shaun of the Dead over 100 times. I think that statement pretty much speaks for itself :)
     4. I almost joined the Army after high school.  Seriously!  I actually got all the way to the swear in ceremony before I changed my mind.  The only reason for the change of heart was I wasn't happy with the job they were going to be giving me....Mechanic!
     5. I am actually a very shy person.  I know anyone who knows me well will read this and laugh, but it is true.  Once I get to know people, this lively personality that you see here comes shinning through....but before that...TORTURE! :)
     6. I despise drivers that do not use their turn signals!  I know it's a petty thing, but still...why oh why can't drivers be courteous and let the people behind them know that they are turning????
     7. My motto:  She who dies with the most books wins!  I love to read, but truthfully, I am a lover of books.  I love the way books smell.  I love to hold them and turn the pages.  I love to store them on my bookshelves.  I love to re-read my favorite ones.  I don't want to read my books on hand held electronic devises...but that's just me :) 

The second thing that I am suppose to do after being nominated is to nominate seven other blogs for this award.  So here are my nominations for the Beautiful Blogger Award:

1. Des at Life's Ambrosia. This has to be my favorite food blog! Her pictures are beautiful. Her recipes are simple and delicious. Some of my favorite recipes come from this site.

2. Tracey at Tracey's Culinary Adventures. Tracey always has fantastic looking cupcakes and other sweets on her site. Be sure to check out the recipe for Black and White Cheesecake Bars...YUM!

3. Annie at Annie's Eats. Yet another site with amazing photos.  I love her section on baby food.  While I don't have children of my own, I think it's great that she has created these recipes to share with other mothers.

4. The Sister's Cafe.  Five sisters with a love for cooking. This site has that great at home feel to it...like when you are at a party and everyone ends up hanging out in the kitchen..that's this site..the kitchen at a party :)
 
5. Bobby at Blog Chef. Great recipes, fantastic photos.  If you are a fan of Asian dishes, check out Bobby's site.  There are a ton of really yummy recipes.

6. Sarah at Redhead Recipes.  I found Sarah's site thanks to the Foodie Blogroll.  I think her photos are great, her recipes looks so yummy.  Can't wait to see what she'll post next!

7. Debbie at Mocha Me.  Another site that I just found but love.  Debbie's got some really great recipes posted.  She's a girl after my own heart..lots of tasty pasta!!!  

If you've been nominated, will you please pay it forward? Here are the guidelines:
  • Thank the person who nominated YOU.
  • Copy the award and post it you YOUR blog.
  • Link back to the person who nominated you.
  • Share 7 interesting things about yourself.
  • Nominate 7 more bloggers for this award.
  • Post your link to those 7 blogs.
Once my feet actually touch the ground again, I'll post a new recipe... so check back later today to see what it will be...Ciao!

Thursday, January 28, 2010

Walnut Crusted Chicken Strips with Honey Mustard Sauce

When I was younger, I ate a lot of McDonald's chicken nuggets.  No, not as a kid, we lived in a small town and to go to McDonald's was a special treat sort of trip.  No, this large chicken nugget consumption happened in college and even a few years beyond.  I loved the crispy deep fried coating.  I knew this was not a healthy meal and after gaining a not so healthy 15 pounds, I waved goodbye to those delicious deep fried devils and never looked back...ok, maybe I snuck a peek over my shoulder every now and then :)  Now don't get me wrong, I still eat frozen chicken nuggets (one of my guilty pleasures) and I still love a good piece of fried chicken now and then, but I try really hard to stay away from any sort of fried chicken making at home.

I have tried a few different recipes for fried "baked" chicken and haven't been able to either find the right recipe, or master the technique.  But this recipe, this recipe turned out to be pretty fantastic.  It bakes to a nice crispiness that will make you forget it's not fried.  And once again, walnuts = omega 3 fatty acids = good for you!!!  These chicken strips are flavorful enough that you don't need a sauce to dip them in, but I'm a sauce girl and I think it just adds to the meal.

Oh, and one more thing.. these would make great snacks for your Super Bowl party :)

Walnut Crusted Chicken Strips w/Honey Mustard Sauce
Adapted from Good Housekeeping 
Ingredients:
Non-stick cooking spray
1/2 cup Panko (Japanese bread crumbs)
1/8 teaspoon cayenne pepper
salt and pepper
1/2 cup walnuts
2 Tablespoons fresh parsley, loosely packed
1 large egg white
1 teaspoon Dijon mustard (I actually used Sriracha hot chili sauce)
1 lbs. chicken breasts or cutlets, sliced into strips
Honey Mustard Sauce (optional), recipe follows

Directions:

Preheat oven to 400 degrees. Place a wire rack in a baking sheet with a lip on it; spray rack with cooking spray. (**if you do not have a wire rack, you can either use just a cookie sheet or a broiler pan..see below for extra special instructions if using one of these)

On a large dinner plate or pie pan, combine the panko, cayenne pepper, 1/2 teaspoon salt, and 1/4 teaspoon pepper. In a food processor, add the walnuts and parsley. Pulse until the walnuts are finely chopped; toss with panko mixture until well blended.

In a pie pan, whisk the egg white and Dijon until well mixed.

One at a time, dip the chicken strips into the egg white mixture, then into the walnut/panko mixture; pressing firmly to make sure mixture adheres to both sides. Arrange chicken on prepared pan. (**if you are using a cookie sheet or broiler pan, you may only want to coat one side of the chicken, the side that sits directly on the pan has a tendancy to get moist and in turn causes the coating to be soggy. Or you can turn the chicken half way through the cooking to ensure crispiness on both sides.)

Bake chicken 15-20 minutes or until the topping is golden brown and the chicken is no longer pink. Serve with Honey Mustard Sauce or any dip of your choice.

Honey Mustard Sauce
1/2 cup Dijon Mustard
1 Tablespoon mayonnaise
3 Tablespoons honey

In a small bowl, combine all ingredients until smooth. Store in refrigerator till ready to use.

(Nutritional Info on chicken strips only: 215 Calories, 8 grams fat, 5 grams carbohydrates, 29 grams protein, 166mg cholesterol, 280mg sodium)
 

Wednesday, January 27, 2010

Smothered Pork Chops with Thyme


The one thing missing from this meal... bread to sop up all the gravy with.  The one night I don't have bread to go with our meal is the one night we really needed it!  The gravy for this dish was so delicious I think Chris and I could have just put it in a cup and slurped it up that way!  This gravy would go well with chicken too, so if you aren't big into pork, you can still enjoy the flavors of the gravy.  You could use bone in, skin on or boneless, skinless chicken breasts.  Either way, chicken or pork, this is one to add to your recipe box.

Now if you aren't a fan of onions or shallots, my suggestion would be to still use them per the directions and then strain the gravy before you serve it.  I think you need the flavor that the shallot/onion brings to this dish.  The original recipe for this called for onions, but I had a shallot instead, so I went ahead and used that.  Shallots have a pungent blend of garlic and onion flavor.  If you have never tried cooking with them, this is a good recipe to experiment with.  The shallots don't get that slimy texture that onions can tend to produce when cooked.  Beware, though, shallots can burn easily because of their high sugar content, so keep on eye on it at all times.  Burned shallots = icky gravy :)

Smothered Pork Chops with Thyme
Ingredients:
1 cup fat free, less sodium beef broth, divided
2 Tablespoons 2% milk
2 teaspoons all-purpose flour
2 teaspoons Dijon mustard
1/4 teaspoon salt
1/4 teaspoon pepper
2 butterfly center cut pork chops (about 1 pound)
1/2 teaspoon paprika (I used Hungarian sweet paprika)
1/4 teaspoon dried thyme
cooking spray
1 shallot, sliced thin (or half a small onion)

Directions:
Combine 1/4 cup broth, milk, flour, mustard, salt and pepper in a small bowl, stir with a whisk; set aside.

Sprinkle each side of the pork chops with paprika and thyme.  Heat a large non stick skillet over medium high heat.  Coat the pan with cooking spray.  Add the pork to the pan and saute for 2 minutes on each side. Remove from pan and cover.

Reduce heat to medium and add sliced shallots, saute about 4 minutes or until light golden brown.  Add remaining 3/4 cup broth and bring to a boil.  Let simmer for 2 minutes.  Add the milk mixture, stirring with a whisk.  Add pork back to the pan, turning to coat.  Reduce heat to low; let pork simmer for another 5-8 minutes or until the pork is no longer pink in the middle.  Enjoy!
(Nutritional Info:  145 calories, 5.5 grams fat, 17.2 grams protein, 5.8 grams carbohydrates, 475 mg sodium)

Tuesday, January 26, 2010

Firecracker Tiliapa with Lemon Aioli

WARNING!! WARNING!! WARNING!! 
This dish is not for the weak of tongue or stomach!!
Fiery... Spicy... Hot... Burning... Blazing... Blistering... Thermogenic..  Those are just a few words I would use to describe this dish.  Ok, ok.. I may have gotten a little carried away with the synonyms, but still, I think you get the picture, this dish is HOT, so beware!  If you are not a spicy food lover, turn away now!

Chris and I love this recipe!  I've tested it on him a few times now.  Last time I made it, I actually put the fish in a foil packet and grilled it.  If you aren't into too much heat, cut back on the red pepper flakes and the cayenne pepper.  If you are feeling adventurous, though, I encourage you to try this one.  If you don't do fish, this spice mix will work on chicken or shrimp.

The key to this dish, once again, is the sauce.  The lemon aioli softens the blow of the heat.  It cools your tongue after the fish sets it aflame! So, what's aioli, you ask?   Aioli is a sauce that is traditionally made with garlic, olive oil, eggs, and lemon. In this recipe, I use mayonnaise instead of the oil and eggs to simplify things.  Once you try this aioli and you find you like it, check online for other aioli recipes, there are many and they are good! (if you want some of mine, shoot me an email and I'd be glad to share then with you before I post them)

Firecracker Tilapia with Lemon Aioli
Ingredients:
2 teaspoons black pepper
1/2 teaspoon salt
1 teaspoon onion powder
1 teaspoon chili pepper flakes
1 teaspoon ground sweet paprika
1/2 teaspoon cayenne pepper
1 teaspoon dried oregano
1 teaspoon dried thyme
1 teaspoon garlic powder
2-4 Tilapia fillets
2 Tablespoons olive oil 

Lemon Aioli
1/2 cup mayonnaise (you can use light mayo)
1 clove of garlic, minced 
2.5 Tablespoons lemon juice
salt and pepper to taste
1 Tablespoon fresh chopped rosemary or chives (optional)
Directions:
Preheat oven to 400 degrees.  Prepare a baking dish with non stick cooking spray.

In a small bowl, combine all of the aioli ingredients together.  Refrigerate until ready to use.

In another small bowl, mix all of the ingredients together except the fish and the olive oil.  Brush the fish with olive oil.  Sprinkle both sides of each fillet with the spice mixture and place in prepared baking dish.  Bake for 15-20 minutes.  Serve with aioli. Enjoy!

Monday, January 25, 2010

Super Bowl Count Down...Take Two: More Appetizers

So this week, for my Super Bowl count down recipes, I've included one of my favorites.  I'm sure you have all been to a party where someone brings onion dip.  Most of the time, when I have had it, it's been made with sour cream and Lipton's Onion Soup Mix.  Well, my friends, throw that recipe out because I found a homemade version that will knock your socks off.  It's called Caramelized French Onion Dip.  It takes a bit more time then the normal Lipton's version, but it's well wroth it.  I've also included a very simple recipe for Tomato & Basil Bruschetta.  Tomatoes, basil and garlic on top of a crunchy little toast.  It's simple, light, and delicious.

By the way, my prediction for Super Bowl Champions... New Orleans... GO SAINTS!!

Caramelized French Onion Dip
Recipe courtesy Life's Ambrosia 
Ingredients:
1 Tbls olive oil
1 cup finely chopped onion
1 garlic clove, minced
1/2 cup mayonnaise
1/2 cup sour cream
1/2 tsp Worcestershire sauce
1/4 tsp pepper
1/4 tsp kosher salt

Directions:
Heat olive oil in a small pan over medium-low heat. Add onion and garlic and cook until they turn brown in color, stirring occasionally, about 20-40 minutes. Take care not to burn the onions. Remove from heat and allow to cool. 

In a bowl combine cooled onion, mayonnaise, sour cream, Worcestershire sauce, salt and pepper. Chill 30 minutes.
--------------------------------------------------------------------------------------------------------
 
Tomato & Basil Bruschetta
Ingredients:
1/2 baguette or crusty long loaf bread, sliced (12 pieces)
1-2 cloves garlic, skin removed and cut in half
Extra virgin olive oil
3 small tomatoes, seeded and diced
20 fresh basil leaves, ripped or chopped
salt and pepper
Shredded Parmesan cheese 

Directions:
Preheat broiler to high.  Place the bread slices on a broiler pan.  Toast each piece on each side under broiler, making sure you don't let the bread burn.  Remove from oven.

Rub toasts with cut side of garlic and drizzle with olive oil.   Sprinkle half of the basil on the toasts.  Sprinkle the tomatoes with salt and pepper.  Pile the tomatoes on each toast.  Sprinkle rest of basil and the parmesan cheese on the toasts.  Enjoy!

Friday, January 22, 2010

Chicken & Basil Stir Fry


There is a Thai restaurant out here that serves a killer dish called Crispy Basil Chicken.  It has these crispy little bite size pieces of chicken that have been tossed in a molasses and garlic sauce and it's served over flash fried basil.  It is scrumptious!  I actually haven't been there in years, but, oh how I remember it's sweet crispiness!  It was the first time I'd actually had Thai basil and I fell madly in love with it.  Thai basil has more of a licorice or mint flavor then say sweet or lemon basil.  When I came across this recipe, I immediately thought of that dish.  It's not the same dish of course, but it's got the same basic flavors.  Next time I make it I might change the sauce up a bit, but for now, it was the perfect way to fill the void that the crispy basil chicken had left :)   Don't worry if you can't find Thai basil, any variety of basil will actually work for this dish.

One thing before I leave you... I'm going to try and start adding nutritional information after each recipe.  I can't guarantee it will be with every recipe, but when I can add it, I will.  The nutritional info that goes with this recipe is for the chicken only, rice is not included.

Chicken & Basil Stir-Fry
Adapted from My Recipes.com 
Ingredients:
1 lbs. boneless, skinless chicken breast, cut into bite size chunks
1 Tablespoon vegetable oil
2 garlic cloves, minced
1 red pepper, julienned or chopped into bite size pieces
1 teaspoon ground ginger
1/4 teaspoon red chili flakes
2/3 cup chicken broth
1 Tablespoon soy sauce
2 teaspoons hoisin sauce (optional)
2 teaspoons cornstarch
1 cup lightly packed fresh Thai basil, rinsed and chopped (if you can't find Thai basil, any basil will do)

Directions:
In a small bowl, mix ginger, chili flakes, broth, soy sauce, hoisin, and cornstarch until smooth.  Set aside.

In a large skillet or wok, heat the oil over medium high heat.  Add the chicken and stir fry until almost cooked through, about 3-4 minutes.  Add the red pepper and stir fry for 1 minute.  Add the garlic and stir fry another minute.  Add the sauce mixture to the pan and stir until the sauce starts to boil, about 1-2 minutes.  Add the basil and cook just until wilted, about 30 seconds. Serve over rice or noodles. Enjoy!

(Nutritional Info:  202 calories (25% from fat), 5.7grams fat, 30grams protein, 6.5grams carbohydrates)

Thursday, January 21, 2010

Lemon Tuna Pasta with Basil & Zucchini


Growing up, one of my favorite things my mom made for dinner was tuna casserole.  I would eat it until I was miserably stuffed.  It was just so creamy and good.  She even made buttery bread crumbs to put over top of it...mmmmm :) To this day, I still consider my mom's tuna casserole to be one of the best I've had.  It's simple and easy, but to me it will forever remind me of good times in my childhood.  Since I want to try and eat a bit more healthier, it doesn't make a whole lot of sense to make a big dish of tuna casserole, even though I've been craving it for weeks, because I will eat it and eat it and eat it.  So what's a girl to do?  You crave the comforting, heavy foods of your childhood but you also want to fit into those jeans tomorrow morning.  I think I may have found my solution...this dish.  It's got all the comforting agents of pasta without all the heavy creamy cheesy buttery goodness of a casserole.  Did I say goodness?  I meant heavy creamy cheesy buttery evilness that will stick with you for another month.  Don't think for a second that this isn't as good just because it's lighter and healthier.  It's got a nice light fresh flavor to it.  And don't forget, Tuna is rich in protein, low in fat and calories and is an excellent source of the essential omega-3 fatty acids which help to lower blood pressure and cholesterol.  So see.. yummy AND good for you!

Oh.. and If you wanted to make this even more healthier, use whole wheat pasta.  I haven't found my love for it yet, but it is better for you then standard pasta.

Lemon Tuna Pasta with Basil & Zucchini
Adapted from Epicurious.com 
Ingredients:
1 lbs. penne pasta
2 garlic cloves, minced
1 Tablespoon olive oil
1 lemon, zested & juiced
1/4 cup packed fresh basil leaves, chopped
1 6oz can of tuna packed in olive oil, do not drain
1 cup sliced zucchini (I cut them into rounds, then sliced the rounds into three strips)
Salt and Pepper to taste

Directions:
Prepare pasta according to package directions.  Drain and put into a large bowl.

In a skillet, quickly saute the zucchini, about 2-3 minutes.  Add the zucchini to the bowl with the pasta in it.  In the same skillet, add the olive oil and the garlic and saute for 1 minute.  Pour over the pasta.  Add the lemon zest and juice, tuna with the olive oil, and basil to the pasta.  Toss to combine.  (If the pasta is too dry, you can add a bit more olive oil.)  Season with salt and pepper.  Enjoy!

Wednesday, January 20, 2010

Pan Seared Tilapia with White Bar-B-Q Sauce


Never fear, ye non lovers of fish... the original recipe for this barbecue sauce was for chicken.  You can easily use the same spice mix on chicken and either pan fry it, grill it or bake it.

The sauce is what makes this dish.  I actually made this sauce last summer with a little recipe I like to call my "disaster" fish.  It would have had zero flavor if not for the sauce.  It's tart, tangy and .... well.... yummy :)


Pan Seared Tilapia with White Bar-B-Q Sauce
Ingredients:
3/4 tsp thyme
3/4 tsp oregano
3/4 tsp sweet paprika
1/4 tsp onion powder
1/4 tsp salt
1/4 tsp pepper
lime or lemon juice
1 Tbls olive oil
4 Tilapia Fillets
For the sauce:
1/2 cup mayonnaise
2 Tbls white wine vinegar
1/4 tsp garlic powder
1/2 coarse ground pepper
1 tsp spicy brown mustard or Dijon mustard
1/2 tsp sugar
1/4 tsp salt
1 tsp horseradish

Directions: 
For the sauce:  Mix all sauce ingredients together until well blended.  Cover and store in the refrigerator until ready to use.

In a small bowl, mix the first 7 ingredients together.  Drizzle both sides of the fish with lime or lemon juice.  Evenly distribute the spice mixture on both sides of the all the fillets.

In a skillet large enough to hold all 4 fillets (or a smaller one that holds two at a time), heat olive oil over medium heat.  Add fish and fry about 4-6 minutes on each side or until the fish flakes easily with a fork. (You may need to adjust your heat so you don't burn the fish) Serve with sauce on the side.  Enjoy! 


Tuesday, January 19, 2010

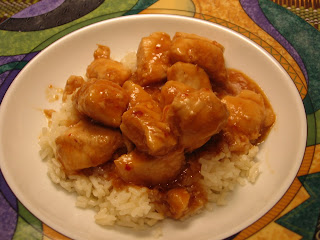
Bourbon Chicken


I know what you are thinking, BOURBON?  Well, fear not, this recipe actually does not have bourbon in it.  So why the name?  Well, originally, this recipe was created with bourbon as an ingredient.  I just happen to have stumbled across a recipe that did not call for it.  If you check Wikipedia, it also says that this dish was named after Bourbon Street in New Orleans, which I find very interesting since I assumed this was more of a Chinese dish.  Either way, we both loved this. The sauce was sweet and a tiny bit spicy...my favorite combination.  I served it over plain white rice and with a side salad.  If you wanted to add some veggies to the dish, I would recommend red peppers, snow peas, mushrooms, zucchini or even broccoli.

Bourbon Chicken
Original recipe by Blog Chef 
Ingredients:
2lb boneless skinless chicken breasts
oil (for frying)
cornstarch (for dusting, optional)
Sauce-
1 garlic clove (minced)
1/4 teaspoon ginger

3/4 teaspoon crushed red pepper flakes
1/4 cup apple juice
1/3 cup light brown sugar
2 tablespoon ketchup
1 tablespoon cider vinegar

1/2 cup water
1/3 cup soy sauce

Directions:
Cut chicken breasts into bit sized pieces, and if you choose lightly dust with cornstarch. Heat oil in your wok and fry chicken bits in batches until lightly browned. Drain on paper towels and set aside.

In a bowl combine all sauce ingredients. Pour into wok and bring to a boil. Add chicken bits back to the pan, reduce the heat and simmer for 10 minutes (I only let it simmer for 5 minutes).  Enjoy!

***I only used 1 lbs of chicken, so I cut all other ingredient amounts in half.  It was enough to feed Chris and I with no leftovers.*** 

Monday, January 18, 2010

Super Bowl Count Down...Take One: Appetizers

The playoffs are under way and the Super Bowl is just around the corner.  Even though my team shamefully got their butts kicked this past Saturday, I'm still aware that most people are either planning on throwing or planning on attending a Super Bowl party.  So over the next three weeks, I will post some of my favorite game time snacks.

First up on the count down:  Basil Parmesan Dip and Stuffed Jalapenos.

Basil Parmesan Dip, a creamy combination of classic Italian flavors.  Serve it with pita chips, carrot sticks, cucumbers, or even crostini.
Basil Parmesan Dip
Adapted from Cooking Light 
Ingredients:
1 cup lightly packed basil leaves
3/4 cup grated or shredded Parmesan cheese
3/4 cup reduced fat sour cream
2 teaspoons lemon juice
1 garlic clove

Directions:
In a food processor, add the garlic clove and pulse a few times.  Add the basil and pulse until lightly chopped.  Add the Parmesan cheese and process until everything in the processor is finely chopped.  (If you don't have a food processor, just chop everything up as fine as you can.)

In a medium bowl, add the sour cream and lemon juice and mix thoroughly.  Add the basil mixture and fold to combine.  Chill for at least 30 minutes.  Serve with pita chips, crostini, or veggies.
------------------------------------------------------------------------------------------------------------
Jalapenos, bacon and cream cheese....need I say more about these little spicy baked snacks?  (if it were summer time, I'd suggest doing these on the grill!!)
Stuffed Jalapenos
Ingredients:
5-10 jalapenos (depending on size..5 large, 10 small) sliced in half lengthwise, seeds and ribs removed, you want to create a shell
4 oz cream cheese
4 slices of bacon, cooked and crumbled
1/4 tsp garlic powder
salt and pepper to taste

Directions:
Preheat oven to 350 degrees.
Place empty jalapenos on a baking sheet and bake in preheated oven for 5-6 minutes or until lightly softened.

Meanwhile, in a bowl combine the cheese, bacon, garlic powder.  Season with salt and pepper to taste.

Remove jalapenos from the oven and fill with cheese mixture.  Return to the oven and bake for about 8 minutes.  Turn broiler on and broil for 2 more minutes.  Remove and serve.

Friday, January 15, 2010

Bacon-Parmesan Crusted Tilapia


I think one of the best aromas in the world is the smell of frying bacon!  When I smell bacon cooking, my eyes glaze over, I start to salivate, and all thought and reasoning are pushed aside.  I mean, I could have just eaten a full three course meal and if I smell bacon, I'll want to devour it!  So, obviously, when I saw this recipe, I HAD to try it.  It's now one of my favorite fish recipes.

Now, let's just say you love the sound of this recipe but aren't a fan of fish.  Go ahead and use chicken instead.  I think the flavors of the bacon-parmesan mixture would work fantastic on chicken too.

Bacon-Parmesan Crusted Tilapia
Adapted from MyRecipes.com/Coastal Living 
Makes 2 Servings
Ingredients:
4-6 bacon slices, cooked and crumbled
1/4 cup Panko (Japanese breadcrumbs)
1/4 cup shredded or grated Parmesan cheese
1 tablespoons chopped fresh Italian parsley (or 1/2 Tbls dried parsley)
2 (5- to 6-ounce) Tilapia fillets (or any white fish such as cod or sole or haddock)
1/4 teaspoon freshly ground pepper
olive oil
garlic powder

Directions:
Preheat oven to 400 degrees.  Prepare a baking dish by spraying it with non stick cooking spray.

Combine first 4 ingredients in a shallow dish. Set aside.

Place fish in prepared dish.  Drizzle fish with olive oil and sprinkle with garlic powder.  Top each fillet evenly with the breadcrumb mixture.  Bake for 15 minutes or until the fish flakes easily with a fork.  Enjoy!

**A note regarding panko:  In a lot of my recipes, you will see that I use panko instead of regular dry bread crumbs.  Panko is a variety of bread crumbs used in Japan.  It tends to have an airier, crispier texture then most bread crumbs used in Western cuisines.  Most grocery stores carry at least one brand of panko, but not always, so if this is the case at your grocery store, you can easily use dry bread crumbs.  If you are feeling really adventurous, though, you can even make your own.  Personally, I like the crunchy texture that panko gives to foods, even if you aren't deep frying it.

Thursday, January 14, 2010

Balsamic, Dijon & Garlic Chicken

Like so many Americans, I stuffed myself with a ton of sweets and comforting foods over the holidays.  Even though we are two weeks into January, my eating habits have not changed much, so I figured it was about time to wean myself off of those yummy fattening things and try and cook a bit more healthier... for at least one night :)

One of my favorite things to eat, besides pasta :), is grilled chicken.  If cooked right, it will be juicy and flavorful.  If cooked wrong, it will be a dry jerky-type mess.  The key to grilling chicken is leave it be!  Just like a lot of meats, you should only have to turn it once.  If you spend a lot of time flipping and squashing, you will loose all the flavor and a lot of the juices.  I know most people are worried that they are going to under cook the chicken, and I understand that, I mean who wants to cut into a piece of chicken and see pink?  Not me, that's for sure.  Boneless, skinless chicken breasts are one of the easiest things to grill.  It should only cook for 15-20 minutes (unless you have a majorly thick piece, that is, but that can be solved by pounding the meat with a meat tenderizer).  Anything longer then that and you will dry it out.  My suggestion, invest in a meat thermometer.  Chicken should have an internal temperature of 165 degree.  Another key to grilling chicken, or any meat for that matter, let it sit for a couple of minutes before you cut into it.  First, it will continue to cook as it sits.  Second, it will leave less juice on the plate.

Both Chris and I loved this recipe.  It was light and fresh.  I served it with some roasted potatoes and a side salad.  It was the perfect meal after many weeks of heavy foods.

Balsamic, Dijon & Garlic Chicken
Adapted from For the Love of Cooking 
Ingredients:
3-4 chicken breasts, trimmed of any fat
1/3 cup balsamic vinegar
2 tbsp Dijon mustard
2 tbsp olive oil
1 tbsp fresh parsley, chopped
1 tbsp fresh basil, chopped
3 cloves of garlic, minced
Salt and pepper to taste

Directions:
Combine all ingredients in a large zip lock bag and mix thoroughly; add chicken and marinate in the refrigerator for at least 2 hours.

Grill meat about 5-8 minutes on each side or until juices are running clear. Let the meat for rest a couple of minutes before cutting it. Enjoy!

***As always, if you can't grill, this would be a great dish to either bake or pan sear.  Personally, I would sear it in a skillet and then transfer to a 350-375 degree oven to finish the cooking process.

Wednesday, January 13, 2010

Creamy Italian Sausage Pasta


I think it was Federico Fellini who said "Life is a combination of magic and pasta".  Personally, I think pasta IS magic.  I love pasta.  It is my comfort food of choice.  I would eat it morning, noon, and night, seven days a week if I could.  I love it with red sauces and white sauces.  I love it with meats.  I love it with cheeses. I love it with veggies. I even love it with just a little butter and garlic.  Did I mention that I love pasta? :)

I found this dish on the Tasty Kitchen website.  I saw it and printed it out just because I thought the name sounded good.  I didn't even look at the ingredients, actually.  When it came time for me to make it the other night, I realized, hhhhmmmmm... this isn't what I thought it was going to be, so I decided to change it up a bit.  I liked it a lot.  Actually, I liked it more the next day, but that's sometimes how it goes with pasta :)  Chris liked it too, but he had a really hard time with the color of it.  He said it reminded him of how one of his sister use to make her tomato soup.  So I guess as long as the color of the sauce doesn't bother you, I recommend trying this.  It might not be the healthiest thing, but if you are looking for comfort in calories, this is the dish for you :)

Creamy Italian Sausage Pasta
Adapted from Tasty Kitchen 
Ingredients:
1 lbs. sweet Italian sausage
1 cup finely diced onion, caramelized (see recipe for caramelized onions below)
2 cloves of garlic, minced
3/4 cup heavy cream
3/4 cup pasta sauce (homemade or store bought)
1/4 cup chicken broth
1 lbs. ziti or penne pasta
Fresh Parmesan cheese, for topping

Directions:
Cook pasta according to package directions.  Drain and rinse. 

In a Dutch oven or large pot, brown the sausage.  Drain off any excess fat.  Add the onion and garlic and saute for 1 minutes.  Add the pasta sauce and the chicken broth.  Stir until combined.  Add the cream.  Simmer, stirring often, until reduced by half. 

Toss with pasta and top with Parmesan cheese.  Enjoy!

Caramelized Onions:
(note, though you use 1 cup of diced onion, it will cook down to about 1/2 cup or less)
Ingredients:
1 Tablespoon olive oil
1 cup finely diced onion

Directions:
Heat olive oil in a small pan over medium-low heat. Add onion and cook until they turn brown in color, stirring occasionally, about 20-40 minutes. Take care not to burn the onions. Remove from heat and allow to cool.


By the way, this was my lunch the next day :)  Like I said, just as good, if not better!

Tuesday, January 12, 2010

Triple Chocolate Mayan Brownies

A few months back, my friend Barb forwarded me an email regarding a local restaurant that was hosting a dessert competition.  It was called the Dessert Throwdown in the Desert (or something like that).  The top recipes would be picked to compete in a cook off.  The winning dessert would then be featured on the restaurants menu for a year and part of the proceeds from the sales of the dessert would go to the winners favorite charity.  At first I thought, hey, I could do that.  Then self doubt quickly crept in.  I can easily convince myself that I am not a good cook.  I mean, really, most of the time all I really do is a follow a recipe, how hard is that, right?  I, then, convinced myself that I didn't have any recipes of my own, so I couldn't compete anyway.  Little by little, Chris helped pump up my confidence and before it was too late, I believed I had a shot. Unfortunately, I did not win the competition, but I did have a good time with it and in the end, that's what counts.

The competition had some guidelines, so of course, I couldn't make just any dessert.  It had to be a cookie, brownie, or pie.  No cakes.  I knew I didn't want to do a cookie.  I have a good chocolate chip cookie recipe, but who doesn't.  I didn't have a single pie recipe that I created, so brownies seemed the most obvious.  I got the idea for this recipe from a bundt cake I made a few years back.  It was a bundt cake that had chocolate and cayenne pepper in it. I thought the combination of the chocolate and cayenne pepper was a marriage made in heaven.  I love chocolate.  I love spicy.  What more needs to be said.

If you do not like fiery things, do not be afraid to cut back on the cayenne pepper, or even cut it out all together.  The cinnamon will still add a bit of a "kick" to what would be a standard chocolate brownie.

Triple Chocolate Mayan Brownies
Ingredients:
4 oz. unsweetened chocolate, roughly chopped
2 oz. semi-sweet chocolate, roughly chopped
1/2 cup unsalted butter (1 stick)
1 1/4 cup packed brown sugar
1 Tablespoon cinnamon
1/4 teaspoon cayenne pepper
1/4 teaspoon salt
3 large eggs
1 teaspoon vanilla
3/4 cup all purpose flour
1/2 cup milk chocolate chips

Directions:
Preheat oven to 325 degrees.  Line a 9x9 or 8 x 8 -inch pan with parchment paper or aluminum foil.  Grease lightly.

In a microwave safe dish or in a double broiler on the stove, melt the unsweetened chocolate, the semi-sweet chocolate, and butter until smooth.  Let cool for a few minutes.

In a large mixing bowl of a standing mixer, or in a large bowl, add the melted chocolate, brown sugar, cinnamon, cayenne pepper and salt.  If using a standing mixer, use paddle attachment and mix on low until blended.  If mixing by hand, a whisk tend to work the best to incorporate all ingredients.

Mix in the eggs, one at a time.  Batter should be smooth by the last egg.  Add vanilla.

With a spatula, fold in the flour.  As soon as the flour is incorporated into the mixture, add the chocolate chips.  Fold gently to combine.

Pour mixture into prepared pan.  Bake 35-40 minutes or until a toothpick inserted into the middle of the brownies comes out clean.  (We like more fudgey brownies, so I take the brownies out when there are still a few crumbs on the toothpick, but it's not wet.)  Enjoy!