Search This Blog

Thursday, March 31, 2011

Thai Steaks with Fried Rice

This is one of those recipes that I kept saying I wanted to try, yet kept putting it aside.  No real reason, it just happens sometimes.  Well, I'm so glad that I finally tried it.  Mainly because it finally forced me to make fried rice!!  It's actually a bit shocking to me that with all the rice we consume, I have never...not once...made fried rice.  Now that's just silly.  And now that I have made this, I'm thinking even Chris will request it every now and then!  Fried rice is really very simple, and with very few ingredients, it transforms plain old rice into something magical!

I found this recipe on Nibble Me This (no, I'm not stalking Chris, it's just that he's sort of my go to person on grilling ideas...plus he's way too far away for me to stalk).  Chris actually made basil fried rice and I had every intention of making that too, but when I got home from the store I realized I had forgotten to get basil!!  DUH!!  Key ingredient to any recipe that starts with the word "basil".  So, even though I was a bit disappointed that I did not have the basil, this rice still turned out really good and I would make it again, exactly this same way!

And, let's not forget about the steak.  Can I just say Yum?  Well, I'm going to anyway... YUM!  The steaks were flavorful and scrumptious!!  A perfect blend of flavors, nothing was overpowering.  I was actually looking for skirt steak, as that's what the original recipe used, but surprisingly could not find anything.  All I could find within my price range where sirloin steaks which were on sale...this was not a problem for me, as I love sirloins.

Would I make this again?  You bet....it was one of my favorite meals so far this year!  See, sometimes it's good to stalk follow other blogs :)

Thai Steaks with Fried Rice
Adapted from Chris, Nibble Me This
Printable Recipe 
Ingredients:
For the steaks -
2 Tablespoons lime juice
1 1/2 teaspoons fish sauce
1 Tablespoon low sodium soy sauce
1/4 teaspoon sesame oil
1 Tablespoon Sriracha
2 Tablespoons vegetable oil
1 garlic clove, chopped
1 teaspoon hoisin sauce
1 lbs. petite sirloin steaks

For the rice -
2 eggs, whisked together
3 cups Basmati rice, cooked and chilled
1/2 sweet onion, finely diced
1 red bell pepper, diced
1 clove garlic, minced
4 pieces of bacon, diced and cooked until crispy
2 Tablespoons fresh chopped parsley
3-4 Tablespoons low sodium soy sauce
pinch of sugar (if you need a measurement use 1/8tsp)
dash of sesame oil (if you need a measurement, use 1/8tsp)

Directions:
In a small bowl, mix together the lime juice, fish sauce, soy, sesame, Sriracha, oil, garlic and hoisin until well blended.  Place the steaks in a resealable bag and pour the marinade over it.  Let steaks marinate for 4-6 hours.

Preheat your grill to 400-425 degrees F.  Remove the steaks from the bag and discard the marinade.  Place the steaks on the grill and cook for 4-6 minutes on each side, or until the steak reaches your desired internal temp.

Meanwhile, in a wok or deep skillet, heat a few tablespoons of oil over medium heat.  Pour eggs into wok let them cook like an omelet, remove from the wok and chop the eggs; set aside.  Mix together the soy, sugar, and sesame in a small bowl; set aside.

Add the onion and allow to cook for about 5 minutes, or just until they start to soften.  Add the pepper and cook another 1-2 minutes.  Add the garlic and stir fry for 1 minutes.  Add the cold rice.  Stir fry the rice - let is stand for 15 seconds, stir, repeat.  When the rice is browning and appearing close to being done, add the bacon and the soy mixture.  Toss to coat everything.  Add the egg and toss one more time.  Serve along side steaks.  Enjoy!


One Year Ago:  Honey Garlic Pasta
 

Wednesday, March 30, 2011

Teriyaki Hoisin Sauce

Instead of making this post about my beloved Tilapia.. today, it's just going to be about the sauce.  This sauce is so versatile and delicious that it would work on chicken, pork, or fish.  Oh, you could even toss it with some shrimp and grill or saute it... now that would be really good!  I'm thinking of actually marinating chicken and then grilling it....but that's for another day.

This sauce was probably one of the best teriyaki sauces I have had....at least out of all the ones I have attempted to make...and that list is surprisingly long.  It had the perfect blend of salty sweetness.  Definitely one I would make again and again!

Teriyaki Hoisin Sauce
Adapted from Rose Reisman's Art of Living Well
Printable Recipe 
Ingredients:
3 Tablespoons light brown sugar
2 Tablespoons soy sauce
1 Tablespoons rice vinegar
1 Tablespoon Hoisin sauce
1 Tablespoon water
1 teaspoon sesame oil
2 teaspoons cornstarch
1/4 teaspoons garlic powder
1/8 teaspoons ground ginger

Directions:
In a sauce pan, mix all ingredients together until well blended.  Bring everything to a boil, reduce the heat and simmer just until the sauce thickens.  Remove from heat and allow to cool.  Spoon over fish or chicken while baking or use as marinade or saute shrimp in it or stir fry up some chicken and veggies and pour over rice....the possibilities are endless.  Enjoy!


One Year Ago:  Parmesan Crusted Chicken

Tuesday, March 29, 2011

Orange Chicken Stir Fry

I love, love, love the orange chicken at Panda Express.  What I do not love is all those fat and calories.  So when I thought about how I could bring that yummy orange flavor to my table with a ton less of those fat and/or calories I hate so much, I knew all I really had to do was not fry the chicken.  Don't get me wrong, I love that fried crispy chicken that you get at restaurants, but with this recipe, I don't have to run an extra mile in the morning!

I did a search for orange chicken recipes and came up with this conglomeration of those ingredients used.  This was the perfect dish to satisfy any craving you might have for orange chicken.

Orange Chicken Stir Fry
Printable Recipe 
Ingredients:
1 lbs. boneless, skinless chicken breasts
1 red pepper, thinly sliced
1 orange pepper, thinly sliced
3 green onions, thinly sliced
2 Tablespoons orange juice
1 Tablespoon lemon juice
1/3 cup water, plus 1 Tablespoon; divided
2 Tablespoons rice vinegar
1 Tablespoon soy sauce
1 large garlic clove, finely minced
3 Tablespoons light brown sugar
1/4 teaspoon red pepper flakes
1/8 teaspoon ground ginger
1 1/2 Tablespoons cornstarch
1 Tablespoon vegetable oil

Directions:
Rinse chicken and pat dry.  Place on plate or cookie sheet in a single layer.  Put in freezer for 30 minutes.  Remove from freezer and slice the chicken into thin slices or bite size chunks.

Meanwhile, in a small bowl, mix together the orange juice, lemon juice, 1/3 cup water, vinegar, soy, garlic, sugar, pepper flakes, and ginger until well blended.  In another bowl, mix together the cornstarch and the remaining 1 tablespoon water; stir until smooth.  Set both aside.

In a wok or a large, deep skillet, heat the vegetable oil on medium high heat.  Add the chicken and quickly stir fry until just cooked through, about 4-5 minutes.  Add the peppers and continue to cook for 1-2 minutes.  Now, whisk the cornstarch mixture into the sauce, then immediately pour the sauce into the wok/skillet.  Bring to a boil, stirring constantly, and cook until the sauce thickens.  Add the green onions and toss to combine.  Immediately remove from heat.  Serve over rice.  Enjoy! 

One Year Ago:  Honey and Spiced Glazed Pork Chops

Monday, March 28, 2011

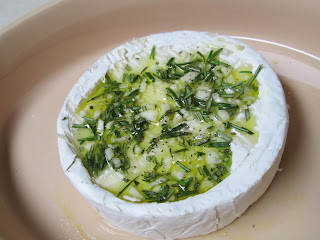
Baked Camembert Pasta

Camembert Cheese... I love it!!  Camembert is soft, creamy cow's milk cheese.  Maybe there are a lot of you out there that have never had it before.  If so, this is the time to try it.  Lucky for me, I found an 8 ounce wheel of it on sale for $3 (normally $5.99) while I was looking for Fontina cheese.  I was actually going to make a chipotle mac and cheese...but when I saw the Camembert, I just knew I had to make this pasta.  Guess the chipotle mac will have to wait :)

I saw a recipe for this about 2 years ago.  For the life of me, I cannot find and do not remember where the original recipe came from.  I did remember that Jamie Oliver had posted baked Camembert before, so I started there.  The one thing I do remember is reading through the recipe and thinking... oh, yea, this is definitely something I need to try.  And try it I finally did!  After having this fabulous dish, I'm sorry I waited so long to make it, but, I will admit, it was well worth the long years of waiting!!

This is simple, delicious, creamy, and well..just down right fan-frickin-tastic!  (If you can't find Camembert, I'm thinking you can probably use brie instead...though I'm not 100% certain on that, so don't try it, have it fail, and then blame me!)

Baked Camembert Pasta
Slightly adapted from Jamie Oliver
Printable Recipe 
Ingredients:
1 box (8oz.) Camembert cheese wheel
2 gloves of garlic, minced
1 sprig fresh rosemary, leaves only
sea salt and pepper
extra virgin olive oil
4oz grated parmesan cheese
2 1/2 cups Barilla Plus multigrain elbow pasta (or any tubular pasta will work)
1-2 cups (or more if you want) fresh spinach leaves
cherry tomatoes; quartered (optional)

Directions:
Preheat your oven to 350 degrees.  Open the cheese and unwrap it.  Place in oven safe dish.  Score a circle in the top of the rind, leaving a border, then peel the rind off the top and discard.  Scatter the minced garlic on top, season with salt and pepper, and then drizzle with some olive oil.  Scatter the rosemary leaves on top and lightly press them into the oil and cheese.

Place in preheated oven and bake 25-30 minutes, or until the cheese has melted.

Meanwhile, cook the pasta according to the package directions.  Drain; reserving 1 cup of the pasta water.  Once drained, add the spinach and stir to wilt.  Drizzle with some olive oil and add the parmesan cheese.  Once the Camembert is ready, spoon the cheese over the pasta.  I would suggest doing this with each serving as dumping it all in there may cause it to clump up.  If cheese is too thick, add a little pasta water to thin out.  Top with tomatoes if desired.  Enjoy!

One Year Ago:  The Obsessive Chef's Tilapia Fillets

Saturday, March 26, 2011

Not much to do about food....

Today's post has nothing to do with this picture...but I love my kitties...and I thought this was such a cute picture... I just had to share!!

This post, unfortunately, is not going to focus a lot on food... I know, I'm sorry, but that's just how it goes sometimes.  Don't get me wrong.. I have a bunch of stuff in the "works" - i.e. half finished started posts, and I should really be posting one of those...but today I have other things to talk about, so you are just going to have to bear with me here :)

(Picture, respectfully stolen ...er...taken from Nibble Me This)

First, please make sure to stop by Nibble Me This before Thursday, March 31st.  Why?  Because, Chris is giving away a copy of "The Encyclopedia of Sandwiches" by Susan Russo, that's why.  So go....well finish reading this post, then go.  There are three ways you can enter to win....and good luck!!

(Lauren and Marcos...aren't they cute???)

Second, one of the girls I work with (Lauren) is getting married next February.  She and her fiance (Marcos) are of course trying very hard to keep costs down for the wedding as they are also trying to buy a house.  UGH... The cost of weddings is outrageous and I can't imagine what a dent this will put in their pocket.  BUT, they are a smart couple and are doing whatever they can to try and cut expenses.  They have also entered the Crate & Barrel "The Ultimate Wedding Contest".  This is a chance for them to win $100,000 for their ultimate wedding!  I was so excited for them that I couldn't help but ask you...my wonderful and loyal readers.. to please oh please oh please go vote for them.  You don't have to sign up for anything, all you have to do is be a Facebook user....no other strings attached, I promise.  And voting takes seconds.  So please, if you have a moment stop here and place your votes.  Lauren and Marcos will be forever grateful (and so will I)!

And, last but not least, don't forget to check out my Fire Day Friday post for Mediterranean Grilled Chicken.  It's one you don't want to miss.  And, since we finally are speaking about food, if you haven't seen yesterdays guest post from Michael of Me, My Food and I, make it a point to go there now (click here) - Michael made a fantastic orzo salad that you'll be thinking about all day....and night...trust me.

 
Have a great weekend!  Ciao!

Friday, March 25, 2011

Guest Blogger: Orzo Salad with Prawns, Petit Pois and Arugula Pesto

I am extremely excited to introduce this weeks guest blogger - Michael of Me, My Food and I!  I found Michael, thanks to Chef Dennis of More Than A Mount Full, where he was a guest on Chef's Guest Post Friday.  I was instantly drawn to Michael's site.  What kept me coming back to Me, My Food and I, was not only Michael's great writing skills, but his love for food and for Nigella Lawson and the luscious simplicities of her recipes.  Michael loves to cook for his friends and is not afraid to indulge every now and then (you gotta love that!).  Although Michael lives 5090 miles away from me...I would be happy to share my kitchen with him any day!  So, stop by Me, My Food and I and say hi to Michael.  While you are there, browse around...I bet you'll find a TON of new delicious recipes!

Oh...and don't forget to check out my Fire Day Friday post over at Our Krazy Kitchen.  Today's recipe: Mediterranean Grilled Chicken.  So I'll stop typing now and let Michael take it away...

Hello readers of Jenn's Food Journey!  I hope you are all doing well.  My name is Michael Toa, I am 23 years old and I live in Sunderland, U.K.  I love Italian food and for me nothing says Italian food like pasta.  Unlike other infamous Italian food like pizza and tomato sauce, which have a fairly recent history, pasta may indeed have a much older pedigree, going back hundreds, if not thousands of years.

I was once told that the Venetian merchant, Marco Polo, brought back pasta from his journey to China in 1295.  So, I did a little research and found out there are evidences of Italian recipe books from earlier years containing references to pasta dishes.  Since China is an ancient civilization, with a complex culture dating back thousands of years, it's likely that pasta existed in China very early.  Right, so we now know pasta did not arrive in Italy courtesy of Marco Polo; and let's just stop here because I am not a food historian and I could go on and on talking about pasta, but let me get to the point and share with you this delicious recipe for orzo salad with prawns, petit pois and arugula pesto.  Arugula, or 'rocket' as we call it in the UK, is one of my favorite salad leaves.  I was introduced by an Italian friend to this arugula pesto and I am a complete convert.  I still often us the traditional sweet basil for pesto sauce, bit I just adore the peppery taste of arugula.

Orzo or sometimes called risoni are rice-shaped pasta.  Mind-boggling, isn't it?  I am so easily amused. They take minutes to cook and are perfect for salad dishes.  I love the balance of flavors in this hearty salad.  Balance is not something I can do in real-life, but nonetheless more manageable in my food.  I love the mixture of peppery, garlicky taste from the pesto, together with natural sweetness from the prawns and petit pois, saltiness from the parmesan and freshness from lemon.  In one short word: yum.

Regardless of it's history, I think pasta is here to stay.  Don't you think? :)

Orzo Salad with Prawns, Petit Pois, and Arugula Pesto
Recipe from the kitchen of Michael Toa - Me, My Food, and I
- Serves 4-6 -
Printable Recipe 
500 gr orzo pasta
250 gr cooked king prawns, anyway you like.  Grilled with a little olive oil, lemon zest and oregano...just a thought.
200 gr frozen petit pois
3 tablespoon extra virgin olive oil
zest and juice of 1 lemon
sea salt and black pepper, to taste

For the pesto:
100 gr arugula
50 gr pine nuts
1 clove of garlic, peeled
100 gr freshly grated parmesan cheese
Extra virgin olive oil

In a big pot of salted boiling water, cook the orzo according to the instructions at the back of the packet.  Two minutes before the end of the specified cooking time, add the petit pois to the pot.  Once cooked, drain and rinse with cold water to stop the cooking.  Transfer to a large bowl and add 3 tablespoons of olive oil and stir to prevent the pasta from sticking.

To make the pesto sauce, in a food processor, add all the ingredients except the olive oil.  Blitz to mix for a few seconds and with the machine running, gradually add the olive oil to the desired consistency.  Season pest to taste with salt and pepper.

Toss the orzo and little peas with the prawns, lemon zest, juice, and the arugula pesto until everything is well-coated.  Taste the salad and check if you need more lemon juice, more grating of parmesan or salt and pepper.

Best serve at room temperature with a handful of more arugula and just a little drizzle of extra virgin olive oil on each plate.  Enjoy.


One Year Ago:  Hamburger & Macaroni (aka: Chris' Goulash)

Thursday, March 24, 2011

Baked Fish with Sour Cream-Parmesan Sauce

This was seriously good.  Sometimes I'm surprised that I can find/come up with such great new ideas for tilapia.  Sooner or later, you know it's going to happen... you'll come, check out my site and there will be no posts for fish!  I know that may come as good news to some, but it is saddening news to this blogger.

Ok, maybe I'm being a bit dramatic....I'll admit, that happens from time to time.  But nonetheless...this recipe was outstanding!  It was crispy, it was a little creamy, it was flavorful, it was delicious!  And of course, as always, let's not forget simple :)  You know I'm a sucker for simple!

Baked Fish with Sour Cream-Parmesan Sauce
Adpated from Southern Cooking
Printable Recipe 
Ingredients:
4 tilapia fillets
1/4 cup reduced fat sour cream
3 Tablespoons shredded parmesan cheese
1/4 teaspoon paprika
1/4 teaspoon salt
1/8 teaspoon pepper
1 Tablespoon Italian seasoned bread crumbs
1 Tablespoon panko bread crumbs

Directions:
Preheat oven to 400 degrees.  Spray a baking dish with non-stick spray.  Rinse the fillets and pat dry.  Place fillets in prepared baking dish.

In a small bowl, mix together sour cream, parmesan, paprika, salt, and pepper until well blended.  Spread the mixture evenly over each piece of fish.  In another bowl, combine the two bread crumbs.  Sprinkle the bread crumbs evenly over each piece of fish.

Bake for 12-15 minutes or until the fish flakes easily with a fork.  Enjoy!

One Year Ago:  Creamy Ranch Chicken Enchiladas

Wednesday, March 23, 2011

Herb-Mustard Marinated Chicken

Ever since I posted that recipe for Mustard Roasted Potatoes, I have been craving all things mustard!  I know it might sound strange, but it's true.  I really do love the flavor that Dijon brings to dishes.  So, when I saw this marinade, I knew I had to try it.

I like this recipe because it used ingredients I had on hand.  Actually, it used ingredients I have stocked in my kitchen all the time.  That's just convenient and wonderful!  It uses dry herbs, which some people might turn their nose up to because fresh is better.  But unless you have your own little herb garden, buying all these herbs fresh would put a huge dent in your...or at least my...wallet.  Simple, convenient, delicious.


Herb-Mustard Marinated Chicken
Adapted from Better Homes & Gardens Grillin' & Chillin' Cookbook
Printable Recipe 
Ingredients:
1/2 cup Dijon mustard
2 Tablespoon extra virgin olive oil
1 Tablespoon dry red wine
1 garlic clove, finely minced
1/2 teaspoon dried crushed rosemary
1/2 teaspoon dried basil
1/4 teaspoon dried oregano
1/4 teaspoon dried thyme
1/4 black pepper
4 boneless, skinless chicken breasts

Directions:
In a small bowl, mix together all the ingredients except for the chicken.  Rinse the chicken and pat dry.  Reserve 3 tablespoons of the sauce for dipping.  Spread the remaining sauce over both sides of all the chicken.  Allow to marinate in the refrigerator for 4-8 hours.

Preheat grill to 400 degrees.  Oil the grill grates.  Place the chicken directly over the heat and grill 8-10 minutes per side or until the chicken is cooked through.  Carefully remove from grill.  Serve with reserved sauce on the side.  Enjoy! 


One Year Ago:  Lemon Pasta with Chicken

Tuesday, March 22, 2011

Penne with Meat Ragu

Here is why you should thoroughly read through a recipe you are prepared to make it:  Penne with Meat Ragu

Here's what happened - I saw this recipe in a magazine that I found, Tastes of Italia.  It was the front cover picture and it just instantly made my mouth water.  So I scan the recipe for the ingredients, make my adjustments, and put it aside.  The night...and we are talking week night here...I'm going to just "throw this together", I start putting ingredients in the pan and then I suddenly read a little further down through the recipe (which I had never read at all before this point) and it says "simmer for 3 hours".  3HOURS???  WHHHHAAAAT????  Ok, I don't have three hours..it's already 7:00pm as I'm doing this and I don't really want to eat at 10pm.  So, I make the decision that 1 hour will be long enough.  Now I'm sure that had it simmered for the full 3 hours, the flavors would have melded together even better, but I have to say, even after 30 minutes the sauce tasted wonderful.

So, even though it still turned out really good instead of turning into a disaster, the morale to this story is:  Always read through your recipes!!  Don't be like Jenn and think you know it all!

Penne with Meat Ragu
Adapted from Tastes of Italia
Printable Recipe 
Ingredients:
1 medium carrot
1 stalk of celery
1/2 sweet onion
3 Tablespoons extra virgin olive oil
12 oz ground beef
4 oz ground pork
1 28oz can crushed tomatoes
1 teaspoon dried oregano
1 teaspoon dried basil
1/2 teaspoon garlic powder
salt and pepper
1 teaspoon tomato paste (optional)
1/2 cup beef stock (if needed to thin sauce out)
1 13.25oz box of whole grain penne pasta

Directions:
In a food processor, add the carrot, celery, and onion.   Pulse until diced finely.  In a large wide pot add the olive oil and the chopped vegetables.  Saute about 4 minutes or until the veggies are softened.  Add the ground beef and pork and saute until brown, stirring occasionally.  Add the pureed tomatoes and tomato paste if desired.  Add the oregano, basil, and garlic powder.  Season with salt and pepper.  Reduce the heat to low and cover.  Cook sauce for 1 hour or up to 3 hours over low heat, stirring occasionally.

When ready to eat.  Cook the pasta according to package instructions.  Drain and toss with ragu.  Use the beef stock to thin out the sauce if necessary.  Serve hot, topped with parmesan cheese if desired.  Enjoy!

One Year Ago:  Classic Steak House Marinated Steaks with Red Pepper Aioli

Monday, March 21, 2011

Pulled Pork BBQ Pizza

Here's a fantastic way to use up some leftover pulled pork.  It's different from the regular pulled pork sandwich or taco idea.  We really enjoyed this pizza.  Even though the bbq sauce was maybe a bit too sweet for the pizza, it was still a killer pizza!

Of course, no matter how often I make pizza dough (ok, it's not like I make it every day or something), I still can't seem to perfect it.  I seem to have a problem when it comes to stretching the dough.  Mine tends to either stretch too much and break here and there, or I can't get it to stretch out enough.  I'm sure there is something I am doing in the process that is causing that, but I just don't know what it is.  If you have an insight as to why, I would greatly appreciate the advice.

Despite struggling with the dough, this pizza turned out incredibly good.  Then again, you can't really go wrong with pizza on the grill.  There is just something about it that makes me go... mmmmmmmmmmmmmmmm!!!!!

Pulled Pork BBQ Pizza
Printable Recipe 
Ingredients:
1 pizza dough ball
olive oil
salt and pepper
1 cup BBQ sauce (I would suggest going with something tangy and bold, the sweeter bbq sauces are just a bit too sweet for this pizza...at least that is my thought)
1-2 cups pulled pork (I think I just just a little over a cup, but didn't measure it)
1/2 sweet onion, diced and caramelized (you can slice them thin intead)
4 slices of bacon, diced and cooked until crispy
1 orange pepper, chopped or sliced thin (now I left mine raw and put them on the pizza, you can saute them or roast them first if you want)
1-2 cups shredded Monterey jack cheese

Directions:
Preheat the grill to medium high.  Stretch your dough and brush both sides with olive oil and season with salt and pepper.  Now you can put the dough directly on the grill, but I haven't had the nerve to do that yet (always afraid the dough will sink into the grates) so I just put it on a piece of aluminum foil that has been sprayed with non-stick spray and put that directly on the grill.  Grill one side for about 3-4 minutes or until it's brown and crisp on the bottom.  Remove from grill and flip the crust over.  Now it's time to build the pizza.  Spread the sauce over the entire thing, leaving at least a 1/2 inch of the dough around the edges uncovered.  Top with pulled pork, then the caramelized onions, then the pepper, and finally top it with the cheese.  Put the pizza back on the grill and cover.  Grill until the cheese has melted and the crust is golden brown.  Remove from grill, slice, and devour!


One Year Ago:  Chicken Tortilla Pizza

Saturday, March 19, 2011

Is it ice cream or is it cake?

So a good friend of mine from Nebraska, Susan, is a baking goddess.  I say this because she is forever baking dozens of cookies at a time.  She seems to be always making yummy snacks for co-workers, for her son Josh to take to school, for bake sales, etc.  Well, a few weeks ago (maybe it's been longer then that), she mentioned that she was going out to pick up a kit for making cake pops.  Cake pops?  What?  Never heard of it.  Of course, I mentioned this to a couple people at work and they all looked at me like I had two heads.  How could I NOT have heard of cake pops before?  Geez!! :)

Anyway, she mentioned Thursday morning that she had to go home and make cake pop ice cream cones, as Josh wanted to bring something extra special for his teacher for her birthday.  I was interested to see what they looked like, so I forced her to send me some pictures of the final product.  I really didn't know what to expect.... I opened the email and was greeted with these:


OMG aren't those fantastic?  Not that I doubted she could do them, but I have to admit, I was amazed how how incredibly good they looked.  I mean, this was her first time making them.  I don't know about you, but my shit never comes out that fantastic on the first try.  At least not anything I have to decorate with icing!!  I whole heartily believe she could enter a contest with these and blow the competition away!

Anyway... I just HAD to share these with you.  And I thank Susan so very much for allowing me to post these pictures!  Maybe one day I'll actually do something like this.... Then again, maybe one day I'll just have Susan do it for me!!

Have a fantastic weekend! 

One Year Ago:  Baked Dijon Tilapia with Crumb Crust

Friday, March 18, 2011

Sriracha Coleslaw

If you have been following my blog for a while now, you are very aware of my love for Sriracha.  So, there was no question on whether I was going to make this or not when I stumbled upon it on Life's Ambrosia.  The unfortunate thing about trying this recipe is that I probably will never go back to plain-jane coleslaw.  Once you've had a little Sriracha in it, you will never go back...trust me.  So before you try this, be sure it's what you want - Be sure you are ok with saying goodbye to your standard every day coleslaw.

You have been warned.


Sriracha Coleslaw
Adapted from Life's Ambrosia
Printable Recipe 
Ingredients:
1 14oz bag coleslaw mix
1/4 cup mayonnaise
1 1/2 teaspoons Sriracha (less Sriracha will give you less heat, start with a little and add a little at a time if you are concerned with the spice level)
1/8-1/4 teaspoon ground ginger
1 Tablespoon rice vinegar
salt and pepper

Directions:
In a large bowl, combine the mayo, Sriracha, ginger, and rice vinegar.  Stir until smooth.  Add the coleslaw mix and toss to combine.  Season with salt and pepper.  I like to let my coleslaw sit in the fridge for at least 30 minutes before I serve it...just to make sure all the flavors have had time to meld together.  Enjoy!


One Year Ago:  Pan Fried Pork Chops with Mushroom Gravy

Thursday, March 17, 2011

Smoked Pork Butt

I know, I know...it's St. Patrick's day and I'm posting a recipe for smoked pork butt.  Not exactly a good St. Patty's day meal, but...my pork was Irish... yea, that's it... Irish pork butt...see, I'm all about celebrating the holiday :)

So, the other day I walked outside to get my grill ready for whatever I was planning on grilling that night, when I heard this strange noise coming from this sad little covered form sitting in the corner of our back porch.  I listened carefully and I heard this muffled voice say "hey...hey...you with the love for the grill.....remember me?  yea, me...the smoker you won and were so frickin' ecstatic about?  you know, the one that you used to use every weekend?  remember me???  hey, i'm talking to you....."  I tried to ignore the voice but it just kept going on and on... I think it even called me a few choice names that I dare not repeat, as I want to keep my blog on the PG-13 rating or lower.  Alas, I could not deny that what the voice said was true.  It had been early January since the last time I had used it, I'm sorry to say.  So with a little push from my smoker, and a little inspiration from Chris Grove at Nibble Me This, I decided I was going to smoke some pork in it.   And not just pork, but pork butt.  Something that I could end up shredding and making into sandwiches, quesadillas, nachos, tacos, pizza (check back next week for that recipe, by the way!!), etc.

With quite a bit of help from Chris G., I was able to make a mean smoked butt, let me tell you.  (plus, I get to keep saying smoked butt..hehehehe)  Without Chris G.'s instructions, I think I would have ended up ruining this, because the pork got up to about 158 degrees and stalled there for about 4 hours.  Had Chris not told me this was normal, I probably would have done something tragic and we may have ended up with another brisket tragedy!!!  So, thank you Chris....my pork butt owes you!!!

This was a wonderful way to make the pork and the pulled pork sandwiches we made out if it that night were fantastic!!  Topped with some homemade bbq sauce and some sriracha coleslaw (WHAT? did she say Sriracha coleslaw?  Why, yes I did...and if you come back tomorrow, you will see exactly how I made it!!)  it was a sandwich fit for a king.... or at least for the two of us!!

Smoked Pork Butt
Inspiration and guidance courtesy of Chris at Nibble Me This
Printable Recipe 
Ingredients:
4 lbs pork butt (you can use pork shoulder too)
For the rub -
4 teaspoons seasoning salt (I used Country Bob's)
2 teaspoons brown sugar
1 1/2 teaspoons granulated sugar
1 1/2 teaspoons Hungarian sweet paprika
1/4 teaspoon cayenne pepper
1/4 teaspoon garlic powder
1/4 teaspoon pepper
1/8 teaspoon dry mustard
Additional items for smoking -
Apple wood chips (make sure to soak them for at least 30 minutes)
2 bottles of beer

Directions:
Mix all the rub ingredients together in a small bowl.  Rub the mixture over all sides of the pork, even into the cracks (hehehe, butt crack) if you can.  Allow to marinate in the refrigerator for 4 hours.

Add the wood chips to your smoker and preheat it to 225-230 degrees F.  I added both bottles of beer to my water pan in the smoker, but you can do one and then one later during the smoking process if you want.  Place the pork butt in the smoker and allow to cook for about 1.5 hours per pound.  As Chris informed me, it's going to reach about 160-165 degrees and it will just stay there....like FOREVER.  But be patient, it will rise and then, once it reaches an internal temperature of 195-198 degrees, remove from the smoker, double wrap in aluminum foil, and return to the empty smoker for 1-2 hours.  Pull it apart by shredding it with two large forks.  Serve as pulled pork sandwiches, pulled pork pizza, quesadillas, nachos, tacos, or whatever your heart desires.  But most of all... Enjoy!


One Year Ago:  Poblano Chicken

Wednesday, March 16, 2011

Smoked Yellow Chili Poppers

Ok, so these were supposed to be Smoked ABT's ... do you know what an ABT is?  Cause I really had no idea...  ABT's are Atomic Buffalo Turds!  LOL  Yes, I know, ewwww!!! (Seriously, Chris at Nibble Me This had to tell me what they were, I had no idea what it stood for)  I've actually made ABT's before (I just didn't know it), but have never done them smoked OR wrapped in bacon.  This time I had to do things just slightly different, you see, Chris' stomach has been arguing with him each and every time I've used jalapenos lately, so I wanted to be kind to him and decided to go with a flavorful, yet very mild pepper.
Anyway, since I had the smoker on (oh yes, I was smoking more then just peppers...gonna have to check in tomorrow to find out), I figured why not try some smoked jalapeno... er, yellow pepper poppers!  Of course since I was thinking of putting them in the smoker, I HAD to wrap them in bacon.  Now, I believe I should have used a leaner bacon because I had to stick them under the broiler for about 2 minutes to get the bacon crispy enough, but whatever, they were frickin' good.  AND, even though they lacked the heat of a true ABT, I would not be ashamed to serve them to smoked food lovers and/or experts.
Even if you don't have a smoker, you can still enjoy these wonderful little bites.  Just stick them under the broiler until the bacon is brown and crispy.  Or, stick them on the grill until they are a bit charred, tender, and the bacon is cooked.

Smoked Yellow Chili Poppers
(I received a little assistance from Chris at Nibble Me This)
Printable Recipe 
Ingredients:
5-6 yellow chili peppers (med-large in size)
1/4 cup cream cheese, softened
1-2 Tablespoons shredded cheddar cheese
dash of garlic powder
5-6 strips of bacon

Directions:
Slice the peppers lengthwise.  Using a spoon, scrape out the seeds.  (you can leave the veins or scrape them out, since this is a mild pepper, it's not going to matter.  If you are using jalapenos, scrape them out...and you might want to wear gloves.)
 
In a small bowl, mix together the cream cheese, cheddar cheese, and a dash of garlic powder.  Stuff the pepper with the mixture.  Do not over stuff as the mix will expand.  Wrap each pepper in bacon.  You can use a toothpick if you need to to, but I did not have to.

Place in smoker that has been preheated to 225 degrees.  Smoke for 1 hour to 90 minutes, until the bacon has reached the desired crispiness.  Enjoy!


One Year Ago:  Sloppy Joes

Tuesday, March 15, 2011

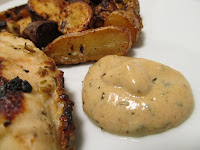
Grilled Chicken with Rustic Mustard Sauce

Ok, this was seriously good.  Sometimes you just need to pat yourself on the back...hang on while I do that :)  Seriously, (I know I just said that, but seriously) this was incredibly easy and incredibly DELICIOUS!!

I think you all know my feelings on sauces by this point - A sauce can make a fabulous dish, heavenly.  A sauce can make a so-so dish, incredible.  A sauce can make you laugh...it can make you dance...it can.........well, I love sauce, enough said.

I love to grill during the week, too.  It's quick and simple.  I always make sure the marinade or rub is simple and uses few ingredients.  And of course, the sauce, the sauce must be simple, yet flavorful.  This recipe is all of that. 

Grilled Chicken with Rustic Mustard Sauce
Printable Recipe 
Ingredients:
4 boneless, skinless chicken breasts
1 Tablespoon olive oil
1 Tablespoon plus 2 teaspoons Dijon mustard
1 teaspoon chopped fresh rosemary, divided
salt and pepper
3 Tablespoons mayonnaise
1/2 - 1 teaspoon horseradish (depends on the spiciness you want)

Directions:
In a small bowl, mix together 2 teaspoons mustard, olive oil and 1 teaspoon rosemary.  Rinse chicken and pat dry.  Rub the mustard mixture over both sides of the chicken and allow to marinate in the refrigerator for at least 2 hours.

Preheat grill to 400 degrees.  Rub the grill grates with oil.  Place the chicken directly over the fire and cook for 8-10 minutes per side or until chicken is cooked all the way through.

While the chicken is grilling, combine remaining Dijon (1T), remaining rosemary (1tsp), mayonnaise, and horseradish in a bowl.  Stir until well combined.  Serve with chicken.  Enjoy!


One Year Ago:  Tuscan Chicken with Pasta Medley

Monday, March 14, 2011

Cream Cheese Chocolate Chip Cookies

We have an internship program at the advertising agency I work for.  I like the program and hate the program all at the same time.  It's good because we get young "kids" just getting ready to graduate from college, who have lots of energy and enthusiasm.  It's bad because if you get really good ones, you are just starting to get to know them well and enjoy working with them, when it's time for them to move on.

Why am I telling you this?  Well, you see, we had an intern, Casey, who joined our team last year in our social media department.  She was fantastic to work with from the beginning.  Always willing to help out.  Always friendly and easy going.  Always there with a smile on her face.  Hell, she even knew how to play the intern game.  She made sure to make herself known to us.  Not only us (as in other employees) but she always was also wise enough to make an impression on the owners.  She is smart, let me tell you.  After her internship ended, they brought her on part time.  Unfortunately, our SM department doesn't have enough work to keep her busy, so they had to let her go.  Knowing that last week was her last week there, I decided to make cookies for her.  Not that cookies even come close to thanking her for all she had done for me, but it's the one way I know how to truly put my heart into something and say thank you.

 
So, you probably think this story is going to end in a sad goodbye, right?  That's what I thought too, when I walked into work on Friday.  But alas, this story has a happy ending:  Casey was offered a job in another department Friday morning!!!  (WHEW!!  Nothing like waiting until the last minute to ask her, huh?)  She still is only part time, but my hope is that after she proves to them that she can take on any job, they'll find a way to keep her on permanently!!  My goodbye cookies became congratulations cookies.  And what better way to say congratulations then with cream cheese and chocolate chips all wrapped up in a cookie??

Cream Cheese Chocolate Chip Cookies
Slightly adapted from Modern Mom
Printable Recipe 
Ingredients:
2 1/2 cups all-purpose flour
1 teaspoon baking soda
1/2 teaspoon kosher salt
8oz package of cream cheese, softened
1 cup (2 sticks) unsalted butter, softened
1 1/2 cups packed brown sugar
1 egg
1 teaspoon vanilla
12oz bag of milk or semi-sweet chocolate chips

Directions:
Preheat oven to 350 degrees F.  In a large bowl, combine the flour, baking soda, and salt.  Whisk to combine; set aside.

In a bowl of a standing mixer with a paddle attachment.  Add the cream cheese and the butter.  Beat on medium speed until creamy and light, about 2 minutes.  Add the sugar and mix well.  Scrape down the sides of the bowl and add the egg and vanilla.  Beat on medium speed for 1 minute.  Slowly, add the flour mixture a little at a time, until well combined.  Remove bowl from mixer and fold in chocolate chips.  (I refrigerated mine for 30 minutes, but you can skip that if you want.  I think it helps keep the cookies from spreading while baking.)

Roll dough into walnut size balls, place on baking sheets, and flatten just a little bit with your thumb. (to make much thinner cookies, just drop dough by the tablespoon directly onto the baking sheet)  Place in oven and bake for 12 minutes, or until the edges are golden.  Let rest on cookie sheet for 5 minutes then move to a wire rack to cool completely.  Your cookies should be light and cakey.  Enjoy!


One Year Ago:  Baked Parmesan Tilapia