Search This Blog

Tuesday, April 12, 2011

Spicy Garlic Shrimp Pasta

I'm pretty sure I've said this many times... you do not see a lot of shrimp recipes on here because I have had bad experiences with the frozen kind and fresh is not that easy to find out here.  So, I tend to only buy it on certain occasions.  BUT.. I was looking for something different to make... something outside of my standard chicken or tilapia...so I grabbed a bag and hoped for the best.

Good thing I did, because this bag was good.  No stinky, smelly shrimp!! YAY!!!

Of course, the first thing I wanted to make was a pasta dish!! There's just something about shrimp and pasta that I adore.  It's actually the one time I prefer to have a thin pasta like angel hair, over my beloved penne.  And garlic........ I mean, shrimp and pasta go so well with garlic!! (as do so many, many more things!!)

Anyway, this is yet another fantastic week night meal.  It can easily come together in less then 30 minutes...you just can't beat that.  Not only is this a good week night meal for the entire family, but it can also be a fantastic little romantic dinner for two!  Versatility is your friend!!

Spicy Garlic Shrimp Pasta
Printable Recipe 
Ingredients:
3/4 lbs angel hair pasta
2 Tablespoon extra virgin olive oil, divided
1/4-1/2 lbs. shelled and deveined medium shrimp
2 garlic cloves, finely minced
1 teaspoon red pepper flakes (use less for less heat)
1 cup cherry tomatoes, quartered
1/4 cup fresh chopped parsley
salt and pepper
freshly toasted homemade Italian seasoned breadcrumbs (optional)
Parmesan cheese

Directions:
Cook the pasta according to package directions.  Drain; reserving 1/2 cup pasta water.

In a skillet, heat 1 tablespoon of olive oil.  Add the garlic, red pepper flakes, and tomatoes.  Cook for 1 minute.  Add the shrimp and cook until shrimp is heated through.  Remove from heat and add the cooked pasta, tossing to coat.  Toss in 1 tablespoon of olive oil, the parsley and season with salt and pepper.  If the pasta is too dry, add the reserved pasta water.  Top with breadcrumbs and parmesan cheese.  Enjoy!


One Year Ago:  Steaks with Balsamic Vinegar, Dijon & Garlic Marinade

Monday, April 11, 2011

Peach Glazed Grilled Chicken

So here's something funny and unusual about me:  I love peach flavored things, but I do not like the fruit itself.  Well, if it was the last thing on earth to eat, I would definitely eat it, I don't dislike it that much...  But given the choice between peaches and anything else, and I'm probably gonna go for the anything else.

With that said, I was at the store looking for apricot preserves and would you believe it, they did not have one single jar of it.  So, I thought, ok.. what's close to apricot??  Peach?  Really?  Peach is the only thing on this shelf that is sort of like it?  Well, crap... ok, then, let's get it.  So into the cart it went and into the pantry it went once we got home.  And there it stayed....and stayed...and all of a sudden I could not remember what I had planned on making with the apricot preserves!!  Wanting to use this jar of preserves that I really had not wanted in the first place, I decided to make a marinade for chicken with it.  And believe it or not, a star was born!  A simple, yet flavorful marinade that could even double for a sauce, if you were so inclined to heat it up in a sauce pan...I'm just saying, it would be good :)

Peach Glazed Grilled Chicken
Printable Recipe 
Ingredients:
1/2 cup peach preserves
1 clove garlic, finely minced
1 Tablespoon olive oil
1 Tablespoon low sodium soy sauce
1 1/2 teaspoons Dijon mustard
1/4-1/2 teaspoon red pepper flakes
4 boneless, skinless chicken breasts

Directions:
In a small bowl, mix together all the ingredients except the chicken.  Rinse the chicken and pat dry.  Place chicken in shallow dish or resealable bag and pour marinade over it.  Let marinate for 8 hours or over night. (If you are in a pinch, you can marinate it for 4 hours, but I wouldn't recommend any less time.)

Preheat grill to 400 degrees.  Oil the grill grates.  Remove the chicken from the bag or dish and discard marinade.  Place chicken on grill and grill 6-10 minutes per side, depending on the thickness of the chicken.  Chicken is ready when it reaches an internal temperature of 160 degrees F.  Enjoy!


One Year Ago:  The Best Barbecued Sticky Chicken with Lemon & Garlic

Friday, April 8, 2011

Guest Blogger: Filet Mignon with Creamy Mushroom Sauce

Happy Friday everyone!!  Before I introduce today's guest blogger, I just want to remind you to stop by and check out my Fire Day Friday post over at Our Krazy Kitchen.  Today's recipe:  Grilled Pork Chops with Pineapple Cucumber Relish.  You are not going to want to miss this one...I even tell a little story about Kamikazes!!

Today I'm really excited to introduce a Desi from SteakNPotatoesKindaGirl.  I was taken in by Desi's blog instantly...her love for sauces was an immediate draw for me.  I mean, to find someone that loves sauces (and bacon...mmmm bacon sauce!!) as much as myself is hard to find.  Up until I ran across Desi's site, there was only one other blogger that I followed that pronounced her love for sauces as loudly as I did (Alisa...you know I'm talkin' about you girl!!).  Wait a second..could it be?  And now I know for sure, I just added one more girl to my wolf pack!  (please tell me you've seen The Hangover because that line will be a hell of a lot funnier if you have)  ANYWAY, I'm rambling and Desi has something amazing to talk about..... so Desi, it's all you:

Hey yall!!! I am super excited and honored that Jenn has asked me to be a guest blogger for the day!  My name is Desiree, but you can call me Desi.  I'm a steak n potatoes kinda girl, if you couldn't tell, but to be honest, I don't get to make a lot of steak recipes because I love my filet, and well...it's pricey!!  But I do love steak (and potatoes, and bacon, but that's another story for another time) so I thought, why not share a recipe the reflects my name?

Anyone who follows my blog knows that I love me some mushrooms.  I could probably eat them on ANYTHING! It's obvious that they go well with steak.  And anyone who follows my blog also knows that, like Jenn, I am a sauce girl!  Again, I could pour sauce on just about anything.  That's why Jenn and I are foodie soul sistas!

So this one's for all the steak lovers, the mushroom huggers, the sauce addicts!  Run to the store and buy your fave steaks NOW, cuz it's about to get delicious in here!

Filet Mignon with Creamy Mushroom Sauce
Adapted from Taste of Home
3/4 pound fresh mushrooms, sliced
5 Tablespoons butter, divided
2 teaspoons all-purpose flour
1 teaspoon salt
1/4 teaspoon freshly ground black pepper
1 cup heavy whipping cream
1 Tablespoon minced fresh parsley
6 filet mignon steaks, about 4-6 oz each *we used only 2 steaks but still made all of the sauce

In a large skillet, saute mushrooms in 3 tablespoons of butter for 7 minutes or until tender.  Stir in the flour, salt, and pepper until blended.  Gradually add the cream, small amounts at a time, stirring between each addition.  Bring to a gentle boil; cook and stir for 2 minutes or until thickened.  Stir in parsley; set aside and keep warm.

Meanwhile, in another large skillet, heat the remaining butter over medium-high heat.  Cook steaks for 7 minutes on each side, or until the meat has reached desired temperature.  Serve with the mushroom sauce. 

Printable Recipe

*The recipe does make plenty of sauce, I just didn't want so much sauce on my steak this particular time because I was watching my weight, and well, this sauce is loaded with heavy whipping cream and butter.  I know there isn't much sauce in the picture, I served myself mostly mushrooms with a bit of sauce.  But believe me, the recipe makes plenty of sauce and  you can slather your steak in this sauce if you really wanted to (like I used to).  So don't let the picture fool ya.  :) 

Of course, I want to thank Jenn for the opportunity to share this recipe with all of her readers... YOU!  I hope all all will stop by my blog and pay me a visit anytime!  You're always welcome!

Peace, and bacon grease!

Thursday, April 7, 2011

Braised Beef Short Ribs in Red Wine Sauce

Every now and then I like to really do something out of the "norm" for dinner.  I very much enjoy doing this on Saturday's.  I love Saturday's.  I mean I get the whole day to do whatever I want...even if it's absolutely nothing!  And the wonderful knowledge that you did not have to work that day AND that you do not have to work the next day....it's the only day of it's kind.

So, I guess what I'm trying to say is that on Saturday's, I love to make meals that take a little extra time.  This meal was perfect for just that!

This was absolutely delicious. Tender, flavorful...and did I mention delicious??  I know Chris had the unfortunate pleasure of having pieces that were a little more fattier then mine, but my ribs were tender and melt in your mouth fantastic!!  And the red wine sauce....ok, I'll be honest...I just spooned it on to my plate and mopped it up with warm bread.  I could have dinned on that alone, trust me!

Braised Beef Short Ribs in Red Wine Sauce
Adapted from Tastes of Italia Magazine
Printable Recipe 
Ingredients:
1 Tablespoon olive oil
1 Tablespoon butter
2.5 lbs beef short ribs
1/2 sweet onion
2 stalks of celery
1 large carrot
1 Tablespoon tomato paste
1 cup dry red wine
1 cup beef broth
1 bay leaf
Salt and pepper

Directions:
In a Dutch oven, add the olive oil and butter over medium heat.  When butter as melted, add the short ribs and season with salt and pepper.  Brown the meat on all sides.  Remove meat and set aside.

In a food processor, add the onion, celery, and carrot.  Pulse until finely minced.  Add to the Dutch oven along with the tomato paste.  Cook about 8 minutes.

Add the wine and broth and scrap bits off the bottom of the pan.  Bring mixture to a boil, then return the ribs to the pot.  Add the bay leaf and cover.  Reduce heat to simmer and cook for 3 hours or until meat is tender.  Remove bay leaf and set the beef on a platter.  Add cornstarch to the mixture and bring to a boil.  Once sauce has thickened a bit, return meat to the pot, and taste for seasoning.  Serve sauce over beef ribs and enjoy!


One Year Ago:  Basil Pesto

Wednesday, April 6, 2011

Cinnamon Rolls

So, back at the beginning of the year, I said that all I really wanted to do this year was make cinnamon rolls.  Well, folks...looks like I'm done... see ya next year!!  

Seriously, though...YAY!!  I FINALLY did it!!  And it wasn't so bad.  Ok, ok.. yes it was bad, but not THAT bad.

My biggest problem with these, as with any yeast breads I seem to make, was that I could not get the dough to rise.  I ended up putting it in the sun so that it would have some extra heat to help it along.  The process took twice as long and I got impatient and believe I put them in the oven before they were at their most fluffiest.  I believe that led to "heavier" cinnamon rolls.  They definitely were not light and flakey.  And I know they were supposed to be, because I politely took this recipe from Mary over at One Perfect Bite.  I have never made anything from her site that was not fantastic.  And I mean, look at her pictures, then look at mine... and I followed the directions to the T.  Ok, obviously I didn't as they would have turned out exactly like hers, but I'm sure you get what I'm saying.  I believe that I allowed the milk to cool too much, so when the yeast hit it, it was not hot enough to activate it.  That's my theory at least and I'm going to stick with that.  Because, if I don't, I'll think it's just me and I'll never try making these again.. and THAT would be a shame for sure, because honestly, I love cinnamon rolls and these had the perfect flavor, just not the perfect texture.... so I will be trying my hand at these again.

Cinnamon Rolls
Recipe courtesy Mary, One Perfect Bite
Printable Recipe 
Ingredients:
Dough - 
1 cup whole milk
1 stick (8T) unsalted butter, room temperature
2 1/4 teaspoons (1 package) active dry yeast
1/2 cup granulated sugar
4 1/2 cups all-purpose flour
2 eggs, room temperature
1 teaspoons table salt
Filling - 
1/3 cup unsalted butter, softened
1/3 brown sugar
2 Tablespoons ground cinnamon
1 cup chopped toasted pecans (I left this out)
Icing - 
4 ounces cream cheese, room temperature
1/4 cup butter, softened
1/2 teaspoon vanilla
1 1/2 cups confectioners' sugar (I used 1 cup)
1 Tablespoons milk 

Directions:
To make dough:  Scald milk over medium-high heat.  Pour into a large bowl of an electric mixer.  Add the butter and stir until butter has melted.  Set aside until mixture is lukewarm.  Stir yeast and sugar into milk.  Add 1 cup flour and mix well.  Add eggs, one at a time, beating well after each addition.  Add salt and 1 more cup of flour.  Mix vigorously until dough is smooth and elastic, about 3 minutes on medium speed.  Add reserved 2 1/2 cups flour and mix just until incorporated.  Turn dough onto a lightly floured surface.  Continue kneading by hand until it is smooth.  Place the dough in a bowl, cover with plastic wrap and a towel, and set aside until it has doubled in size, about 2 hours.

To make the filling:  Mix cinnamon and sugar together in a small bowl.

To assemble rolls:  Grease a 13x9-inch baking pan (I used two round cake pans).  Turn dough onto a well-floured surface.  Roll dough with a rolling pin into an evenly shopped 12x16-inch rectangle.  Brush dough liberally with softened butter.  Sprinkle with an even layer of cinnamon/sugar mixture, leaving a 1/2 inch border along one of the long sides.  Sprinkle with toasted pecans if using.  Roll, beginning with long side of rectangle.  Use finger tips to pinch dough as you roll, sealing edges firmly to form a seam.  Cut into 12 pieces using a serrated knife or dental floss and arrange in pan.  Cover loosely with plastic wrap and allow to rise until double in size, about 4 hours.

Preheat oven to 350 degrees F.  Bake rolls in center of oven until they are golden, 25-30 minutes.  Invert rolls onto a wire rack and cool to rooms temperature, about 20 minutes.

To make icing:  Mix all ingredients until smoother, add more milk as required for drizzling.  Drizzle (or spread as I did) icing over rolls with spoon.  Cut or pull apart to separate.  Serve warm.  Enjoy! 


One Year Ago:  Peanut Butter Ice Cream
 

Tuesday, April 5, 2011

Teriyaki Chicken over Fettuccine

 
First... I should have used a more tubular pasta...the Fettuccine was just too much for the fork.  Second... I doubled the sauce thinking that we needed more, that there would not be enough of the sauce to "cover" the noodles, but I was wrong (the recipe I've written here has NOT been doubled).  A little of the sauce goes a long way, this is definitely not red sauce :)

With that said...this was pretty good.  Really, it's just a teriyaki chicken over pasta instead of rice.  I used basically the same recipe as with the Teriyaki Hoisin sauce, but left the hoisin out, of course.  I think it would have been even better had I kept the hoisin in it.  This sauce was much sweeter then the hoisin sauce.  Oh, well...you live and you learn, right?

Would I make it again?  Yes, but this time I'd leave it as a stir fry and serve it over rice.

Teriyaki Chicken over Fettuccine
Printable Recipe 
Ingredients:
3 Tablespoons light brown sugar
1/4 cup rice vinegar
1/4 cup water
1/4 cup low sodium soy sauce
1 Tablespoon cornstarch
1/4 teaspoon garlic powder
1/4 teaspoon grown ginger
1/4 teaspoon sesame oil
2 chicken breasts, cut into bite size pieces or strips
1 teaspoon vegetable oil
1 red pepper, thinly sliced
1 yellow pepper, thinly sliced
1/2 - 3/4 lbs fettuccine pasta (I would use penne next time)
handful of fresh chopped parsley

Directions:
Cook pasta according to package directions.  Drain pasta, reserving 1/2 cup pasta water. Set aside.

In a bowl, mix together the first 8 ingredients until well combined.  Set aside.

In a large deep skillet or wok, heat 1 tsp vegetable oil over medium high heat.  When the skillet is hot, add the chicken and quickly stir fry for 4 minutes.  Add the red and yellow pepper and cook another 2 minutes.  Add the sauce to the pan and bring to a boil.  As soon as the sauce thickens, remove from heat, add the parsley and stir to combine.  If sauce is too thick, add the reserved pasta water a little at a time.  Spoon over pasta and serve immediately.  Enjoy!


One Year Ago:  Sriracha Chicken Strips

Monday, April 4, 2011

Jo Jo Potatoes

 
Have you ever heard of Jo Jo potatoes before?  Well, I, for one, have not.  And it wasn't until I opened the April/May addition of Cook's Country (America's Test Kitchen), that I even realized that I wanted to try Jo Jo potatoes!  You know when a picture makes you instantly drool that it's a must try!  And this... this is a MUST try.  OMG, they were everything the recipe claimed they would be.  They were crispy on the outside and so wonderfully fluffy on the inside.  And the flavor.. it was incredible!  I must say, this is now my new favorite way to consume potatoes.

One of my all time biggest weakness is fries.  I LOVE them.  Give me a plate of really good fries and I could consume them so fast that it would make you laugh.  But I am particular about my fries.  I like them crisp on the outside, tender on the inside.  I don't like to pick up a fry and have it hang limp in my hand.  That's unacceptable!!  Normally, I love a shoestring type of fry....slim and crispy.  These potatoes, though, would make me shun shoestring fries for life.  They are just that good!  So, if you are a fan of fries, try is recipe, it's seriously will make you forget deep fried french fries!!

Jo Jo Potatoes
Slightly adapted from Cook's Country
- Serves 2-4 -
Printable Recipe 
Ingredients:
2 medium to large russet potatoes
3 Tablespoons, plus 1 teaspoon vegetable oil
1/2 cup panko bread crumbs
1/2 cup grated parmesan cheese
2 teaspoons paprika (I used Hungarian sweet paprika)
1 1/2 teaspoons dry mustard
1/2 teaspoon kosher salt
1/4 teaspoon garlic powder
1/4 teaspoon dried thyme
1/4 teaspoon cayenne powder (for less heat use only 1/8 tsp)

Directions:
Cut each potato lengthwise into wedges.  Place potatoes in large bowl and wrap tightly with plastic wrap.  Microwave until edges of potatoes are translucent but centers remain slightly firm about 4-5 minutes, shaking bowl (without removing plastic wrap) to redistribute potatoes halfway through cooking time.  Carefully remove plastic wrap and drain potatoes well.  Return potatoes to bowl, add 3 tablespoons of oil, and stir until potatoes are coated with starchy film, about 1 minute.

Combine panko, parmesan, paprika, mustard, salt, garlic powder, thyme, and cayenne in a shallow dish.  Dredge each potato into panko mixture, pressing gently to adhere, and then transfer to a clean platter.  Let sit for 15 minutes.

Meanwhile, adjust oven rack to the middle position, place rimmed baking sheet on rack, and heat oven to 400 degrees F.  When potatoes are ready, remove the baking sheet from the oven (please be very careful in this step!!!) and brush with remaining 1 teaspoon of oil.  Arrange potatoes, cut side down, in a single layer.  Bake, flipping halfway through, until crisp and golden brown, about 25-30 minutes.  Serve with a side of Ranch dressing.  Enjoy!

One Year Ago:  Tarragon Tilapia

Friday, April 1, 2011

Chocolate Mayonnaise Cake

 
I searched and searched to try and find information about the exact origins of Chocolate Mayonnaise Cake, but could not find one real definite thing about it.  What I do know is this:  chocolate mayonnaise cake was created around WWII, at a time when eggs and oil were being rationed.  Using the mayonnaise in place of those two items was the perfect way to still be able to enjoy a wonderfully, moist chocolate cake.  And this cake is wonderful and it is unbelievably moist!

When Chris and I first started dating, he talked about this chocolate mayo cake that his mom would make.  Now, my mom made a chocolate zucchini cake, and for some reason I want to say she made a mayo cake too, but for some reason the zucchini cake stands out more.  (Mom, if you are reading this...did you ever make a chocolate mayo cake?  I think you did, but my memory is not what it used to be, so please help me out here!!)  Anyway, so I quickly did a search online and found this recipe.  I LOVE this cake.  This is one of the best chocolate cakes out there.  It's just really moist and luscious and very simple to make.  I've made this batter and used it for a layered cake before... I've made this batter and used it for cupcakes.  Both ways were delicious..and of course, this cake really does not need frosting...but come one.. it's cream cheese frosting, doesn't that go with just about any kind of cake???

Now I did do something a tad bit different this time.  This time I made it with a small amount of black onyx cocoa powder.  Although, the addition of the darker cocoa made the cake a little less moist (due to less fat in the cocoa), it was a wonderful way to give the cake an even richer, decadent look to it.  I was recently introduced to this wonderful product by Andrea the Kitchen Witch.  She posted an awesome Death By Chocolate Cookies.  OMG did they look amazing!  But what really interested me, was that she used black onyx cocoa powder.  Honestly, I had never even heard of it before.  So, after reading about it and seeing her cookies, I immediately got on the Savory Spice website and ordered some.  I would probably not use this again in this cake, but I would use it, believe me.  It's like a really dark unsweetened cocoa powder...and wonderful little change to the regular cocoa powder.  I'm thinking of using it in either cookies or brownies next.... unless someone has a better idea???

Chocolate Mayonnaise Cake
Recipe courtesy About.com
Printable Recipe 
Ingredients:
2 cups all purpose flour
1/2 cup cocoa powder
1 1/2 teaspoons baking soda
1/4 teaspoon salt
1 cup granulated sugar
3/4 cup mayonnaise
1 cup water
1 teaspoon vanilla

Directions:
Preheat the oven 350 degrees F.  Sift together the flour, cocoa, soda and salt.  Cream together the sugar, mayonnaise, water, and vanilla.  Add dry ingredients to the creamed mixture; stir until well blended.  Pour batter into 2 greased and floured layer cake pans  or 1 9x13-inch pan.  Bake for 25 minutes or until a toothpick poked into the middle of the cake comes out clean.  Enjoy!

(P.S...that's cream cheese frosting on top...4 oz of cream cheese mixed with about 1-2 cups powdered sugar, and vanilla extract.  If it's too thin, add more powdered sugar)


One Year Ago:  Strawberry Chicken

Thursday, March 31, 2011

Thai Steaks with Fried Rice

This is one of those recipes that I kept saying I wanted to try, yet kept putting it aside.  No real reason, it just happens sometimes.  Well, I'm so glad that I finally tried it.  Mainly because it finally forced me to make fried rice!!  It's actually a bit shocking to me that with all the rice we consume, I have never...not once...made fried rice.  Now that's just silly.  And now that I have made this, I'm thinking even Chris will request it every now and then!  Fried rice is really very simple, and with very few ingredients, it transforms plain old rice into something magical!

I found this recipe on Nibble Me This (no, I'm not stalking Chris, it's just that he's sort of my go to person on grilling ideas...plus he's way too far away for me to stalk).  Chris actually made basil fried rice and I had every intention of making that too, but when I got home from the store I realized I had forgotten to get basil!!  DUH!!  Key ingredient to any recipe that starts with the word "basil".  So, even though I was a bit disappointed that I did not have the basil, this rice still turned out really good and I would make it again, exactly this same way!

And, let's not forget about the steak.  Can I just say Yum?  Well, I'm going to anyway... YUM!  The steaks were flavorful and scrumptious!!  A perfect blend of flavors, nothing was overpowering.  I was actually looking for skirt steak, as that's what the original recipe used, but surprisingly could not find anything.  All I could find within my price range where sirloin steaks which were on sale...this was not a problem for me, as I love sirloins.

Would I make this again?  You bet....it was one of my favorite meals so far this year!  See, sometimes it's good to stalk follow other blogs :)

Thai Steaks with Fried Rice
Adapted from Chris, Nibble Me This
Printable Recipe 
Ingredients:
For the steaks -
2 Tablespoons lime juice
1 1/2 teaspoons fish sauce
1 Tablespoon low sodium soy sauce
1/4 teaspoon sesame oil
1 Tablespoon Sriracha
2 Tablespoons vegetable oil
1 garlic clove, chopped
1 teaspoon hoisin sauce
1 lbs. petite sirloin steaks

For the rice -
2 eggs, whisked together
3 cups Basmati rice, cooked and chilled
1/2 sweet onion, finely diced
1 red bell pepper, diced
1 clove garlic, minced
4 pieces of bacon, diced and cooked until crispy
2 Tablespoons fresh chopped parsley
3-4 Tablespoons low sodium soy sauce
pinch of sugar (if you need a measurement use 1/8tsp)
dash of sesame oil (if you need a measurement, use 1/8tsp)

Directions:
In a small bowl, mix together the lime juice, fish sauce, soy, sesame, Sriracha, oil, garlic and hoisin until well blended.  Place the steaks in a resealable bag and pour the marinade over it.  Let steaks marinate for 4-6 hours.
Preheat your grill to 400-425 degrees F.  Remove the steaks from the bag and discard the marinade.  Place the steaks on the grill and cook for 4-6 minutes on each side, or until the steak reaches your desired internal temp.

Meanwhile, in a wok or deep skillet, heat a few tablespoons of oil over medium heat.  Pour eggs into wok let them cook like an omelet, remove from the wok and chop the eggs; set aside.  Mix together the soy, sugar, and sesame in a small bowl; set aside.

Add the onion and allow to cook for about 5 minutes, or just until they start to soften.  Add the pepper and cook another 1-2 minutes.  Add the garlic and stir fry for 1 minutes.  Add the cold rice.  Stir fry the rice - let is stand for 15 seconds, stir, repeat.  When the rice is browning and appearing close to being done, add the bacon and the soy mixture.  Toss to coat everything.  Add the egg and toss one more time.  Serve along side steaks.  Enjoy!


One Year Ago:  Honey Garlic Pasta
 

Wednesday, March 30, 2011

Teriyaki Hoisin Sauce

Instead of making this post about my beloved Tilapia.. today, it's just going to be about the sauce.  This sauce is so versatile and delicious that it would work on chicken, pork, or fish.  Oh, you could even toss it with some shrimp and grill or saute it... now that would be really good!  I'm thinking of actually marinating chicken and then grilling it....but that's for another day.

This sauce was probably one of the best teriyaki sauces I have had....at least out of all the ones I have attempted to make...and that list is surprisingly long.  It had the perfect blend of salty sweetness.  Definitely one I would make again and again!

Teriyaki Hoisin Sauce
Adapted from Rose Reisman's Art of Living Well
Printable Recipe 
Ingredients:
3 Tablespoons light brown sugar
2 Tablespoons soy sauce
1 Tablespoons rice vinegar
1 Tablespoon Hoisin sauce
1 Tablespoon water
1 teaspoon sesame oil
2 teaspoons cornstarch
1/4 teaspoons garlic powder
1/8 teaspoons ground ginger

Directions:
In a sauce pan, mix all ingredients together until well blended.  Bring everything to a boil, reduce the heat and simmer just until the sauce thickens.  Remove from heat and allow to cool.  Spoon over fish or chicken while baking or use as marinade or saute shrimp in it or stir fry up some chicken and veggies and pour over rice....the possibilities are endless.  Enjoy!

One Year Ago:  Parmesan Crusted Chicken

Tuesday, March 29, 2011

Orange Chicken Stir Fry

I love, love, love the orange chicken at Panda Express.  What I do not love is all those fat and calories.  So when I thought about how I could bring that yummy orange flavor to my table with a ton less of those fat and/or calories I hate so much, I knew all I really had to do was not fry the chicken.  Don't get me wrong, I love that fried crispy chicken that you get at restaurants, but with this recipe, I don't have to run an extra mile in the morning!

I did a search for orange chicken recipes and came up with this conglomeration of those ingredients used.  This was the perfect dish to satisfy any craving you might have for orange chicken.

Orange Chicken Stir Fry
Printable Recipe 
Ingredients:
1 lbs. boneless, skinless chicken breasts
1 red pepper, thinly sliced
1 orange pepper, thinly sliced
3 green onions, thinly sliced
2 Tablespoons orange juice
1 Tablespoon lemon juice
1/3 cup water, plus 1 Tablespoon; divided
2 Tablespoons rice vinegar
1 Tablespoon soy sauce
1 large garlic clove, finely minced
3 Tablespoons light brown sugar
1/4 teaspoon red pepper flakes
1/8 teaspoon ground ginger
1 1/2 Tablespoons cornstarch
1 Tablespoon vegetable oil

Directions:
Rinse chicken and pat dry.  Place on plate or cookie sheet in a single layer.  Put in freezer for 30 minutes.  Remove from freezer and slice the chicken into thin slices or bite size chunks.

Meanwhile, in a small bowl, mix together the orange juice, lemon juice, 1/3 cup water, vinegar, soy, garlic, sugar, pepper flakes, and ginger until well blended.  In another bowl, mix together the cornstarch and the remaining 1 tablespoon water; stir until smooth.  Set both aside.

In a wok or a large, deep skillet, heat the vegetable oil on medium high heat.  Add the chicken and quickly stir fry until just cooked through, about 4-5 minutes.  Add the peppers and continue to cook for 1-2 minutes.  Now, whisk the cornstarch mixture into the sauce, then immediately pour the sauce into the wok/skillet.  Bring to a boil, stirring constantly, and cook until the sauce thickens.  Add the green onions and toss to combine.  Immediately remove from heat.  Serve over rice.  Enjoy! 

One Year Ago:  Honey and Spiced Glazed Pork Chops

Monday, March 28, 2011

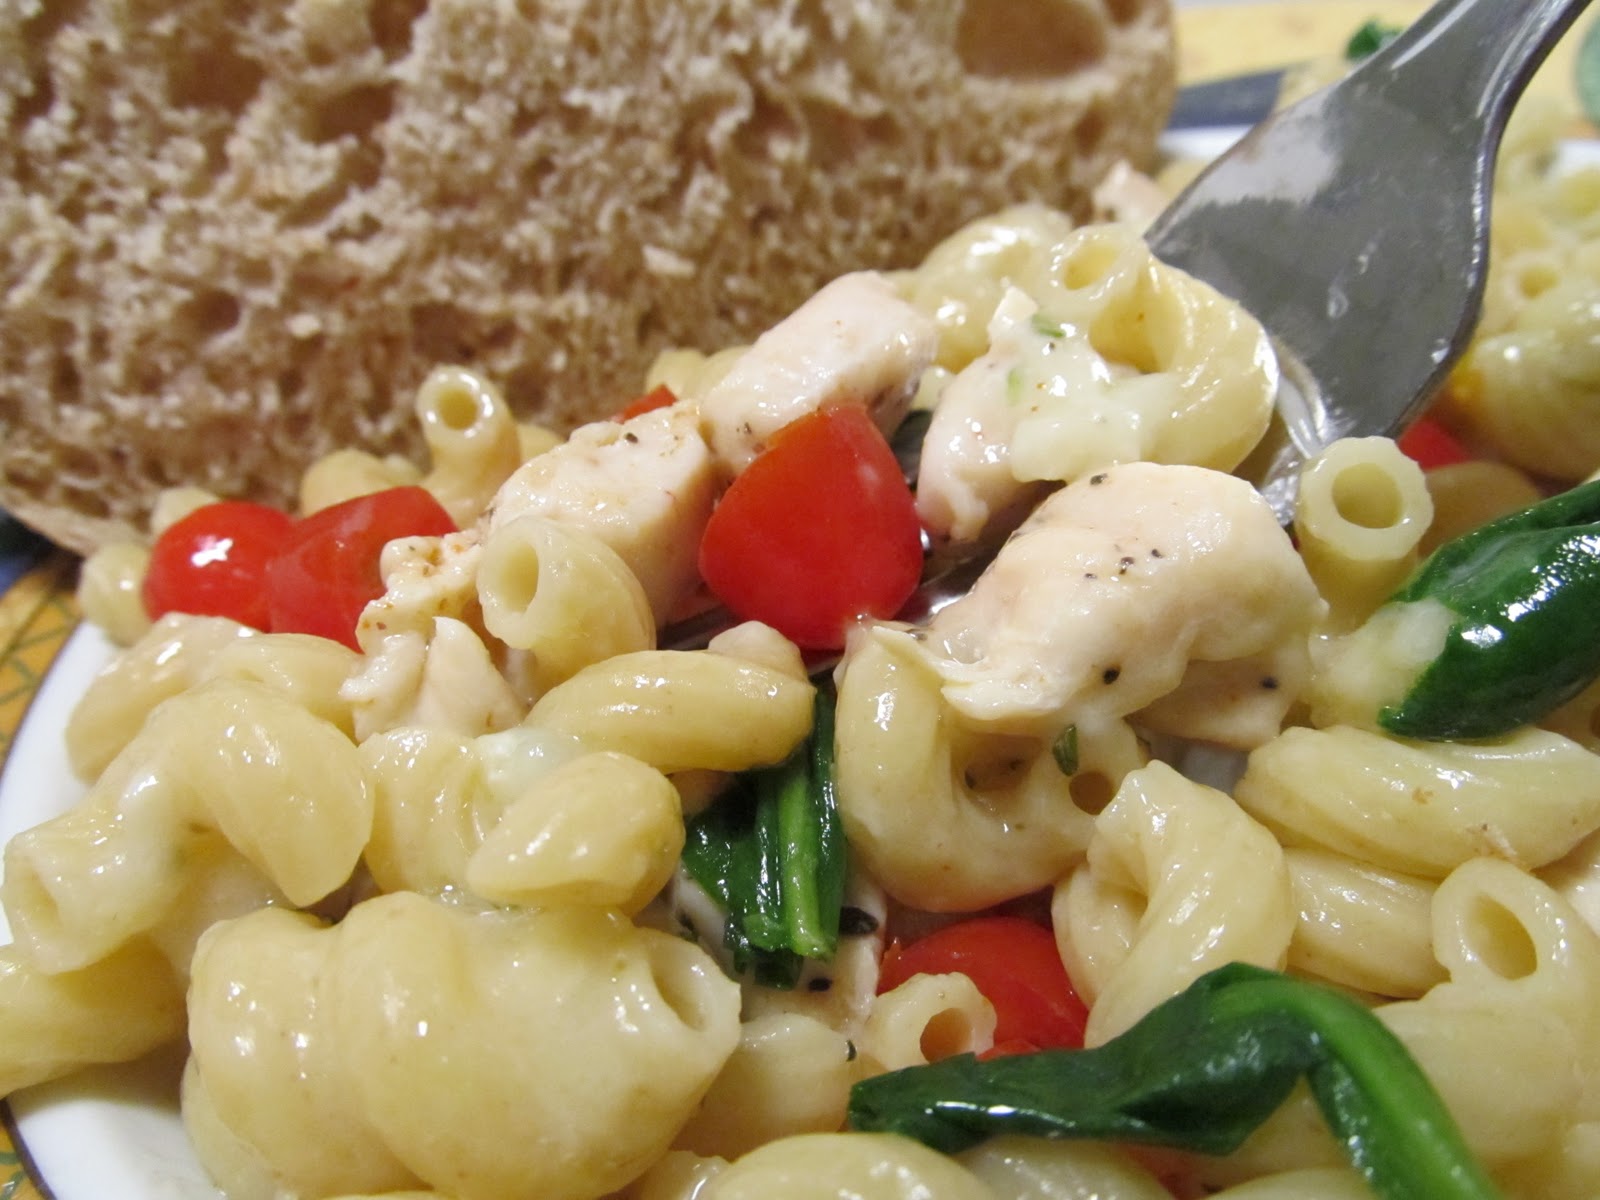
Baked Camembert Pasta

Camembert Cheese... I love it!!  Camembert is soft, creamy cow's milk cheese.  Maybe there are a lot of you out there that have never had it before.  If so, this is the time to try it.  Lucky for me, I found an 8 ounce wheel of it on sale for $3 (normally $5.99) while I was looking for Fontina cheese.  I was actually going to make a chipotle mac and cheese...but when I saw the Camembert, I just knew I had to make this pasta.  Guess the chipotle mac will have to wait :)

I saw a recipe for this about 2 years ago.  For the life of me, I cannot find and do not remember where the original recipe came from.  I did remember that Jamie Oliver had posted baked Camembert before, so I started there.  The one thing I do remember is reading through the recipe and thinking... oh, yea, this is definitely something I need to try.  And try it I finally did!  After having this fabulous dish, I'm sorry I waited so long to make it, but, I will admit, it was well worth the long years of waiting!!

This is simple, delicious, creamy, and well..just down right fan-frickin-tastic!  (If you can't find Camembert, I'm thinking you can probably use brie instead...though I'm not 100% certain on that, so don't try it, have it fail, and then blame me!)

Baked Camembert Pasta
Slightly adapted from Jamie Oliver
Printable Recipe 
Ingredients:
1 box (8oz.) Camembert cheese wheel
2 gloves of garlic, minced
1 sprig fresh rosemary, leaves only
sea salt and pepper
extra virgin olive oil
4oz grated parmesan cheese
2 1/2 cups Barilla Plus multigrain elbow pasta (or any tubular pasta will work)
1-2 cups (or more if you want) fresh spinach leaves
cherry tomatoes; quartered (optional)

Directions:
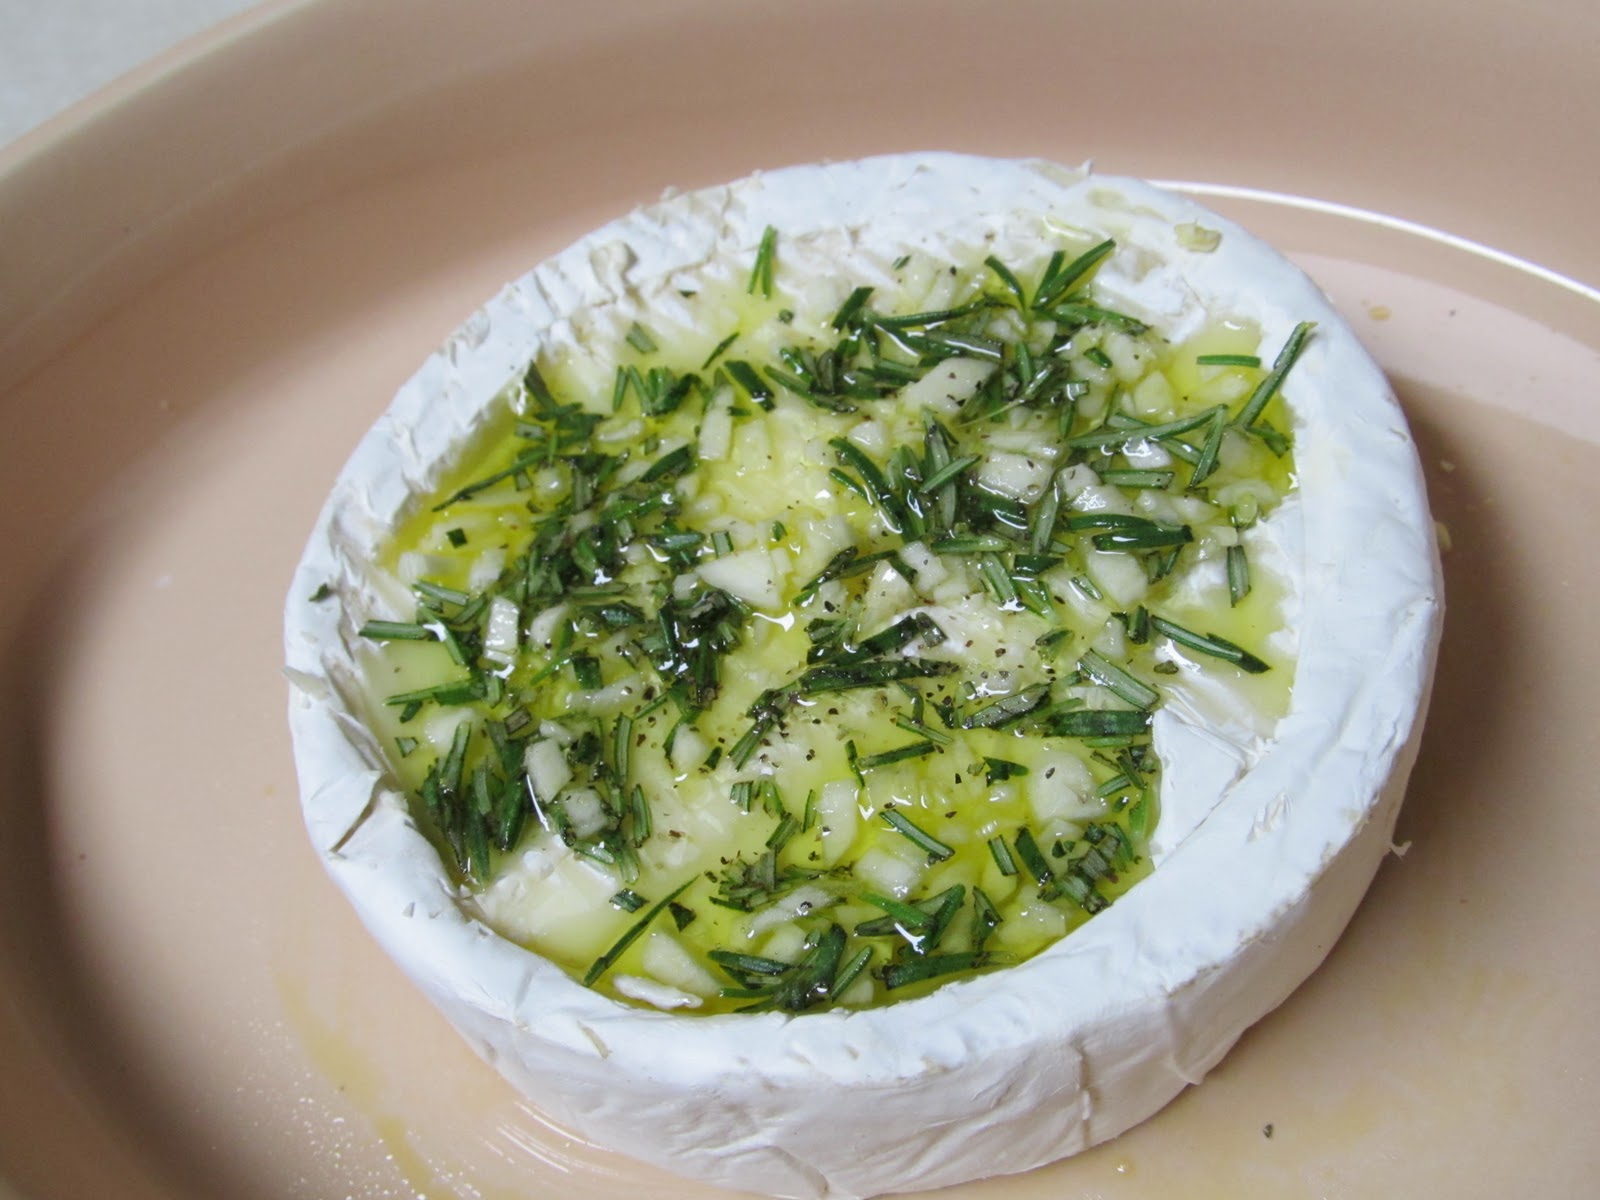
Preheat your oven to 350 degrees.  Open the cheese and unwrap it.  Place in oven safe dish.  Score a circle in the top of the rind, leaving a border, then peel the rind off the top and discard.  Scatter the minced garlic on top, season with salt and pepper, and then drizzle with some olive oil.  Scatter the rosemary leaves on top and lightly press them into the oil and cheese.

Place in preheated oven and bake 25-30 minutes, or until the cheese has melted.

Meanwhile, cook the pasta according to the package directions.  Drain; reserving 1 cup of the pasta water.  Once drained, add the spinach and stir to wilt.  Drizzle with some olive oil and add the parmesan cheese.  Once the Camembert is ready, spoon the cheese over the pasta.  I would suggest doing this with each serving as dumping it all in there may cause it to clump up.  If cheese is too thick, add a little pasta water to thin out.  Top with tomatoes if desired.  Enjoy!

One Year Ago:  The Obsessive Chef's Tilapia Fillets

Saturday, March 26, 2011

Not much to do about food....

Today's post has nothing to do with this picture...but I love my kitties...and I thought this was such a cute picture... I just had to share!!

This post, unfortunately, is not going to focus a lot on food... I know, I'm sorry, but that's just how it goes sometimes.  Don't get me wrong.. I have a bunch of stuff in the "works" - i.e. half finished started posts, and I should really be posting one of those...but today I have other things to talk about, so you are just going to have to bear with me here :)

(Picture, respectfully stolen ...er...taken from Nibble Me This)

First, please make sure to stop by Nibble Me This before Thursday, March 31st.  Why?  Because, Chris is giving away a copy of "The Encyclopedia of Sandwiches" by Susan Russo, that's why.  So go....well finish reading this post, then go.  There are three ways you can enter to win....and good luck!!

(Lauren and Marcos...aren't they cute???)

Second, one of the girls I work with (Lauren) is getting married next February.  She and her fiance (Marcos) are of course trying very hard to keep costs down for the wedding as they are also trying to buy a house.  UGH... The cost of weddings is outrageous and I can't imagine what a dent this will put in their pocket.  BUT, they are a smart couple and are doing whatever they can to try and cut expenses.  They have also entered the Crate & Barrel "The Ultimate Wedding Contest".  This is a chance for them to win $100,000 for their ultimate wedding!  I was so excited for them that I couldn't help but ask you...my wonderful and loyal readers.. to please oh please oh please go vote for them.  You don't have to sign up for anything, all you have to do is be a Facebook user....no other strings attached, I promise.  And voting takes seconds.  So please, if you have a moment stop here and place your votes.  Lauren and Marcos will be forever grateful (and so will I)!

And, last but not least, don't forget to check out my Fire Day Friday post for Mediterranean Grilled Chicken.  It's one you don't want to miss.  And, since we finally are speaking about food, if you haven't seen yesterdays guest post from Michael of Me, My Food and I, make it a point to go there now (click here) - Michael made a fantastic orzo salad that you'll be thinking about all day....and night...trust me.

 
Have a great weekend!  Ciao!

Friday, March 25, 2011

Guest Blogger: Orzo Salad with Prawns, Petit Pois and Arugula Pesto

I am extremely excited to introduce this weeks guest blogger - Michael of Me, My Food and I!  I found Michael, thanks to Chef Dennis of More Than A Mount Full, where he was a guest on Chef's Guest Post Friday.  I was instantly drawn to Michael's site.  What kept me coming back to Me, My Food and I, was not only Michael's great writing skills, but his love for food and for Nigella Lawson and the luscious simplicities of her recipes.  Michael loves to cook for his friends and is not afraid to indulge every now and then (you gotta love that!).  Although Michael lives 5090 miles away from me...I would be happy to share my kitchen with him any day!  So, stop by Me, My Food and I and say hi to Michael.  While you are there, browse around...I bet you'll find a TON of new delicious recipes!

Oh...and don't forget to check out my Fire Day Friday post over at Our Krazy Kitchen.  Today's recipe: Mediterranean Grilled Chicken.  So I'll stop typing now and let Michael take it away...

Hello readers of Jenn's Food Journey!  I hope you are all doing well.  My name is Michael Toa, I am 23 years old and I live in Sunderland, U.K.  I love Italian food and for me nothing says Italian food like pasta.  Unlike other infamous Italian food like pizza and tomato sauce, which have a fairly recent history, pasta may indeed have a much older pedigree, going back hundreds, if not thousands of years.

I was once told that the Venetian merchant, Marco Polo, brought back pasta from his journey to China in 1295.  So, I did a little research and found out there are evidences of Italian recipe books from earlier years containing references to pasta dishes.  Since China is an ancient civilization, with a complex culture dating back thousands of years, it's likely that pasta existed in China very early.  Right, so we now know pasta did not arrive in Italy courtesy of Marco Polo; and let's just stop here because I am not a food historian and I could go on and on talking about pasta, but let me get to the point and share with you this delicious recipe for orzo salad with prawns, petit pois and arugula pesto.  Arugula, or 'rocket' as we call it in the UK, is one of my favorite salad leaves.  I was introduced by an Italian friend to this arugula pesto and I am a complete convert.  I still often us the traditional sweet basil for pesto sauce, bit I just adore the peppery taste of arugula.

Orzo or sometimes called risoni are rice-shaped pasta.  Mind-boggling, isn't it?  I am so easily amused. They take minutes to cook and are perfect for salad dishes.  I love the balance of flavors in this hearty salad.  Balance is not something I can do in real-life, but nonetheless more manageable in my food.  I love the mixture of peppery, garlicky taste from the pesto, together with natural sweetness from the prawns and petit pois, saltiness from the parmesan and freshness from lemon.  In one short word: yum.

Regardless of it's history, I think pasta is here to stay.  Don't you think? :)

Orzo Salad with Prawns, Petit Pois, and Arugula Pesto
Recipe from the kitchen of Michael Toa - Me, My Food, and I
- Serves 4-6 -
Printable Recipe 
500 gr orzo pasta
250 gr cooked king prawns, anyway you like.  Grilled with a little olive oil, lemon zest and oregano...just a thought.
200 gr frozen petit pois
3 tablespoon extra virgin olive oil
zest and juice of 1 lemon
sea salt and black pepper, to taste

For the pesto:
100 gr arugula
50 gr pine nuts
1 clove of garlic, peeled
100 gr freshly grated parmesan cheese
Extra virgin olive oil

In a big pot of salted boiling water, cook the orzo according to the instructions at the back of the packet.  Two minutes before the end of the specified cooking time, add the petit pois to the pot.  Once cooked, drain and rinse with cold water to stop the cooking.  Transfer to a large bowl and add 3 tablespoons of olive oil and stir to prevent the pasta from sticking.

To make the pesto sauce, in a food processor, add all the ingredients except the olive oil.  Blitz to mix for a few seconds and with the machine running, gradually add the olive oil to the desired consistency.  Season pest to taste with salt and pepper.

Toss the orzo and little peas with the prawns, lemon zest, juice, and the arugula pesto until everything is well-coated.  Taste the salad and check if you need more lemon juice, more grating of parmesan or salt and pepper.

Best serve at room temperature with a handful of more arugula and just a little drizzle of extra virgin olive oil on each plate.  Enjoy.


One Year Ago:  Hamburger & Macaroni (aka: Chris' Goulash)