This lovely little pasta dish may look like so many before it, but it's different, trust me. This recipe is full of flavor and deliciousness and was totally thought up by The College Culinarian.
I love Katie's site, I've said this before. The girl has imagination in the kitchen (and her posts are hilarious, by the way)... imagination and no fear. It's a fantastic combination. A combination that not only comes up with some interesting and delicious meals, but also some handy little tips like how to make a tortilla bowl in the microwave. Pretty fantastic if you ask me :)
Anyway, this was a fantastic pasta dish. Simple and tasty and it utilizes two vegetables that are amazing this time of year. You can always add other vegetables if you want, but I like what was used in the original recipe so I decided to stay true to it. Delicious!
Summer Veggie Pasta with Yogurt Lemon Sauce Adapted from The College Culinarian Printable Recipe Ingredients: 12 oz whole grain penne pasta 1 zucchini, cut lengthwise and then cut into moons 1 cup cherry tomatoes, halved or quartered 2 teaspoons olive oil 1 - 5oz can albacore tuna, drained 2 Tablespoons Greek yogurt 2 Tablespoons grated parmesan cheese 1 Tablespoon lemon juice 1 Tablespoon freshly chopped basil 1 Tablespoons freshly chopped parsley 2 teaspoons freshly snipped chives
Directions: Cook pasta according to package directions. Drain, reserving 1/2 cup of the pasta water.
In a skillet, add the olive oil over medium heat. Add the tomatoes and zucchini and saute for 3-4 minutes or until the veggies begin to soften. Remove from heat and pour over pasta. Add the tuna, yogurt, parmesan and lemon juice, tossing to coat. Toss in the fresh herbs and season with salt and pepper. Use any reserved pasta water if the pasta is too dry. Enjoy!
Confession time: I cut the zucchini the wrong way for skewering.
See, this is what happens when you try to cook and watch Master Chef at the same time.
No bother, the meal was still wonderfully delicious and light. Perfect for those warm (or really, really hot) week night meals. (we hit 118 Saturday - Ouch!)
I used frozen shrimp because that is the best I could find, but if you can find fresh shrimp, please....please, please, please... use it. First, you can put the zucchini and shrimp on the same skewers and your presentation will be prettier. But most importantly, fresh is always better when you can get it :)
Oh........the sauce was heavenly (of course). This one definitely falls into the "spoon directly into your mouth" category!
Shrimp & Zucchini Skewers with Basil Cream Sauce Adapted from Better Homes & Gardens Printable Recipe Ingredients: 4oz sour cream 1/4 cup basil leaves, finely chopped 1 Tablespoon fresh chives, snipped or chopped salt and pepper 3/4 lbs fresh or frozen large shrimp, (peeled and deveined if needed) 1 zucchini, halved lengthwise and cut into 1-inch thick slices 1 Tablespoon basil olive oil (regular olive oil will be fine) 1/4 teaspoon garlic salt 1/2 teaspoon dried Italian herb mix bamboo/wooden skewers
Directions: In a bowl, mix together the sour cream, basil, and chives. Season with salt and pepper to taste. Cover and refrigerate until ready to use.
Place the shrimp in a shallow dish. Toss with olive oil, garlic salt, and Italian herb mix. Cover and refrigerate for at least 30 minutes. While the shrimp marinate, soak the skewers in water until ready to use.
Preheat your grill to 350-375 degrees F. Oil the grill grates. Skewer your shrimp and zucchini and place directly over the fire. Grill until the shrimp is pink and golden (about 3-4 minutes per side) and the zucchini is cooked to your liking. Serve with basil cream sauce. Enjoy!
I must apologize, I do not have a 4th of July holiday cookout post ready for you all. I wanted to compile recipes that would be good for your 4th of July weekend, but alas, my work load has once again taken over my life and I am finding less and less time to focus on my blog. Seriously, the only way you are getting daily posts throughout the week is because I spend the weekend writing them and then schedule them to post on a certain day. I'm not complaining (ok, maybe just a little) I just felt a little overwhelmed last night when I realized that I not only didn't have a post ready for today, but I also did not have a post ready for Fire Day Friday over at Our Krazy Kitchen!!
AAAAAAAAAAAAAAAAAAAAAA!!!! What's a girl to do?
Well, this girl freaked out for a moment and then realized... who's going to care, right? It's not like it's a life or death matter. Right? :)
So, no recipe today on my site...but if you are looking for a very tasty, very simple recipe for some good barbecue chicken - stop on by and see what I have showcased for Fire Day Friday....
You know you want to check it out... so go..... and have a fun and very safe holiday weekend!! I'll be back on Tuesday with a brand new recipe for you all to enjoy!
Sometimes I forget to get certain ingredients at the store. There, I said it! Actually, sometimes I forget to write down the amount of an ingredient I need and I end up not having enough. Take this recipe for instance. The original recipe, from Chris at Nibble Me This, has a cheese sauce made with milk and cheese (obviously). So I picked milk up at the store and thought I was covered. Except, I was making something else (Simple Fudge Ripple Ice Cream) that needed milk and I only got enough for that recipe. So, when I went to make this dish, I realized, a little to late, that I did not have all the ingredients to make this dish. - Sigh -
Did I let that defeat me? For those that know me well enough, you know that would not happen. So I, of course, decided to improvise. I had some goat cheese that needed to be used and I did still have the sour cream that the recipe called for... so I figured out a way to work with what I had instead of scraping the whole meal altogether.
I'm so glad I did because this pasta was amazing. Probably one of my favorites in a long time. But, I'll be honest with you, this pasta really can bite you back, so be careful. If you are afraid of the heat, cut back on the jalapenos. If you aren't, well, then by all means, enjoy this dish......and believe me, you will!
Bite You Back Pasta Adapted from Nibble Me This Printable Recipe Ingredients: 13oz whole grain penne pasta 1/2 lb ground chorizo 1 jalapeno, roughly chopped (I left the seeds in.. I like living dangerously!) 1 red sweet pepper, seeds removed and roughly chopped 1 garlic clove, finely minced 1/2 teaspoon homemade taco seasoning 1/2 teaspoon dried oregano 2 oz goat cheese 2 Tablespoons sour cream
Directions: Cook pasta according to package directions. Drain, reserving 1/2 cup of the pasta water. Set aside.
In a large, deep skillet, cook the chorizo over medium heat for 3 minutes. Add the jalapeno and sweet pepper. Cook another 3-4 minutes or until the chorizo is cooked through. Add the garlic, taco seasoning, and oregano. Stir to combine and cook for 1 minute. Add the goat cheese and stir until cheese is melted. Stir in the sour cream. Remove from heat, add the drained pasta to skillet and toss to coat. If the sauce is too thick, thin it out with a little pasta water. Transfer to plates or bowls and enjoy!
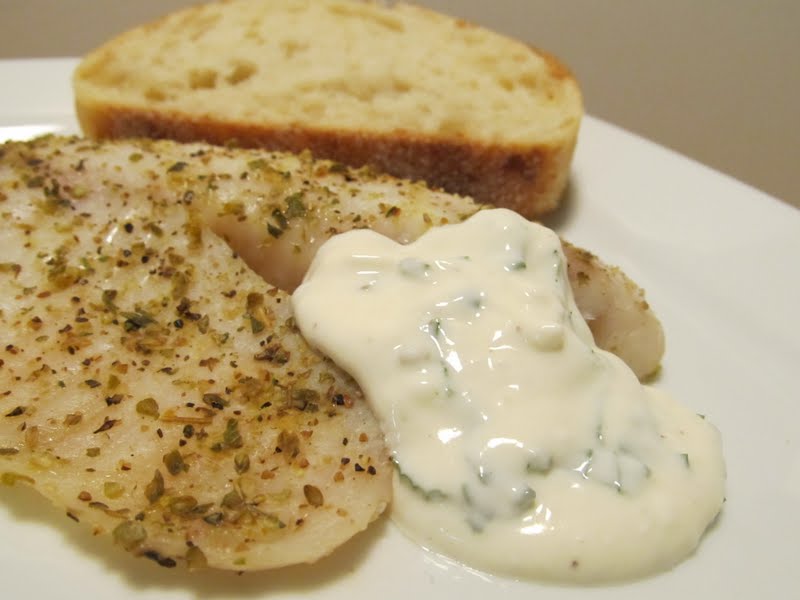
This recipe was actually supposed to be for a vinaigrette.... but there I was, making it, and I noticed, hhhhmmmmm.... adding a little less olive oil will make this more of a sauce then a vinaigrette. And we all know I'm going to stop right there... right at the sauce. The most important part of some meals. The most important part of this meal. Sure, I could have made this post about the grilled fish, but who cares about simple grilled fish.. the sauce is the true star. But you probably expected that, since you are here, and I, as most of you know, am the self proclaimed sauce queen.
The original vinaigrette recipe can be found on Angie's Recipes. If you have not visited her site, it's a must. The pictures are beautiful and her recipes are fun and unique. Thanks, Angie, for all the yummy recipe ideas!
Parmesan Thyme Sauce Adapted from Angie's Recipe Printable Recipe Ingredients: 2 Tablespoons extra virgin olive oil 3 Tablespoons grated parmesan cheese 1 Tablespoons white wine vinegar 2 Tablespoons Greek yogurt 1 teaspoon dried thyme 1 teaspoon Dijon mustard salt and pepper to taste
Directions: In a small bowl, whisk all ingredients together until well combined. Serve immediately or cover and refrigerate up to 2 days. The longer it sits the more it breaks apart, you'll need to whisk it again before serving (you can see from the pictures the oil is starting to break away from everything else). Serve with fish or chicken. Add more olive oil and use as a vinaigrette on salads and green beans. Enjoy!
I found some Naan flatbread at the store the other day and thought how wonderful it would be to use them as little pizza crusts. It would be a simple way to throw together little personal pizzas on a busy week night. There would be no kneading or stretching involved. (YAY!) Brush them with a little olive oil, throw them on the grill... top them... now you are ready to eat. With the busy schedule I've had lately, this came in quite handy, let me tell you. The naan I picked up was garlic flavor too, so there was no need to even season the "crusts". Simple.
And if you don't like the toppings I used, not a problem, top these little babies however you want. I promise to not be offended :)
Chorizo and Shrimp Naan Pizzas Created by Jenn's Food Journey Printable Recipe Ingredients: 2 Naan (mine were garlic flavored) olive oil 1/2 lb ground chorizo, cooked 6 medium sized shrimp, cooked and roughly chopped 1/2 cup cherry tomatoes, quartered 4oz goat cheese (or more if desired) 1/2 - 1 cup shredded Monterey jack cheese
Directions: Preheat grill to 350 degrees F. Brush both sides of the naan with olive oil. Season with salt and pepper if desired. Place the naan over the fire and allow to grill about 3 minutes or until golden brown. Remove from grill.
Brush more olive oil on the grilled side of the naan. Top with goat cheese (I spread a little and then dolloped a little), chorizo, shrimp, tomatoes, and then the monterey jack cheese. Place back on the grill (make sure to cover the grill or the cheese won't melt... I helped mine along by putting an aluminum foil tent over the pizzas) and grill another 3-5 minutes or until the cheese has melted and the bottom are golden brown. Remove from grill and enjoy!
The pictures do not do this ice cream justice. Oh, they aren't BAD, but they aren't good either. If you want to see an absolutely fantastic photo of this scrumptious ice cream, please visit Jean's site - Delightful Repast. She takes much better photos then I do, trust me! :)
Despite my photo challenges, this ice cream was DELICIOUS!!! YUM - YUM and double YUM! That's about all you can say. The fudge sauce is homemade and the only chocolate it uses is cocoa powder, it uses everything I had in my pantry (YAY!)...that's why I could not pass this one up, I had everything on hand!
The only thing I did differently from Jean's original recipe was adding chocolate chips. And, really, it didn't need them, I just had a small amount of them and thought I should use them. Waste not want not...
Simple Fudge Ripple Ice Cream Ever so slightly adapted from Jean at Delightful Repast Printable Recipe Ingredients: 1 cup 2% milk 2/3 cup granulated sugar 2 teaspoons vanilla extract pinch of salt 2 cups heavy whipping cream 1/2 cup chocolate chips or chunks (optional) For the fudge sauce - 1/2 cup granulated sugar 1/4 cup unsweetened cocoa powder pinch of salt 1/3 cup water 1/4 teaspoons vanilla extract 2 Tablespoons unsalted butter
Directions: In a large bowl or 2 quart measuring cup, whisk together the milk, sugar, vanilla, and salt until the sugar is dissolved. Stir in the heavy cream. Cover and refrigerate for at least 2 hours or overnight.
Meanwhile, at least 2 hours before making the ice cream, make the sauce. In a medium sauce pan, whisk together sugar, cocoa, salt, and water. Cook over medium heat, stirring constantly, until mixture comes to a boil; continue cooking for 1 minutes. Remove from heat and stir in vanilla and butter until butter is melted. Let cook at room temperature, then chill for about 30 minutes before using. If you chill it too long, you'll need to wait for it to warm up a bit because it needs to be thin enough to drizzle into "ripples".
Put child ice cream mixture into ice cream maker and process according to manufacturer's instructions. Add the chocolate chips in the last few minutes of the processing.
Transfer a quarter of the soft ice cream to a freezer safe airtight container, drizzle on some of the sauce. Repeat three more times (you will have sauce left over for drizzling on the ice cream when you are ready to serve it). Place in freezer until ice cream is firm. Drizzle with any remaining sauce. Enjoy!
I happened to end up at the store during a sweet meat sale and I found pork back ribs for $5. I could not pass that up. Plus, it was Saturday, there was boxing on later that night, what goes better with boxing then ribs, right??
Alright...so I had ribs, but the last few times I've done ribs, I've done them in the more traditional way, so this time I wanted the flavors to be a bit different. On the fly, I came up with this idea. Now, I'll admit, I think I added a bit too much Chinese 5-spice to the rub, but not to worry, I have changed the amounts and all should be well here. If you are worried, do something I didn't do and just add a little at a time, taste, add more if needed.
If you love Asian flavors as much as I do, you will definitely want to try this.
Grilled Chinese Pork Back Ribs Created by Jenn's Food Journey Printable Recipe Ingredients: 1 rack pork back ribs For the rub - 1/2 teaspoon Chinese 5 spice 1/2 teaspoon garlic powder 1 teaspoon hot mustard powder (you can use regular dry mustard) 1 teaspoon kosher salt 1/2 teaspoon black pepper For the sauce - 2 Tablespoons low sodium soy sauce 2 Tablespoons granulated sugar 1 1/2 Tablespoons hoisin sauce 1 Tablespoon rice vinegar 1/4 teaspoon Chinese 5 spice 1/2 teaspoon sesame oil 1/4 teaspoon ground ginger 1/4 teaspoon black pepper 1 garlic clove, finely minced 2 Tablespoons ketchup 3 Tablespoons honey 1 teaspoon Sriracha
Directions: In a small bowl, mix together all the ingredients for the rub. Rinse the ribs and pat dry. Rub the rub mixture all over the ribs, wrap in plastic wrap, and place in the refrigerator for 6 to 8 hours or over night.
To make the sauce: In a small saucepan over medium heat, add all the ingredients and mix until well combined. Bring to a boil, stirring occasionally. Once sauce comes to a boil, reduce heat and simmer for 15 minutes. Remove from heat and allow to cool. (reserve a little for dipping if you would like)
When you are ready to grill - preheat your grill to 375 degrees. Wrap the ribs in aluminum foil and grill over indirect heat for 1 hour. Carefully remove the ribs from the foil and place directly over the heat. Allow to grill for another 15-20 minutes, basting periodically with the sauce. Remove and allow to rest for at least 5 minutes before cutting into. Enjoy!
Alright, alright.. this really isn't a sauce..it's really just mayo and goat cheese and I say it's a sauce so that I don't feel so guilty about eating it.
So that's it... it's a goat cheese mayonnaise... so what? Don't print this recipe, don't make this recipe, it's no matter to me... it actually just means more for me. (YES!!)
Because my theory is... if you're gonna splurge, why not splurge BIG??!!??!!
Creamy Goat Cheese and Mint Sauce Adapted from Aaron McCargo Jr. Printable Recipe Ingredients: 2 Tablespoons goat cheese, room temperature 3 Tablespoons mayonnaise 2 teaspoons lemon juice 1 Tablespoons freshly chopped mint leaves salt and pepper to taste
Directions: In a small bowl, mix together all the ingredients until smooth. Season with salt and pepper. Cover and refrigerate until ready to use. Serve with fish, chicken, or pork. You can even use it as a spread on your sandwiches. Enjoy!
How can you go wrong with a little pasta, a little shellfish, and a little spice?? This pasta is all that and a bag of chips, as a friend of mine would say! It's light, it's flavorful, and it gives you just a tad bit of a kick.
Not into spice? Not to worry, just cut back on the jalapeno or leave it out all together. Use a sweet pepper instead. Nice thing about this dish is it's simple and very versatile. My favorite type of recipe!
Jalapeno Shrimp Pasta Created by Jenn's Food Journey Printable Recipe Ingredients: 12 oz angel hair pasta 2 Tablespoons extra virgin olive oil 2 jalapenos, seeds removed and roughly chopped 1 red sweet pepper, seeds removed and roughly chopped 2 garlic cloves, finely minced 3/4 lbs. frozen (unthawed) or fresh shrimp, remove shells and tails if necessary 1 Tablespoon basil olive oil (optional) grated parmesan cheese (optional) salt and pepper to taste
Directions: Cook the pasta according to package directions. Drain, reserving 1/2 cup of the pasta water; set aside.
In a skillet, heat 1 tablespoon of the olive oil over medium heat. Add the jalapeno and sweet pepper and saute for 3 minutes. Add the garlic and saute for 1 minute. Add the remaining tablespoon of olive oil and the shrimp and saute until the shrimp is cooked through and warm, about 2 minutes. Toss the cooked pasta into the skillet until everything is coated. You can add pasta water if it is too dry. I finished mine off with a tablespoon of basil olive oil - you can do the same with regular olive oil. Top with parmesan cheese if desired and season to taste with salt and pepper. Enjoy!
This was a little salad that I have been wanting to try for a while now and I finally found the perfect meal to include it with. I served this salad with the Grilled Pork Tenderloin with Greek Aioli and we devoured it. It was the perfect light and flavorful side dish to accompany the Greek flavors of the pork and the aioli.
Ok, let's be honest...this salad would be the perfect accompaniment to any summer dish.
Cucumber, Tomato, and Feta Salad Adapted from Epicurious.com Printable Recipe Ingredients: 3 Tablespoons basil olive oil or extra virgin olive oil 1 Tablespoon pomegranate balsamic vinegar or balsamic vinegar salt and pepper 1 English cucumber, slice and cut into moon shapes 5 oz cherry tomatoes, quartered 1/4 cup Kalamata olives, chopped 1 Tablespoon chopped mint leaves 1/3 -1/2 cup feta cheese
Directions: Whisk together the oil and vinegar, season to taste with salt and pepper.
Place the cucumber, tomato, and olives in a medium bowl. Pour the oil mixture over and toss to coat. Add the mint and feta and toss one more time. Serve cold or at room temperature. Enjoy!
Here's something interesting: As much as I grill, I've only grilled a pork tenderloin twice in my life. Strange, huh? Well, I decided it was time to rectify that. Especially, since this nice little hunk of meat was on sale for $3. I never see pork tenderloin for that price...I felt like I was stealing :)
Ever since finding out Chris likes feta, I've been on this Mediterranean/Greek flavor kick, so I thought that I would incorporate those flavors into the pork. It turned out perfectly. The pork was tender and flavorful and the aioli... well, you know what I'm going to say... it was delicious! A perfect compliment.
Now I brined the tenderloin and then let it marinate. You can skip the brining process if you want, but I would not suggest it. For over a year now, Stephen (The Obsessive Chef) has been preaching to me about the importance of brining. Because of a bad experience with brining well over 6 years ago, I was hesitant to do it. Once I put that bad experience aside and gave it another shot - I must admit - I am now on the brining bandwagon! I never had a problem with my chicken or pork being over cooked, so the meat was always tender. BUT, there is something magical that happens to meat when you brine it and it's well worth taking that extra time to get the best flavors and textures possible.
Grilled Pork Tenderloin with Greek Aioli Created by Jenn's Food Journey Printable Recipe Ingredients: 3 cups water 2 Tablespoons kosher salt 2 1/2 Tablespoons granulated sugar 3 garlic cloves, crushed and minced 1 teaspoon white pepper 1 1/4 lbs pork tenderloin 6oz Greek yogurt 1 Tablespoon lemon juice 1 Tablespoons red wine vinegar 2 teaspoons dried oregano For the aioli - 1/4 cup mayonnaise 1 teaspoon Dijon mustard 1 Tablespoon lemon juice 1/2 teaspoon Greek seasoning (if you do not have this, you can use a mixture of oregano, garlic, pepper, and marjoram)
Directions: Mix together the water, salt, sugar, garlic, and pepper until the sugar has dissolved. Put the tenderloin in a resealable bag or deep dish and pour the brining liquid over top of it. Seal the bag and place in the refrigerator for at least 2 hours. Remove from the brining liquid and thoroughly rinse under cool water. Pat dry and place in shallow dish.
In a small bowl, mix together the yogurt, lemon juice, red wine vinegar, and oregano until smooth. Slather/pour the mixture all over the tenderloin, making sure to cover all sides. Cover with plastic wrap and allow to marinate for at least 2 hours.
Meanwhile, mix together all the ingredients for the aioli until well combined. Cover and place in refrigerator until ready to use.
Preheat your grill to 350 degrees F. Using tongs, dip a wad of paper towel in oil and rub on the grill grates. Shake off as much of the yogurt mixture as you can from the pork and grill over direct heat for 18-20 minutes, turning 3 times, or when the pork reaches 140 degrees F. Remove from the grill and allow to rest for 10 minutes. Slice and serve with aioli. Enjoy!
Please welcome today's guest blogger's - Ken and Patti of Date Night Doins BBQ for Two. I actually "met" Ken and Patti thanks to the Women of the Grill Contest. They have been very wonderful to me and I really wanted to showcase one of their recipes. This is a recipe that I have been wanting to try, but you know how it goes sometimes, so many recipes.. blah blah blah. Ken gave me permission to pull this from their site and I'm excited about sharing this recipe with you. Thank you Ken and Patti... hope you all enjoy!
For our Valentine’s Day dinner this year we wanted to combine comfort food done a little fancy. Patti loves how versatile Mac & cheese can be and so easy to make homemade. When our daughter Katie visits she insists on Mac & cheese made with a jar of chunky hot salsa. Sometimes, we add a package of frozen spinach or broccoli, thawed. A great way to have kids eat veggies is to cover them with cheese. By kids I mean Ken, too. But, for this holiday recipe I added blue cheese, crab legs and shrimp. And a glass of Champagne, because as Patti’s grandmother would say:”It couldn’t hurt”.
1lb. short cut pasta, we used rigatoni
½ lb. cooked medium shrimp, halved
¾ lb. snow crab leg meat or surimi
4 oz. blue cheese, crumbled
1 lb. Velveeta, cubed (we like cooking with it because it melts so nicely)
8 oz. carton onion dip
½ cup fresh garlic, minced
1 teaspoon Country Bob’s Seasoning Salt
1 flute Champagne, if it’s good enough to drink, it’s good enough to use in cooking
Directions: Crabby Macaroni & Cheese
Cook macaroni according to package directions, less two minutes. Drain macaroni; add dip, cheeses, garlic, CB’s Season salt and wine. Stir on medium heat until cheese is melted. Add seafood, stirring in gently. This can be served just like this when heated through or put aside if you’re waiting for a main dish to be done. Reheat in the oven on 350 for about twenty minutes.
Patti made this on the stove, I reheated it on the Royall 3000 Wood Pellet Grill so it could pick up the flavors of the smoke.
About our Recipes We do our recipes on our patio where we have a lineup of grills, including Royall Wood Pellet Grill/Smoker, Traeger, Charmglow, Char-Broil, The Big Easy, Brinkman and Weber. I call it our “Wall of Grill”. Our grilling styles are healthy and low fat and will fit pellet heads, gas, natural wood and even charcoal purists. Almost any of our recipes can be done on any kind of good BBQ.
The important thing to keep in mind is TIME & TEMPERATURE. You can even do some of them in the oven or crock pot, but, then you lose all the flavors you get from cooking outdoors. But sometimes it does rain.
Remember that a recipe is simply an outline; it is not written in stone. Don’t be afraid to make changes to suit your taste.
Al Malekovic makes some fine sauces. Patti uses them for seasoning all kinds of things, but I like them on burgers and steaks. “Country Bob’s All Purpose Sauce”
Check it out, for a free bottle go to his web site or email him. If you email him, tell him that you saw it here and we used it all up and to send us more...
Once again, I'm sitting at my computer while The Hangover plays on the TV in the background. My attention is constantly being drawn away from the matter at hand and to the comedic relief I so very much am craving at the moment...
Sorry, had to share that, I love that song :)
Ok, now on to the recipe...
What can I say? This a great tasting dish. I'm sure it would have been even better if I had coated the meat in cornstarch and then fried it. It probably would have been really really REALLY good... but alas, you know I try very hard to eat healthier versions of things, so this is what you get. Plus, authentic Kung Pao Beef doesn't usually come with so many veggies, but I couldn't help myself. The flavors are still incredible and you won't have to run an extra mile after eating it!
Kung Pao Beef Created by Jenn's Food Journey Printable Recipe Ingredients: 1 1/4 lbs steak (I used flank steak), sliced - against the grain - into bite size strips 2 Tablespoons Hoisin 1 Tablespoon rice vinegar 1 Tablespoon low sodium soy sauce 1 garlic clove, finely minced 2 sweet bell peppers - red, orange, or yellow - thinly sliced 4 green onions, thinly sliced 2 teaspoons vegetable oil For the sauce - 2 teaspoon chili paste 1/4 cup low sodium soy sauce 2 Tablespoon rice vinegar 2 teaspoon granulated sugar 1/4 cup chicken broth 2 teaspoon cornstarch 1/4 teaspoon sesame oil
Directions: In a small bowl, mix together the hoisin, 1 tablespoon rice vinegar and 1 tablespoon soy sauce. Place the sliced steak in a resealable bag and pour the marinade over it. Allow to marinate for at least 1 hour and up to over night.
Mix together all the ingredients for the sauce and set aside.
In a wok or large, deep skillet, heat the vegetable oil over medium high heat. Remove the steak from the marinade and place in the heated skillet. Stir fry the beef for 2 minutes. Add the sliced bell pepper and cook another 5 minutes or until the beef is cooked and the peppers have softened just a bit. Add the garlic, cook for 1 minute. Add the sauce mixture and bring to a boil, stirring to coat everything. Reduce heat and allow to cook until the sauce thickens, another 1-2 minutes. Toss in the sliced green onions. Serve over rice or noodles.... and enjoy!
So you may have heard me mention a time or two that I am a boxing fan. I believe I am actually just a boxing fan by default. My boyfriend loves it, lives it, breaths it, so I at least live it most Saturday nights. That's ok, I've learned a lot about the sport and where it has been and where it has come. And honestly, I've really have enjoyed some of the fights. I even know more then I care to admit about the sport, but that's not really what I'm here to talk about. Today, I just want to mention that last week, the boxing hall of fame inducted 12 new members including boxing greats like Juilo Cesar Chavez, Mike Tyson, and trainer Ignacio "Nacho" Beristain. What might surprise you was that Sylvester Stallone is also a newly inducted member of this pristine club. That's right folks, Sylvester Stallone, Rocky Balboa himself. And why, you ask, would he be inducted considering he wasn't a real heavyweight champion? Well, it's all because of what he did for the sport itself through the Rocky movies. He inspired millions of people and an untold number of future fighters through each film. Rocky was nominated for 10 Academy Awards... 10!!! The success of Rocky began one of the most lucrative and triumphant film franchises in history. He even won the Boxing Writers Association of America award for "Lifetime Cinematic Achievement in Boxing". His involvement in the sport continued as host and executive producer of the boxing reality show "The Contender". I know there are those out there that don't believe he deserved this honor, but I am not one of them. I, for one, am truly excited about the fact that he was honored in this way. As even Mike Tyson was heard saying - "He contributed more to boxing then some champions did." Amen!
Anyway, I don't think a lot of people had heard this news, so I thought I would quickly mention it... and considering I don't have much else to talk about other then work, I thought this was a good introduction to this "3rd round knock out" recipe :) lol
It's moist, flavorful, sticky, and delicious - do I really need to say anything else??
Tequila-Jalapeno Glazed Chicken Adapted from Epicurious.com - Serves 2 - Printable Recipe Ingredients: 1/2 a whole chicken 2 cups water 2 Tablespoons kosher salt 2 Tablespoons granulated sugar 1 teaspoon minced garlic 1 teaspoon white pepper 1/3 cup orange juice 1/4 cup tequila 2 Tablespoons packed light brown sugar 2 Tablespoons honey 1-2 jalapenos with seeds, finely chopped
Directions: Mix together the water, salt, sugar, garlic, and white pepper until the sugar has dissolved. Place chicken in ziploc bag and pour the brining liquid over it. Allow to brine for at least 2 hours. Remove chicken from brine and thoroughly rinse the chicken under cold water. Pat dry.
Meanwhile, in a small saucepan over medium heat, add the orange juice, tequila, brown sugar, honey and jalapeno. Bring mixture to a boil, stirring until the sugar dissolves. Reduce heat to low and simmer until mixture thickens, about 10 minutes. Allow to cool, reserving 2-3 tablespoons for serving.
Preheat grill to 375 degrees. Oil the grill grates. Place the chicken, skin side down, over direct heat and allow to grill for 8-10 minutes. Flip the chicken over and baste the skin side with the glaze. Allow to grill for 5 minutes. Move chicken to indirect heat and continue to grill until the chicken reaches an internal temperature of 165-170 degrees, basting throughout the cooking process. Remove the chicken from the grill, cover with foil and allow to rest for 8 minutes before cutting into it. Serve with reserved sauce. Enjoy!