Search This Blog

Monday, January 17, 2011

Chorizo and Rice Casserole

I love chorizo.  I may have mentioned this little fact before.  In case I haven't, let me reiterate...I LOVE chorizo!  When I saw a posting for Chorizo and Rice Dressing on Nibble Me This, I got an idea.  Oh, yes, that would be a fine dressing or stuffing, but I'm not in the mood to stuff anything....so what's a girl to do?  Well, this girl just adapted it into a casserole and/or lovely side dish.  It was spicy, it was light, it was perfect!  Now, don't get too hung up on the ingredients...if you don't want to use a jalapeno, leave it out.  If you want it to be even spicier, add a Serrano pepper.  My point is (and I've forgotten to remind you all of this lately) create what works best for your tastes!  Build the dish to your liking...it's your canvas remember??  Now paint away!!

Chorizo and Rice Casserole
Adapted from Chris at Nibble Me This
Printable Recipe 
Ingredients:
1 teaspoon olive oil
1 jalapeno pepper, stem removed, seeded, and chopped
1 red bell pepper, stem removed, seeded, and chopped
1 garlic clove, minced
Salt and Pepper
1/2 lb Mexican Chorizo (the bulk stuff, not the already cooked kind...like ground beef looking)
3 cups cooked rice
3 green onions, chopped
2 Tablespoons sour cream

Directions:
Preheat oven to 375.  Spray a small baking dish with non-stick spray.

In a non stick skillet, over medium heat, add the olive oil.  Add the jalapeno and red pepper and let cook about 3 minutes; season with salt and pepper.  Add the garlic and cook for 30 seconds.  Now add the chorizo, breaking it up with a wooden spoon, and cook until cooked through, about 3-5 minutes.  Remove from heat and toss with rice.  Stir in sour cream.  Pour into prepared pan and place in oven.  Let cook 10 minutes...just until everything is nice and warm! Enjoy!


Saturday, January 15, 2011

Biscuits and Sausage Gravy

If you gave Chris the option of Biscuits and Gravy or Country Fried Steak and Eggs for breakfast, he'd probably ask why he couldn't have both! :)

I don't make breakfast very often.  If I do, it's always on the weekends.  Chris is no fun to ask what he wants for breakfast anymore because he always wants the same thing...biscuits and gravy!! Now, don't get me wrong, I like biscuits and gravy, but I'm an egg girl... a fried egg girl if you want to know the truth... a fried egg on a toasted English muffin with melted cheese and bacon girl if you want know the WHOLE truth.  But when Chris actually makes a request of what he would like me to make, I jump on it.  Chris is wonderful in the sense that he always trusts that I will come up with a great meal plan for the week...he very rarely even asks what we are having for dinner...but it's frustrating when I'm having a hard time coming up with ideas and I ask him for suggestions and he just sort of shrugs his shoulders :)  My point being: when the man makes a request, who am I to deny him??

This is a simple recipe that most people probably throw their own twist on...but today, I'm just posting simple.  So simple, I didn't even make fresh biscuits...that's right.. Pillsbury worked just fine for us.  Feel free to make your own, they definitely make a difference and would have made our awesome breakfast even better, BUT laziness was in charge... I mean, come on, it was the weekend!!  And, if you aren't a fan of sausage, you can easily substitute bacon...mmmmmmmm...bacon AND sausage gravy!!!!

Biscuits and Sausage Gravy
Printable Recipe 
Ingredients:
6-8oz breakfast sausage (I say 6-8 because you might want more sausage, you might want less)
1 Tablespoon all purpose flour
1 cup milk (you might need a little more)
salt and pepper
6-8 warm biscuits (homemade or store bought)

Directions:
In a cast iron skillet (you can use any skillet if you want, but cast iron works the best, I think), over medium heat, cook the sausage; breaking it up with a wooden spoon.  When the sausage is cooked (about 5 minutes or so) remove from skillet with slotted spoon; let drain on paper towel lined plate.  Do not drain the oil.  You should have at least 1 tablespoon of oil left, if not add some butter so that it equals a tablespoon.

Add the flour to the oil and cook for 1 minutes, stirring constantly.  Slowly whisk in the milk.  Let simmer until sauce starts to thicken.  Add the sausage back into the skillet and season with salt and pepper.  Let simmer for another 3-5 minutes or until the sausage is heated through.  Pour the gravy over the biscuits....Enjoy!


Friday, January 14, 2011

A New Adventure...Come Join Me

Hey everyone!  Happy Friday!! I have some really exciting news....starting today, I will be co-hosting Fire Day Friday's over at Our Krazy Kitchen with Chris from Nibble Me This.  Every other Friday I will post a recipe fit for fire....or at least fit for Friday!!

Today I'll be posting a recipe for Grilled Chicken with White Barbecue Sauce....so come on over and check out my post...while you are there, check out some of the other tasty recipes on the site.  There are a ton of fantastic bloggers that contribute to it and, who knows, maybe you'll find your next favorite recipe there!!

And don't worry if you can't grill due to the weather or don't even own a grill, you know my recipes can always be adapted to work in your oven, so stop by and say hello!!

Here's a peak at what you'll be missing if you don't stop by:


One Year Ago:  Bacon-Parmesan Crusted Tilapia

Thursday, January 13, 2011

Herb Crusted Tilapia

Did you think that because I said I was running out of ideas for tilapia last week that it would be a while before you saw another fish post? Well have no fear, I am back with a tasty number.  I saw this over on Pam's Midwest Kitchen Korner and immediately knew I had to try it!  This was fantastic!  I did change things just a bit, though.  I added chopped unsalted peanuts to the topping.  I had some that did not get used when I made my Grandma's Cherry Mash last month, so I figured, why not?  It's only going to add to the dish, that's for sure.  And did it... wonderfully, I might add.  So thanks Pam for the tasty new way to eat tilapia...this will definitely be working it's way on to our "favorites list"!

Herb Crusted Tilapia
Adapted from Pam's Midwest Kitchen Korner
Printable Recipe 
Ingredients:
4-6 tilapia fillets
3 Tablespoons Dijon mustard
1 teaspoon horseradish
1/2 teaspoon onion powder
1 teaspoon dried parsley
1/2 teaspoon thyme
1/4 cup panko bread crumbs
1/4 cup crushed or chopped unsalted peanuts

Directions:
Preheat oven to 400 degrees.  Spray a baking dish with non stick cooking spray.  Rinse the tilapia, pat dry with a paper towel, and place in prepared baking dish.

In a small bowl, mix together the Dijon, horseradish, onion powder, parsley, and thyme.  Spread the mixture evenly over the fillets.  Scatter the bread crumb/nut mixture evenly over each fillet.

Bake for 12 minutes or until the fish flakes easily with fork and topping is golden brown.  Enjoy!


One Year Ago:  Balsamic, Dijon & Garlic Chicken

Wednesday, January 12, 2011

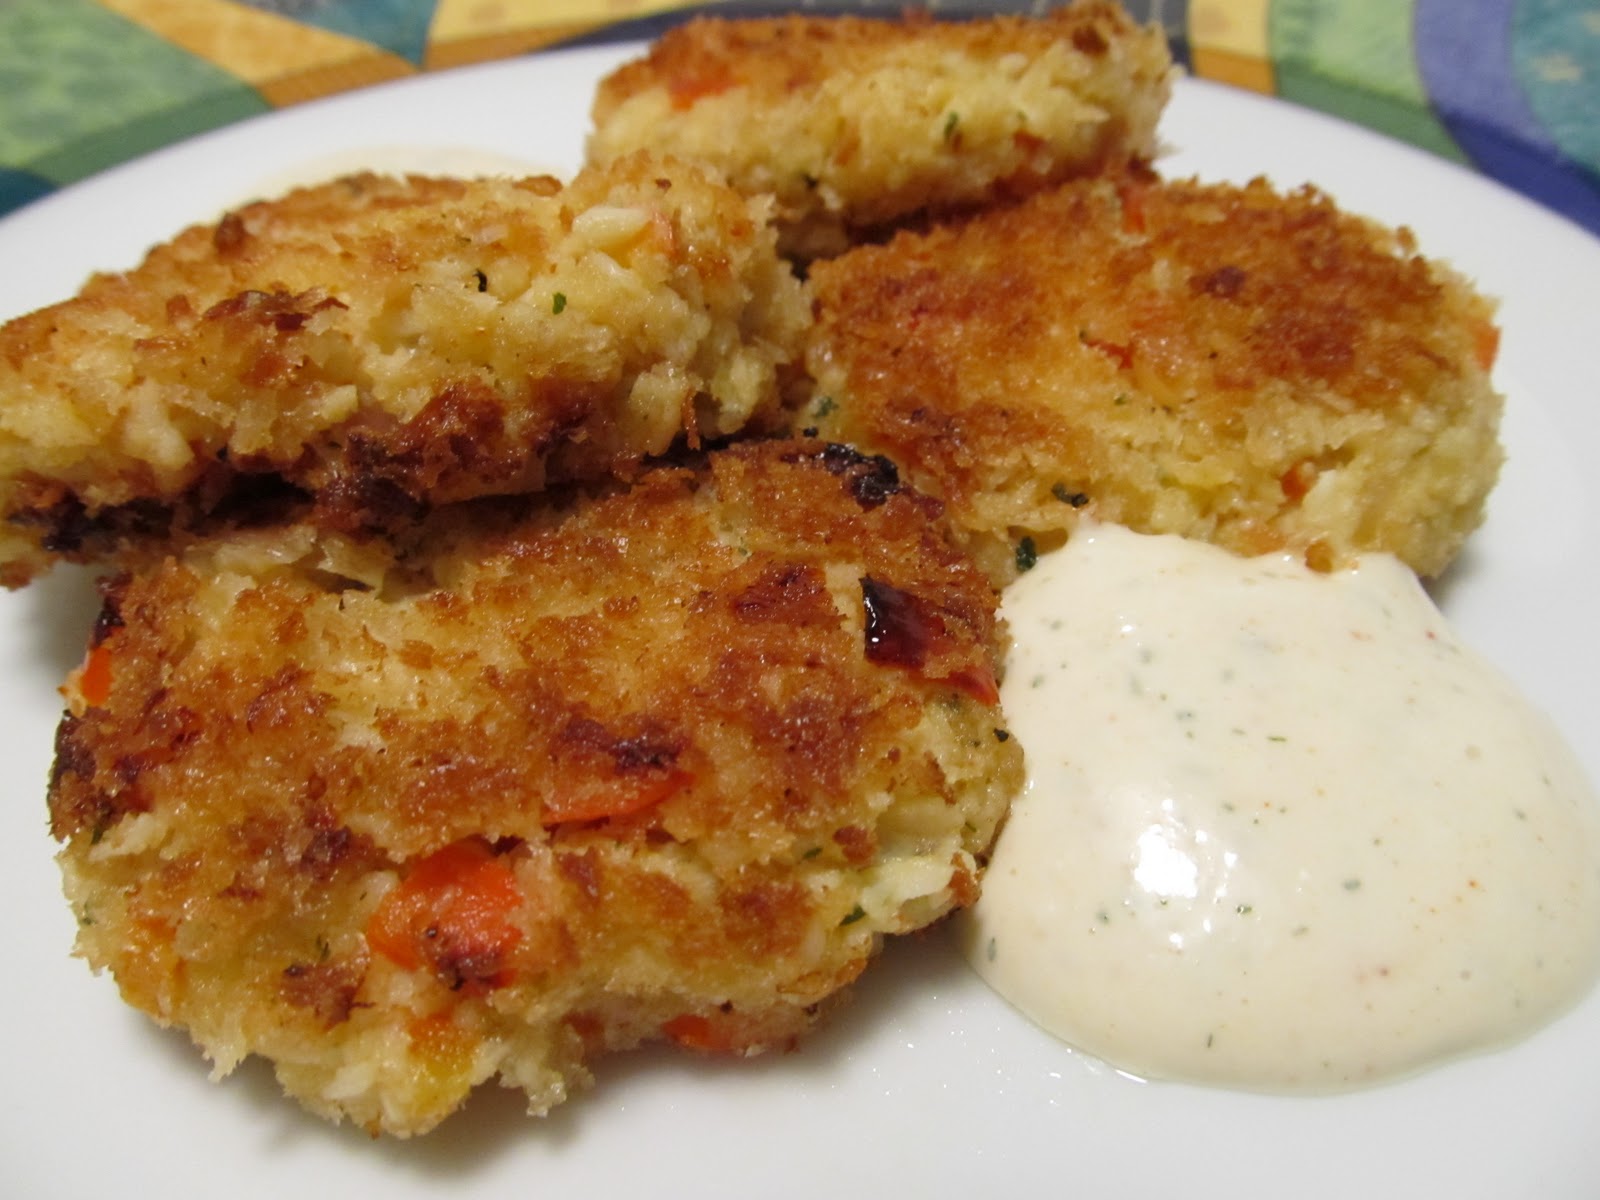
Spicy Crab Cakes with Lemon Aioli

I think I may have said this before, but I really do not like watching the Neeley's on the Food Network.  They are just a bit much for me....what, with their kissing and baby talk.. ugh, it becomes excruciating to watch!!  BUT...I will admit, any recipe that I have tried of theirs has turned out to be really good.  And this little number is no exception!

Most of you who have been reading my blog for a while now, know that Friday nights at our house are either "date night" or "fend for yourself night".  This past Friday was fend for yourself night and I was craving crab cakes!  I knew this was a dish that Chris would not be fond of, so it was the obvious choice to make.  I made these crab cakes a few years back, before Chris and I moved in together, so I knew exactly which recipe I was going to adapt for my dinner.  I had to adapt the amount of ingredients for myself as this recipe called for 1 pound of crab meat and I was only working with about 2oz!  Despite my worries of cutting the ingredients, these turned out to be absolutely wonderful.  The crispy outside, the nice wonderfully, creamy soft inside.  Oh, and the lemon aioli....well, of course you know it was my favorite part of the entire meal!!


Spicy Crab Cakes with Lemon Aioli
Adapted from The Neelys, Food Network
Printable Recipe 
Ingredients:
1 Tablespoon unsalted butter
1 Tablespoon shallots, finely diced
1/2 red bell pepper, finely diced
1 clove garlic, minced
salt and pepper
1 Tablespoon mayonnaise
1 Tablespoon Dijon mustard
1/4 teaspoon lemon juice
1/4 teaspoon cayenne pepper
1/4 teaspoon dried parsley, or 1 teaspoon fresh chopped parsley
2 Tablespoons panko bread crumbs
1 small egg yolk
hot sauce, to taste
2 oz (1 can) crab meat
1-2 Tablespoons vegetable oil
For the lemon aioli -
1/4 cup mayonnaise
2 Tablespoon lemon juice
1/4 teaspoon garlic powder
1 teaspoon Dijon mustard
1/4 teaspoon dried parsley

Directions:
In a small skillet, over medium heat, melt the butter than add the shallot.  Let cook 3-4 minutes or until they become translucent; stirring occasionally. (You may need to adjust the heat so that you do not burn them)  Add the bell pepper and cook another 3 minutes.  Add the garlic and cook for 1 minute; stirring constantly.  Remove from heat and let cool.

In a bowl, add the mayo, Dijon, lemon juice, cayenne, and parsley.  Add the cooled, cooked vegetables, the 1 tablespoon panko, egg yolk, and hot sauce.  Fold in the crab meat.  Place the remaining panko on a plate.  Using about 2 tablespoons of the crab mixture, make patties about 3/4-inches thick.  Dip the cakes into the panko and then move to a plate and allow to sit for 5 minutes.

In a small bowl, mix together all the ingredients for the lemon ailoi.  Cover and set aside.

In a skillet, over medium high heat, add the oil until shimmering.  Carefully place the cakes in the oil and fry about 3-4 minutes or until they are golden brown.  Carefully flip and cook another 3-4 minutes.  Remove from the oil and allow to drain on a paper towel quickly.  Serve with lemon aioli and enjoy!


One Year Ago:  Creamy Italian Sausage Pasta

Tuesday, January 11, 2011

Roasted Garlic and Chicken Soup

I've had my eye on making a roasted garlic soup for a while now.  I think the one thing that held me back was the fact that it would be really, really, really, REALLY garlicky....  Well, it was garlicky... I mean, come on, it's roasted GARLIC soup.  But it wasn't over powering garlic, which is what I was worried about.  It was just this perfect, almost sweet, flavored garlic taste....it was wonderful!!

This would be a great soup for you if you are feeling under the weather.  Not only is it warm and comforting, but garlic is known for it's numerous health benefits.  In 2007, BBC even reported that Alium Sativum (garlic) may have beneficial properties such as preventing and fighting the common cold.  So, see....good for the body and soul!!!  I highly recommend trying this soup, you will not be disappointed.  And, in case you were wondering, this soup would be perfectly fine without the chicken, I only added it because it was a request from Chris :)

Roasted Garlic and Chicken Soup
Inspired and adapted from Life's Ambrosia and Nibble Me This
Printable Recipe 
Ingredients:
2 bulbs of garlic (tops cut off - skin left on)
2 teaspoons olive oil
1/2 teaspoon salt
1/2 teaspoon pepper
3 Tablespoons unsalted butter
1/2 sweet onion, diced
3 Tablespoons all-purpose flour
4 cups chicken stock or broth
1 large russet potato, peeled and diced
1/2 teaspoon dried thyme
1 large chicken breast or 6 chicken tenders, cooked and diced
1/2 cup heavy cream
1 Tablespoon fresh chopped rosemary

Directions:
Preheat oven to 400 degrees.  Drizzle each bulb of garlic (tops cut off) with 1 teaspoon of olive oil, 1/4 teaspoons salt, and 1/4 teaspoons pepper.  Wrap in aluminum foil and roast for 45-60 minutes.  Remove from oven and allow to cool.  When cooled, squeeze each clove from the skin into a small bowl and mash up with a fork.  It will make almost a paste; set aside.

In a Dutch oven or soup pot, add the butter and diced onion.  Cook over medium-low heat for about 10 minutes or until the onions are just starting to turn golden.  Add the flour and cook about 3 minutes, stirring constantly.  Slowly whisk in the chicken stock.  Add the diced potatoes, 1/2 to 3/4 of the mashed up garlic, and the thyme.  Bring to a boil and cook until the potatoes are tender, about 20 minutes.  Taste for seasoning.  You can also add the rest of the garlic at this time (I did not add anymore than 3/4 of it, as I thought it had plenty of garlic flavor at that point).

Using a submersible hand blender, blend up the soup until just about all the potatoes are blended down.  (I left some of them in chunks just for the texture.)  This will help thicken up the soup.  Add the cooked, diced chicken, cream, and rosemary.  Turn down to low and allow to simmer for 5 minutes.  Serve with homemade croutons or warm crusty bread.  Enjoy!

 
One Year Ago:  Triple Chocolate Mayan Brownies

Monday, January 10, 2011

The Great Spam Experiment

So I told you that my cousin Johanna requested a few things when we met for brunch in November.  The first one being Chicken Braciole with Alfredo Sauce.  The second one being this...the great Spam experiment!

Yes, that's right folks......we are talking Spam today....   Hey... Wait!  Where do you think you are going?  Seriously, get back here right now and finish reading this post.  I don't care what your feelings on Spam are.. this is a damn good experiment!!  LOL

Ok, now that I have your attention again....let's talk Spam.  When I was a kid, my grandma Marge would always make us Spam sandwiches, or just plan pan fried Spam.  I remember loving it as a kid.  As I got older, the only time I ever tried it was while on a backpacking trip...I ate it because it was there and I was STARVING!!  But I was in my early 20's when that last happened (I learned to bring better food with us, believe me!!) and, well...that's been quite a few years, so I will admit that I was a bit worried about trying this out.   I'm glad I did though, not only did it reminded of some great childhood memories, but I really did an actual experiment in my kitchen!! YAY!!!  (By the way, for anyone that looks down on me for posting a recipe that includes Spam... all I have to say is this:  Can the whole state of Hawaii really be wrong?  They serve Spam everywhere.. even at Burger King!)

The first test was the old school way.  The way my grandma made it for us...or at least the way I remember her making it for us....straight up pan fried.  I'm not even going to give you a recipe for it because all I did was throw it directly into a non-stick skillet and fried them for about 3-4 minutes on each side:
 
What did we think?  Well, honestly, it was ok, just a bit salty....and this is a fact that I remembered and was not surprised about at all.  I don't mind the salty pork flavor, so it really wasn't too bad at all.

With my second test, I decided that I would boil the meat first to get some of the saltiness out of it (I got that little tip from Stephen over at The Obsessive Chef, check out what he did with Spam!!).  It worked like a charm!  If I was going to do this again, that would be the only way I would eat the Spam...boiled first, than fried!  Johanna had suggested doing a panko coating and than frying the Spam... and I thought, heck, if I'm gonna do that, why not make it sort of like Spam Parmigiana?  And Viola!
 
I will admit, I thought it was actually pretty good.  I would even make this again...truth be told, I'd even serve it to guests at a dinner party!

Conclusion:  I recommend trying Spam again if it's been awhile.  But, what I also recommend is boiling the Spam first.  It makes all the difference in the world.  Well, that's if you are afraid of the salty flavor...if you like a little salty pork (which I do) than just throw it right in the pan.  If you try the parmigiana, though, definitely take the few minutes to boil the meat, you will not be sorry.

Spam Parmigiana
Inspired by Johanna W.
Printable Recipe 
Ingredients:
4-6 slices of Spam (you can cut them however thick or thin you want them)
1/4 cup panko bread crumbs
1 Tablespoon plain or seasoned bread crumbs
1/4 teaspoon pepper
1/4 teaspoon salt
1/4 teaspoon Italian herb seasoning (you can just use basil if you don't have this)
1 Tablespoon vegetable oil
3 Tablespoons of your favorite pasta sauce (you can use more if you want)
shredded mozzarella cheese (you be the judge on how much goes on top of each piece)

Directions:
Bring a pot of water to boil.  Drop the pieces of Spam into the water, reduce the heat, and let it simmer for 3 minutes.  Remove from heat and let the meat sit in the water for another 3-5 minutes.

In a shallow dish, mix together panko, bread crumbs, pepper, salt, and Italian seasoning.  Remove the meat from the water and put it directly into the panko mixture.  Coat each piece with the mixture, pressing into the meat.

Preheat the broiler of the oven.  In a skillet, over medium heat, add the olive oil and heat until shimmering.  Carefully place the Spam pieces in the oil and quickly fry (about 2 minutes on each side).  Remove from skillet and place on a wire rack inside a baking sheet.  Top with sauce and cheese and place under the broiler.  Broil until cheese is melted and bubbly.  Enjoy!


One Year Ago: Chicken Fried Steak 

Sunday, January 9, 2011

2nd runner up isn't bad.....

WOOHOO!!!!  Hey everyone, I couldn't wait to tell you all... I WON I WON I WON!!!!  Ok, so I didn't win first prize....or first runner up...but I got 2nd runner up...and that aint' half bad at all!!!

Back in December, I entered the Women of the Grill contest.  I entered 4 of my recipes and one of them actually got me 3rd place!!!  YIPPY!!!!

The recipe that beat out all the others (except two of course):

I'm so excited!!!  Check out the winners here.  You know what I won??  SAUCES!!!!!!  Seriously, the sauce girl won a gift set with a cookbook and sauces!!!  How cool is that?

Anyway...just wanted to let you all know that the first recipe competition I entered... I took home 3rd place!  And you know what... I thank you all for that.  Without all the support and encouragement I receive, this never would have been possible!!  Thank you!

One Year Ago:  Jalapeno Crusted Tilapia

Saturday, January 8, 2011

Baked Cajun Tilapia

Maybe I shouldn't admit this, but I'm running out of ways to dress up tilapia!!  lol  Ok, ok, so there are many more ways, but not so many that Chris would eat.  I say Chris only because he's a bit more pickier than I am...but just a little.  I tell you this, why?  Well, because this recipe is a lot like ones I have posted in that past.  But that's ok...this was still delicious and flavorful and deserves to be posted.  Not only was it tasty, but simple too.  And, let's not forget healthy.. I have sort of stopped posting nutritional values on my posts only because it was becoming a pain and well, I didn't want to go through that extra step.  But trust me on this one.. this one is light and healthy.

Baked Cajun Tilapia
Printable Recipe 
Ingredients:
4 tilapia fillets
1 1/2 teaspoons thyme
1 teaspoon cayenne pepper
1 teaspoon garlic salt
1 teaspoon onion powder
1/2 teaspoon black pepper
1/2 teaspoon paprika
olive oil

Directions:
Preheat oven to 400 degrees.  Spray a baking dish with non-stick spray.  In a small bowl, mix together the thyme, cayenne, garlic salt, onion powder, pepper, and paprika.  Rinse off the fish and pat dry with a paper towel.  Sprinkle both sides of the fillets with the spice mixture and place in prepared baking dish.  Drizzle just a small amount of oil over the top of the fish.  Bake for 12-15 minutes or until the fish flakes easily with a fork.  Enjoy!


One Year Ago:  Garlic-Mustard Glazed Pork Chops & A Winter Wonderland

Friday, January 7, 2011

The Winner!! ...... And Baked Onion Chips

Because I don't want to keep you guessing, I'll start this post out with the winner and end it with the recipe...... :)

Drum roll please.....

And the winner of the $30 gift card to Penzeys Spices is:

Judy at Cranberry Morning!! 

YAY!!  Congratulations, Judy, I hope this will help inspire you to create more in the kitchen!  Enjoy!  Thanks to everyone who commented...and played along!  Thank you so much for spending time with me on my journey!


Ok, ok.. now it's time for the recipe!!  Baked onion chips.  Not a new concept at all.  Not even a new recipe for me, but it's one I was sort of surprised I hadn't posted already.  Now, let's remember, I am not a huge onion fan, so to get me to eat something like this.. you know it's gotta be good!  You need to remember two things when you are making these.  1) The thin the slices the crispier the chips will become and 2) to get the best tasting chips, you must use a Vadalia or Sweet onion.  Oh, you could use another onion, but the best tasting chips are going to come from a sweet onion.  I will also admit to you that you are going to loose some of that breading, so don't worry too much about it, they will still be really good!

Baked Onion Chips
Printable Recipe 
Ingredients:
1 sweet onion, cut into chip style wedges (I cut the onion in half, then into quarters)
2 Tablespoons all purpose flour, plus 1 Tablespoon
1/4 cup buttermilk
1 egg
1 cup panko bread crumbs (you can also used crushed potato chips)
1/4 teaspoon garlic salt
1/4 teaspoon black pepper
1/4 teaspoon cayenne pepper

Directions:
Preheat oven to 425 degrees.  Place a wire rack on top of a cookie sheet, spray with non stick spray (you can do this directly on the baking sheet too, I just like that they get crispier all around on the rack).

Place the onion chips in a resealable bag along with 2 tablespoons of flour.  Close and shake the bag, making sure all the onions are coated.  Pour the buttermilk into a shallow dish and beat in the egg and the remaining tablespoon of flour.  In another shallow dish, add the panko and the seasonings.  Remove the flour coated onions and drop them into the buttermilk mixture.  Remove from buttermilk and place in panko; toss to coat.  Place prepared onion on baking sheet; continue until all onions are coated.

Place in oven and bake for 20-25 minutes, rotating the sheet once, or until the chips are golden brown.  Serve with your favorite dipping sauce - ours was ranch mixed with Sriracha.. YUM!  Enjoy!


One Year Ago: Chicken Braised in Walnut Sauce

Thursday, January 6, 2011

Chickamauga Chicken

Ok, this chicken was seriously good.  Yes, the name is a bit strange, but please don't let that stop you.  OMG...the spice, the crunch, the cheese....it was wonderful!  I'll be honest with you, the spice for the chicken was so good, it really didn't need anything else on it...but since I had already bought all the stuff, I decided to use it :)

This is another fantastic find from Chris at Nibble Me This via Our Krazy Kitchen.  If you try this for no other reason, try it for the sauce!!  It was flavorful and fantastic.  I love the crunch that the wonton strips added.  It was the perfect little piece of chicken.

Chickamauga Chicken
Adapted from Nibble Me This via Our Krazy Kitchen
Printable Recipe 
Ingredients:
Tortilla or wonton strips (a handful or a little more)
3 oz Ranch dressing
1 oz barbecue sauce
1/2 lemon
1/4 teaspoon black pepper
1/4 teaspoon kosher salt
1/4 teaspoon cayenne pepper
1 teaspoon smoked paprika
1/4 teaspoon grounded cumin
1/4 teaspoon onion powder
4 boneless, skinless chicken breasts
1/4 - 1/2 cup shredded cheese (I used a colby, cheddar blend)
2 oz black olive, diced or chopped
2 green onions, chopped

Directions:
Mix Ranch dressing and barbecue sauce together and set aside.  Drizzle both sides of all the chicken breasts with lemon juice and than season with dry spices.

Preheat your grill to 350 degrees.  Grill chicken over direct heat for 4-5 minutes per side.  Move the chicken to indirect heat and top with wonton strips, black olives, green onion and cheese.  Close the lid of the grill and let chicken cook another 8-10 minutes or until the internal temperature reaches 160 degrees F.  Drizzle with bbq/ranch sauce and enjoy!

Range top/oven instructions:  Dredge chicken in flour and saute about 4-5 minutes per side in 1 1/2 tablespoons of butter and 1 tablespoon olive oil, or until golden brown.  Top with wonton strips, green onions, black olives and cheese.  Place under broiler for about 1-2 minute or until the cheese melts.  Drizzle with bbq/ranch sauce and enjoy!

One Year Ago:  Silpat & Beef Empanadas

***REMEMBER: Today is the last day you can enter for your chance to win a $30 gift card to Penzeys Spices.  The winner will be announced tomorrow morning.***


Wednesday, January 5, 2011

Chicken Braciole with Alfredo Sauce

Shortly after I posted my mom's Braciole recipe, (while my parents where here visiting) we met my mom's cousin's, who live here in Arizona, for brunch.  We were chatting about my blog when Johanna made a couple suggestions for meals I post.  This was one of those suggestions:  Chicken Braciole with Alfredo Sauce.  I figured since I had created a pretty dang good alfredo sauce when I made the Christmas pasta recently, why not give this one a shot.  I've even made a chicken braciole before, so the only thing I  had to do was bring the two together.  So, a big thank you Johanna (by the way, spam is next on my list)...this was a great idea and it turned out to be incredible!  The alfredo sauce works so well to compliment the delicate chicken flavor.  If you enjoy braciole at all, you will love this one for sure!

Chicken Braciole with Alfredo Sauce
Inspired by Johanna W.
Printable Recipe 
Ingredients:
4 boneless, skinless chicken breasts
1/2 cup dried Italian bread crumbs
1/4 cup grated parmesan cheese
1 garlic clove, finely minced
1 bunch parsley, chopped
olive oil
1 stick (1/2 cup) unsalted butter
2 Tablespoons all purpose flour
1 pint heavy cream
1-2 cups freshly shredded parmesan cheese
1/4 teaspoon garlic salt
1/4 teaspoon pepper

Directions:
Pound the chicken breasts between two sheets of parchment paper.  Flatten to about 1/4 inch thick.  In a small bowl, mix together the bread crumbs, parmesan, garlic, and parsley together.  Add enough olive oil to make a paste.  Evenly spread the paste onto the bottom of the chicken.  Roll as tightly as you can and secure with toothpicks or cotton string.

Preheat oven to 375 degrees.  In a skillet (if you have an oven proof one, now is the time to use it, you will use less dishes!!), over medium heat, add 1 teaspoon olive oil.  Carefully add the chicken and quickly sear each side of the chicken.  Place oven proof skillet, or put chicken into a baking dish, in oven and let bake 20 minutes or until the chicken is cooked through.

Meanwhile, in a saucepan, melt the butter over medium low heat.  Add the flour and stir to combine.  Let cook for 1 minute.  Slowly whisk in the heavy cream.  Sprinkle in cheese a little at a time (the more cheese you add the more parmesan flavor you will get) until melted and smooth.  Season with garlic salt and pepper.  Let simmer on very low heat until thickened. (Do not let this boil or you will get a grainy sauce)

To serve, place a small amount of angel hair pasta on a plate.  Place the chicken braciole on the pasta and pour the alfredo sauce over everything.  Enjoy!!


One Year Ago:  Red Velvet Cake with Cream Cheese Frosting (one layer)

***Just a reminder: You have until Thursday, January 6, 2011 to enter for your chance to win a $30 gift card to Penzey's SpicesClick Here for details.**

Tuesday, January 4, 2011

Pepper Sauce and Beer Marinated Steaks with Potato Latkes

I snagged this little marinade recipe from Chris over at Nibble Me This.  I love his site, talk about being envious of someone elses cooking set up... WOW!  I want a green egg!!!  Anyway, other than over cooking my steak (don't you hate when you do that?  What?  I'm the only one that does it?  I don't believe that at all! Fess up, you know you've done it at least once or twice...maybe even three times!), this meal was wonderful.  The flavors that the marinade brings to this steak was amazing.  No sauce of any kind is needed for this steak.  Heck, we didn't even bring salt or pepper to the table when we sat down to eat this meal.  You know that's a sign of something good!!

As for my attempt at potato latkes....I thought I did a pretty good job for my first try!  I adapted the Food Floozie's and Ma What's for Dinner's recipes...and this is what I came up with.  Only thing I would do differently next time....make them thinner!  I had them a bit too thick so they had a bit of a mush texture in the middle....er, I mean creamy texture, yes, creamy!!  lol  Either way, I'll make these again for sure... YUM!

 
Pepper Sauce and Beer Marinated Steaks
Adapted from Nibble Me This
Printable Recipe 
Ingredients:
1 Tablespoon Dijon mustard
2 Tablespoons balsamic vinegar
4 oz beer
1 Tablespoon Frank's hot sauce (or your favorite hot sauce)
1 Tablespoon olive oil
1 chipotle, seeded and diced
1 teaspoon garlic powder
1 teaspoon brown sugar
flank, skirt, or flat iron steak (1lb) - I believe I used sirloin

Directions:
Mix together the first 4 ingredients, then slowly whisk in the olive oil.  Add the remaining ingredients.  Pour marinade over the steak and allow to marinate for 4 hours.

Preheat grill to 400 degrees.  Place steak directly over the fire and grill about 4-6 minutes per side or until internal temperature reaches your desired doneness.  Enjoy!

 
Potato Latkes
Adapted from Food Floozie and Ma, What's for Dinner
Printable Recipe 
Ingredients:
2 cups shredded potatoes
1 Tablespoon finely diced sweet onion
1 egg, beaten
1/2 teaspoon black pepper
1/2 teaspoon garlic salt
3 Tablespoons flour
1 Tablespoon freshly chopped parsley
1/4 teaspoon cayenne pepper
vegetable or peanut oil

Directions:
In a medium size bowl, mix together all ingredients except for the oil.  Form into 4 thin patties.  Let rest on a plate for 10 minutes.

In a skillet, add oil (about 1/4 inch deep) and heat until just shimmering.  Carefully, add the patties and fry until golden brown, about 4-5 minutes on each side.  Drain on a paper towel.  Enjoy!

One Year Ago:  Beer Cheese Soup with Red Peppers & Bacon

***And don't forget to check out my 1 year blogiversary post where you can enter for a chance to win a $30 gift card from my favorite spice store, Penzey's.  You have until Thursday, January 6th***

Monday, January 3, 2011

Simple Baked Fish with Rosemary Aioli

Rosemary aioli.......I think I love you.

Confession time:  I did not make the aioli from scratch...well I did make it from scratch, but not completely from scratch.  You see, I used store bought mayo in place of making my own.  I know, some people think it's just not a true aioli unless you make it 100% from scratch.  Well, I looked around, people.  And I'm here to tell you...even Emeril Lagasse sometimes uses store bought mayo for his aioli (Ok, I really don't know that to be 100% true, so if you are reading Emeril and this isn't true, I'm sorry to have lied for the sake of proving a point.)

Either way, this was a wonderful little sauce to go with a simple baked fish.  I know there are many of you that don't like fish, so you can easily use this on chicken...or even has a sandwich spread...now THAT would be really really GOOD!!

P.S...since I've been around a year now, I have added a link at the end of each post (from here on out) that will lead you to the post from last year.  Who knows, maybe you'll find a new favorite??

***Just a reminder: You have until Thursday, January 6, 2011 to enter for your chance to win a $30 gift card to Penzey's SpicesClick Here for details.***

Simple Baked Fish with Rosemary Aioli
Printable Recipe 
Ingredients:
4 tilapia (or any white fish) fillets
Garlic salt
Pepper
Paprika
1/4 cup mayonnaise
2 teaspoon Dijon mustard
1 Tablespoon lemon juice
1 garlic clove, finely minced
1-2 teaspoons finely chopped fresh rosemary leaves

Directions:
Preheat the oven to 400 degrees.  Spray a baking dish with nonstick cooking spray.  Rinse fish and pat dry.  Season both sides with garlic salt, pepper, and paprika.  Place the fish in prepared dish.  Bake for 12-15 minutes or until the fish flakes easily with a fork.

Meanwhile, mix together the mayonnaise, mustard, lemon juice, garlic, and rosemary.  Serve over fish...and enjoy!  You can also use this as a dip for your french fries.. YUM!

One Year Ago:  Lasagna

Saturday, January 1, 2011

HAPPY 2011!!!

Happy New Year to all of you!!  I can't believe it's 2011.  Do you realize that next year will mark my 20th year since high school?  WOW...where has the time gone?  But, I'll face that next year...for now, it's just good old 2011!

This past year has been wonderful.  I have received so much and feel truly blessed.  I could highlight the year and tell you of all the things that have happened to me, but instead, I'm going to leave you with this....some of my favorite recipes from early 2010.  I figured that most of you are more familiar with my posts in the last few months, so why not dig all the way back to the beginning!

Thank you to everyone who has followed me since the beginning.  Thank you to all of you that have followed me since.  I love your comments, feedback, emails, etc.  You are the reason I continue documenting my culinary journey.

A big thanks goes out to Chris, of course, for being the guinnea pig for all my recipes.  Thank you for your love and support, it gets me through each day.

A big thanks goes out to my family too.  My mom and dad have been a huge support throughout my year of blogging and it means the world to me.

And one more thank you to all of the bloggers that I consider my friends.  You are the best support system out there.  The encouragement and ideas you give me are priceless!

I'm sure I could go on and on, but instead, we'll just end with the best of (early) 2010 list:


As I browsed through my past year recipes, I found a ton of them that I would have loved to have highlighted, but alas, I do not want to keep you here forever.  So, if you are interested, take a little time, browse, there are some pretty good recipes from way back when!

Happy New Year to you all!  May 2011 be filled with love, laughter, and lots of tasty treats!
Ciao!
Jenn