You know what I love about the weekends? I can be sitting at my computer and all of a sudden the feeling of wanting to bake something comes over me. The nice part is, I can pull away from my computer and go to the kitchen and bake or cook whatever I want. I, unfortunately, don't have that luxury while at work :)
So last weekend I was working on some posts and got a craving for something cakey and chocolatey. I did a bit of searching for just a few different ideas and I stumbled across this midnight chocolate cake recipe. I thought....oh yum, chocolate cupcakes with cream cheese frosting!! CRAP! I don't have any cream cheese. Ok, scratch the cream cheese frosting, how about just a plan butter cream frosting.......and so the Midnight Chocolate Cupcake with Strawberry Frosting was born.
Midnight Chocolate Cupcakes with Strawberry Frosting
Adapted from Sunset Magazine
Printable Recipe
Ingredients:
1/4 cup vegetable oil
2/3 cup unsweetened cocoa powder
1 1/3 cups all purpose flour
1 teaspoon baking soda
1/4 teaspoon salt
1 1/4 cups granulated sugar
2 large egg whites
1 teaspoon vanilla
1 cup water
For the Strawberry Frosting -
1 stick of unsalted butter (1/2 cup), softened
1-2 cups powdered sugar
1 teaspoon vanilla extract
strawberry preserves (I used about 2 Tablespoons, you might want more or less strawberry flavor)
Directions:
Preheat your oven to 350 degrees F. Line a 12 cup muffin tin (or you could use your silicone muffin pans) with cupcake liners; set aside.
In a bowl, add the cocoa powder, flour, soda, and salt; whisk until combined.
In a bowl of a stand mixer (or you could use a large mixing bowl and a hand mixer, or you can mix it all together by hand) fitted with a paddle attachment, add the sugar, oil, egg whites, vanilla, and water. Mix on low until well combined. Slowly add the flour mixture, taking time to scrape down the sides as you go. Beat on medium until smooth. Pour into prepared cupcake liners and place in oven. Bake for 18-20 minutes, making sure to rotate your pan half way through the baking time. The cupcakes are done when a toothpick inserted in the middle comes out clean. Remove from oven and allow to cool completely before frosting.
To make the frosting: In a mixing bowl of a stand mixer, fitted with the whip attachment, add the butter. Turn the machine on and let it beat the butter, on low, for about 2 minutes. Slowly add the powdered sugar a little at a time until it reaches the rich consistency for spreading. Add the vanilla and the strawberry preserves and beat until just combined. (If the frosting is too dry, add a little milk or cream...if it's too wet, add more powdered sugar) Frosted cupcakes can be covered and stored for up to 3 days. Enjoy!
One Year Ago: Snickers Cookies
Search This Blog
Friday, February 4, 2011
Thursday, February 3, 2011
Honey Hot Tilapia
I couldn't help myself. The first thing I used my newly acquired sauces on was a tilapia dish. Like I said, I couldn't help myself.
Now most of you will not have any of Country Bob's sauces on hand...that's ok. You can always experiment and substitute. I suggest in the recipe to use some honey barbecue sauce and red pepper flakes, but you could use a steak sauce like A-1. I could not guarantee it what the outcome would be...but that's why I say experiment ...it's what I did to come up with this. :)
I will claim that this recipe was fantastic!! I mean really really really fantastic! It was sweet and hot and savory and delicious. DE-LICI-OUS to be exact!
By the way... I have only opened the one bottle of sauce so far from my winnings, but I can safely say...COUNTRY BOB'S ROCKS! I highly recommend getting your hands on some of the sauce.....especially the Honey Habanero!! (**The opinion stated here is just that - my opinion. I was not compensated at all for my review...er...opinion**)
Honey Hot Tilapia
Printable Recipe
Ingredients:
1 Tablespoon Hoisin
1 Tablespoon low sodium soy sauce
3 Tablespoons Country Bob's Honey Habanero All Purpose Sauce (you could use a honey barbecue sauce with 1/4 teaspoon red pepper flakes as a substitute)
1 garlic clover, finely minced
1/8 teaspoon ground ginger
4 Tilapia fillets
Directions:
In a small bowl, mix together all the ingredients except the Tilapia. Stir until combined and smooth. Reserve 1 tablespoon of the sauce and set aside. Place the fish in a shallow dish and pour the remaining sauce over the tilapia, covering all sides. Cover and place in refrigerator for 1-2 hours.
Preheat oven to 400 degrees. Spray a baking dish with non-stick spray. Remove the fish from the dish and place in prepared baking dish. Drizzle remaining 1 tablespoon of sauce over the fish. Place in the oven and bake for 10-12 minutes or until the fish is cooked through and flakes easily with a fork. Enjoy!
One Year Ago: Bonus: Super Bowl Count Down Extra!!
Now most of you will not have any of Country Bob's sauces on hand...that's ok. You can always experiment and substitute. I suggest in the recipe to use some honey barbecue sauce and red pepper flakes, but you could use a steak sauce like A-1. I could not guarantee it what the outcome would be...but that's why I say experiment ...it's what I did to come up with this. :)
I will claim that this recipe was fantastic!! I mean really really really fantastic! It was sweet and hot and savory and delicious. DE-LICI-OUS to be exact!
By the way... I have only opened the one bottle of sauce so far from my winnings, but I can safely say...COUNTRY BOB'S ROCKS! I highly recommend getting your hands on some of the sauce.....especially the Honey Habanero!! (**The opinion stated here is just that - my opinion. I was not compensated at all for my review...er...opinion**)
Honey Hot Tilapia
Printable Recipe
Ingredients:
1 Tablespoon Hoisin
1 Tablespoon low sodium soy sauce
3 Tablespoons Country Bob's Honey Habanero All Purpose Sauce (you could use a honey barbecue sauce with 1/4 teaspoon red pepper flakes as a substitute)
1 garlic clover, finely minced
1/8 teaspoon ground ginger
4 Tilapia fillets
Directions:
In a small bowl, mix together all the ingredients except the Tilapia. Stir until combined and smooth. Reserve 1 tablespoon of the sauce and set aside. Place the fish in a shallow dish and pour the remaining sauce over the tilapia, covering all sides. Cover and place in refrigerator for 1-2 hours.
Preheat oven to 400 degrees. Spray a baking dish with non-stick spray. Remove the fish from the dish and place in prepared baking dish. Drizzle remaining 1 tablespoon of sauce over the fish. Place in the oven and bake for 10-12 minutes or until the fish is cooked through and flakes easily with a fork. Enjoy!
One Year Ago: Bonus: Super Bowl Count Down Extra!!
Wednesday, February 2, 2011
Spicy Potato Soup
This is a soup recipe that I found, oh, probably about 12 years ago!! That was back in a time when the simpler the dish, the better, as I was not that great of a cook nor did I have the passion for it that I have now. Now, the simpler the dish the better due to time...and this is a great soup to throw together even on a week night. It can be ready, from start to finish in just over an hour...now, who doesn't have time for that...especially when an hour of that time is spent letting the soup simmer??
The soup gets it's spiciness from the hot sauce. You can always leave it out all together or cut back on the amount used. If you are looking for more spice....add some diced up jalapenos...or heck, throw in a chipotle (or two)....it couldn't hurt :)
Spicy Potato Soup
Adapted from Taste of Home
Printable Recipe
Ingredients:
1 lb ground beef (I used 90% lean)
2-3 cups cubed and peeled potatoes (1/2-inch cubes) (I used 2 large Russet potatoes)
1 Tablespoon olive oil
1/2 sweet onion, finely diced
1 clove garlic, minced
3 cans (8 oz each) tomato sauce
3 cups water
1 teaspoon pepper
1 Tablespoon hot pepper sauce (I used Frank's Hot Sauce)
2 teaspoon seasoning salt (I used Country Bob's - you could use 1 tsp of kosher salt)
1Tablespoon fresh, chopped parsley
Directions:
In a Dutch oven or large soup pot, heat the olive oil over medium heat. Add the onion and cook about 5-8 minutes or until tender. Add the garlic and cook 1 minute. Add the ground beef, breaking up with a wooden spoon. Cook about 5-8 minutes or until the meat is almost cooked through. Add the tomato sauce, water, pepper, hot sauce, and seasoning salt; stir to combine. Bring to a boil. Reduce heat and simmer, covered, for 1 hour, or until the potatoes are tender and the soup has thickened. Top with parsley. Enjoy!
One Year Ago: Leek Potato Soup
The soup gets it's spiciness from the hot sauce. You can always leave it out all together or cut back on the amount used. If you are looking for more spice....add some diced up jalapenos...or heck, throw in a chipotle (or two)....it couldn't hurt :)
Spicy Potato Soup
Adapted from Taste of Home
Printable Recipe
Ingredients:
1 lb ground beef (I used 90% lean)
2-3 cups cubed and peeled potatoes (1/2-inch cubes) (I used 2 large Russet potatoes)
1 Tablespoon olive oil
1/2 sweet onion, finely diced
1 clove garlic, minced
3 cans (8 oz each) tomato sauce
3 cups water
1 teaspoon pepper
1 Tablespoon hot pepper sauce (I used Frank's Hot Sauce)
2 teaspoon seasoning salt (I used Country Bob's - you could use 1 tsp of kosher salt)
1Tablespoon fresh, chopped parsley
Directions:
In a Dutch oven or large soup pot, heat the olive oil over medium heat. Add the onion and cook about 5-8 minutes or until tender. Add the garlic and cook 1 minute. Add the ground beef, breaking up with a wooden spoon. Cook about 5-8 minutes or until the meat is almost cooked through. Add the tomato sauce, water, pepper, hot sauce, and seasoning salt; stir to combine. Bring to a boil. Reduce heat and simmer, covered, for 1 hour, or until the potatoes are tender and the soup has thickened. Top with parsley. Enjoy!
One Year Ago: Leek Potato Soup
Tuesday, February 1, 2011
Jamaican-Spiced Chicken
I'd like to be able to say "Wow, this was fantastic!!" BUT, unfortunately, I cannot. All I can say was the chicken was grilled perfectly and it tasted good. Was it good from the grilling or good from the marinating? I'm gonna go with the first one. Ok, ok... so had I marinated the chicken longer, I think it would have helped and the flavors that were so lacking on this would have SHINED!! Funny thing is, though, the original recipe didn't call for any marinating at all! I figured an hour or so would be good for it....I was wrong...I needed more time. Don't make the same mistake I made....plan ahead: If you plan on trying this, plan on allowing at least 8 hours of marinating time......believe me, it can't hurt!
Though it lacked in flavor and spice, it was still good...just not what I was expecting or even hoping for.
Jamaican-Spiced Chicken
Adapted from Cooking Light
Printable Recipe
Ingredients:
1 garlic clove, chopped
1 Tablespoon sugar
1 jalapeno, chopped (I left the seeds in, you can take them out of if you want to cut the heat)
1 Tablespoon white wine vinegar
1 Tablespoon low sodium soy sauce
1/2 teaspoon ground allspice
1/2 teaspoon dried thyme
1/2 teaspoon black pepper
1/4 teaspoon cayenne pepper
4 boneless, skinless chicken breasts
Directions:
Combine all ingredients in a large bowl, except the chicken. Stir to combine. Place the chicken in a resealable bag and pour the marinade over it. Let marinate for at least 8 hours, but over night would be preferred.
Preheat your gill to 400 degrees. Remove chicken from the bag and discard the marinade. Place the chicken on oiled grill grates and allow to cook for 8-10 minutes on each side or until chicken is cooked through (165 degrees F). Remove from grill and allow to sit for 3 minutes. Enjoy!
One Year Ago: Super Bowl Count Down...Take Three: Chili
Though it lacked in flavor and spice, it was still good...just not what I was expecting or even hoping for.
Jamaican-Spiced Chicken
Adapted from Cooking Light
Printable Recipe
Ingredients:
1 garlic clove, chopped
1 Tablespoon sugar
1 jalapeno, chopped (I left the seeds in, you can take them out of if you want to cut the heat)
1 Tablespoon white wine vinegar
1 Tablespoon low sodium soy sauce
1/2 teaspoon ground allspice
1/2 teaspoon dried thyme
1/2 teaspoon black pepper
1/4 teaspoon cayenne pepper
4 boneless, skinless chicken breasts
Directions:
Combine all ingredients in a large bowl, except the chicken. Stir to combine. Place the chicken in a resealable bag and pour the marinade over it. Let marinate for at least 8 hours, but over night would be preferred.
Preheat your gill to 400 degrees. Remove chicken from the bag and discard the marinade. Place the chicken on oiled grill grates and allow to cook for 8-10 minutes on each side or until chicken is cooked through (165 degrees F). Remove from grill and allow to sit for 3 minutes. Enjoy!
One Year Ago: Super Bowl Count Down...Take Three: Chili
Monday, January 31, 2011
Chorizo Chipotle Chili
Last year, before the Super Bowl, I posted my recipe for chili. It's a recipe I've used for years. I seriously, never made chili a different way....until now: Enter the Chorizo Chipotle Chili!!! (YAY!!!!)
I think chili is a good addition to any party (as are nachos), but for some reason, football and chili just fit so well together! And this is just the type of chili you want to be serving at your Super Bowl party! It's full of flavor, it's spicy, it's warm and it's comforting....It's probably the best bowl of chili I've had in a long time. And I'm extra excited because I didn't use my secret ingredient mix this time! No premixed spices.... double yay!!!
I understand that most of you have your favorite chili recipe, and like me, don't detour from it....but this is worth it, believe me. VERY worth it. Beware, it is a bit spicy...you can always add less chipotle or leave the adobo sauce out all together. I must give big props to Des at Life's Ambrosia, though, because her Buffalo Chipotle Chili was the inspiration behind this bowl of heaven! And an inspiration it was...thanks Des!
Chorizo Chipotle Chili
Inspired by Life's Ambrosia
Printable Recipe
Ingredients:
1 Tablespoon olive oil
1/2 sweet onion, finely diced
1/2 teaspoon salt
1/2 teaspoon pepper
1 lbs Mexican Chorizo
1 garlic clover, minced
2 chipotle peppers in adobo sauce, finely chopped
1 Tablespoon adobo sauce
3/4 cup beef broth
1/2 cup beer (I used Bud Light)
10oz can Rotel, drained
8oz chili beans in sauce
1/2 teaspoon cumin
2 teaspoons chili powder
2 Tablespoons tomato sauce
2 teaspoons cocoa powder
Directions:
In a Dutch oven or soup pot, heat the olive oil over medium heat. Add the onions and reduce heat to medium low. Season with 1/2 teaspoon each salt and pepper. Stir and let cook for about 8-10 minutes or until softened and just starting to brown. Add the chorizo and let cook about 5-8 minutes or until the chorizo is cooked through. Turn heat up to medium high and add all the remaining ingredients. Stir to combine. Taste and season if necessary. Let simmer, covered, for 1 hour, stirring occasionally. Enjoy!
One Year Ago: Tomato Walnut Tilapia
I think chili is a good addition to any party (as are nachos), but for some reason, football and chili just fit so well together! And this is just the type of chili you want to be serving at your Super Bowl party! It's full of flavor, it's spicy, it's warm and it's comforting....It's probably the best bowl of chili I've had in a long time. And I'm extra excited because I didn't use my secret ingredient mix this time! No premixed spices.... double yay!!!
I understand that most of you have your favorite chili recipe, and like me, don't detour from it....but this is worth it, believe me. VERY worth it. Beware, it is a bit spicy...you can always add less chipotle or leave the adobo sauce out all together. I must give big props to Des at Life's Ambrosia, though, because her Buffalo Chipotle Chili was the inspiration behind this bowl of heaven! And an inspiration it was...thanks Des!
I love scooping chili up with Frito's!!!
Chorizo Chipotle Chili
Inspired by Life's Ambrosia
Printable Recipe
Ingredients:
1 Tablespoon olive oil
1/2 sweet onion, finely diced
1/2 teaspoon salt
1/2 teaspoon pepper
1 lbs Mexican Chorizo
1 garlic clover, minced
2 chipotle peppers in adobo sauce, finely chopped
1 Tablespoon adobo sauce
3/4 cup beef broth
1/2 cup beer (I used Bud Light)
10oz can Rotel, drained
8oz chili beans in sauce
1/2 teaspoon cumin
2 teaspoons chili powder
2 Tablespoons tomato sauce
2 teaspoons cocoa powder
Directions:
In a Dutch oven or soup pot, heat the olive oil over medium heat. Add the onions and reduce heat to medium low. Season with 1/2 teaspoon each salt and pepper. Stir and let cook for about 8-10 minutes or until softened and just starting to brown. Add the chorizo and let cook about 5-8 minutes or until the chorizo is cooked through. Turn heat up to medium high and add all the remaining ingredients. Stir to combine. Taste and season if necessary. Let simmer, covered, for 1 hour, stirring occasionally. Enjoy!
One Year Ago: Tomato Walnut Tilapia
Friday, January 28, 2011
It's Fire Day Friday!!!
It's that time again!! Time for me to step away from Jenn's Food Journey and head on over to my secondary home, Our Krazy Kitchen, where I'm co-hosting FDF with Chris from Nibble Me This!
Come check out what I'm posting today....don't be afraid to say hello while you are there.....you are not going to want to miss this one:
You know you want to come and see......so go....go now... hurry!!!
(P.S..while you are there, enter for your chance to a win a CSN gift card)
One Year Ago: Walnut Crusted Chicken Strips with Honey Mustard Sauce
Come check out what I'm posting today....don't be afraid to say hello while you are there.....you are not going to want to miss this one:
You know you want to come and see......so go....go now... hurry!!!
(P.S..while you are there, enter for your chance to a win a CSN gift card)
One Year Ago: Walnut Crusted Chicken Strips with Honey Mustard Sauce
Thursday, January 27, 2011
Grilled Nachos
Here's another great idea for your Super Bowl party....than again, this is a great idea for any party...heck, forget the party, this is a good idea for anytime!! Now, I'm sure everyone has their own special nacho recipe....but this is mine. GRILLED NACHOS!! I know you are not surprised by this :) Don't worry, you don't HAVE to grill these, you can easily put them in the oven, but hey, I like my grill, it was in the 70's here...I HAD to grill!! I also had to use the rest of that cheddar cheese soup I used in the Cheesy Rice Casserole...so there, excuse enough, right? The one real thing lacking on these...black olives, I forgot to pick up some black olives. Oh, well, even as simple as these were, they were fantastic! I tried to put more jalapenos on them to detour Chris from eating them, but he just picked them off and continued to eat....dang it...foiled again!! My suggestion, make a lot, these will disappear fast!
Grilled Nachos
Printable Recipe
Ingredients:
1/4 lb Mexican pork chorizo
1 jalapeno, sliced
6 cherry tomatoes, diced
1/4 cup (or more if you have it) cheddar cheese condensed soup
1 Tablespoon milk
1 1/2 - 2 cups shredded habanero cheddar cheese (or regular cheddar)
Tortilla chips (I used enough to cover a 10 x 14-inch grill tray)
Sour cream and guacamole (optional)
Directions:
Preheat your grill to 400 degrees. Line a 10 x 14-inch grill tray with aluminum foil. Cover with one layer of tortilla chips.
In a small microwaveable bowl, add the cheddar cheese soup and the milk. Heat until warm and pourable. Cover and set aside.
Place a small amount of oil in a small cast iron skillet. Add the chorizo and cook directly over the fire for about 4 minutes, stirring occasionally, or until cooked through. Remove chorizo from skillet and let drain on a plate lined with a paper towel. To the same skillet, add the jalapeno and let cook for about 2-3 minutes, or just until softened, stirring occasionally. Remove from heat.
Sprinkle half of the shredded cheese over the tortilla chips, the pour the cheddar cheese over it all. Sprinkle with the cooked chorizo, than the diced tomato, than the jalapenos. Top with remaining shredded cheese.
Place tray on grill grates and turn off the fire directly under it. If you are using a charcoal grill, move the charcoal to one side of the grill. Cover the lid and let grill about 5-10 minutes or until the cheese is melted. Top with sour cream and guacamole if desired. Enjoy!
***To Bake: Preheat the oven to 350 degrees. Follow all other directs but cook on stove top in non-stick skillet. Build as instructed. Bake for 5-10 minutes or until cheese is melted.***
One Year Ago: Smothered Pork Chops with Thyme
Grilled Nachos
Printable Recipe
Ingredients:
1/4 lb Mexican pork chorizo
1 jalapeno, sliced
6 cherry tomatoes, diced
1/4 cup (or more if you have it) cheddar cheese condensed soup
1 Tablespoon milk
1 1/2 - 2 cups shredded habanero cheddar cheese (or regular cheddar)
Tortilla chips (I used enough to cover a 10 x 14-inch grill tray)
Sour cream and guacamole (optional)
Directions:
Preheat your grill to 400 degrees. Line a 10 x 14-inch grill tray with aluminum foil. Cover with one layer of tortilla chips.
In a small microwaveable bowl, add the cheddar cheese soup and the milk. Heat until warm and pourable. Cover and set aside.
Place a small amount of oil in a small cast iron skillet. Add the chorizo and cook directly over the fire for about 4 minutes, stirring occasionally, or until cooked through. Remove chorizo from skillet and let drain on a plate lined with a paper towel. To the same skillet, add the jalapeno and let cook for about 2-3 minutes, or just until softened, stirring occasionally. Remove from heat.
Sprinkle half of the shredded cheese over the tortilla chips, the pour the cheddar cheese over it all. Sprinkle with the cooked chorizo, than the diced tomato, than the jalapenos. Top with remaining shredded cheese.
Place tray on grill grates and turn off the fire directly under it. If you are using a charcoal grill, move the charcoal to one side of the grill. Cover the lid and let grill about 5-10 minutes or until the cheese is melted. Top with sour cream and guacamole if desired. Enjoy!
***To Bake: Preheat the oven to 350 degrees. Follow all other directs but cook on stove top in non-stick skillet. Build as instructed. Bake for 5-10 minutes or until cheese is melted.***
One Year Ago: Smothered Pork Chops with Thyme
Wednesday, January 26, 2011
Cheesy Rice Casserole
Normally, I will not use condensed soups...I just don't, they aren't the healthiest thing for you, I can't even pronounce some of the ingredients listed, and honestly, I'd just rather spend time making homemade soups. BUT the other day when I was scrounging around in the pantry, I noticed way, way in the back corner, a can of cheddar cheese condensed soup. Now I don't ever actually remember buying that...but I'm pretty sure Chris wouldn't have done it on his own, so I grabbed it and thought about putting it to good use before it went bad.
We eat a lot of rice, I'm pretty sure I have mentioned that fact before. It's usually very simple, and that's been ok...until recently...recently, I just wanted something different. Than the idea hit me: Why not blend my want for something different with my need to use this soup??? And a star was born! (If you really are against condensed soups, you can always make your own cheese sauce)
Seriously, this was DELICIOUS! I probably could have used more of the soup, but I was trying to keep the rice from becoming too mushy. Feel free to add more if you want...but tomorrow I'll show you what to do with the other half...if you are interested that is :)
Cheesy Rice Casserole
Printable Recipe
Ingredients:
2 cups cooked rice (I used basmati)
1 red pepper, chopped
1 small zucchini, chopped (optional - I was going to use one but it had gone bad)
2 garlic cloves, minced
6 Tablespoons condensed cheddar cheese soup
3 Tablespoons milk
salt
pepper
hot sauce
shredded cheddar cheese (I used about 1/2 cup)
Directions:
Preheat oven to 350 degrees F. Spray a small baking dish with non stick cooking spray; set aside. In a small bowl, add the soup, milk, and hot sauce, salt, and pepper all to taste. (I had originally added fresh rosemary...about 1 teaspoon...it was good, but it was really overpowering, so I'm keeping that out...but feel free to add it if you want, like I said, it was good with it!)
In a small skillet, over medium heat, add the oil until hot. Add the red pepper and cook for 3 minutes. Add the zucchini and cook another 3 minutes. Add the garlic and cook 1 more minute. Remove from heat.
Place the rice in a large bowl and add the cooked veggies. Pour the cheese mixture over and stir to combine. Pour into prepared baking dish and top with shredded cheese. Bake for 10 minutes or until heated through and the cheese on top is melted. Enjoy!
One Year Ago: Firecracker Tilapia with Lemon Aioli
We eat a lot of rice, I'm pretty sure I have mentioned that fact before. It's usually very simple, and that's been ok...until recently...recently, I just wanted something different. Than the idea hit me: Why not blend my want for something different with my need to use this soup??? And a star was born! (If you really are against condensed soups, you can always make your own cheese sauce)
Seriously, this was DELICIOUS! I probably could have used more of the soup, but I was trying to keep the rice from becoming too mushy. Feel free to add more if you want...but tomorrow I'll show you what to do with the other half...if you are interested that is :)
Cheesy Rice Casserole
Printable Recipe
Ingredients:
2 cups cooked rice (I used basmati)
1 red pepper, chopped
1 small zucchini, chopped (optional - I was going to use one but it had gone bad)
2 garlic cloves, minced
6 Tablespoons condensed cheddar cheese soup
3 Tablespoons milk
salt
pepper
hot sauce
shredded cheddar cheese (I used about 1/2 cup)
Directions:
Preheat oven to 350 degrees F. Spray a small baking dish with non stick cooking spray; set aside. In a small bowl, add the soup, milk, and hot sauce, salt, and pepper all to taste. (I had originally added fresh rosemary...about 1 teaspoon...it was good, but it was really overpowering, so I'm keeping that out...but feel free to add it if you want, like I said, it was good with it!)
In a small skillet, over medium heat, add the oil until hot. Add the red pepper and cook for 3 minutes. Add the zucchini and cook another 3 minutes. Add the garlic and cook 1 more minute. Remove from heat.
Place the rice in a large bowl and add the cooked veggies. Pour the cheese mixture over and stir to combine. Pour into prepared baking dish and top with shredded cheese. Bake for 10 minutes or until heated through and the cheese on top is melted. Enjoy!
One Year Ago: Firecracker Tilapia with Lemon Aioli
Tuesday, January 25, 2011
Rotini with Cherry Tomatoes and Tuna
I made something similar to this a while back...but this was enough of a change where I thought, what the heck, hardly anyone has seen that old recipe anyway... :)
The nice thing about this recipe...it sort of had that feeling of summertime to it. We, fortunately, have been experiencing wonderful weather lately. Last week our highs were in the upper 70's!! Considering other people were still in single digit weather, I considered myself very lucky. With the warm weather came a craving for something light and fresh. And this little dish was the perfect fix for that craving!
Rotini with Cherry Tomatoes and Tuna
Printable Recipe
Ingredients:
1 1/2 cups cherry tomatoes, quartered (I may have actually used about 2 cups)
1/2 teaspoon thyme
2 teaspoons lemon juice
1/2 teaspoon salt
1/2 teaspoon pepper
1/4 teaspoon sugar
2 teaspoons, plus 2 Tablespoon olive oil, divided
1 Tablespoons fresh chopped parsley
1 yellow bell pepper, cut into bite size pieces
1 small zucchini, cut into bite size pieces or strips
1 garlic clove, minced
2 1/2 cups dried whole grain rotini pasta
1 can of tuna in water, drained
Directions:
In a bowl, add the cherry tomatoes, thyme, lemon juice, salt, pepper, sugar, 2 teaspoons olive oil, and parsley. Toss to combine; set aside.
Cook the pasta according to package directions. Drain; reserving 1/2 cup of the pasta water.
Meanwhile, in a large skillet, add 1 tablespoon of olive oil and saute the pepper over medium heat for about 3 minutes. Add the zucchini and saute another 2 minutes. Add the garlic and cook for 1 minute. Remove from heat and add the drained tuna. Toss in the drained pasta, the tomato mixture and the remaining 1 tablespoon of olive oil. Toss to combine. If the pasta is too dry, add more oil or the reserved pasta water. Top with parmesan cheese if desired and enjoy!!
One Year Ago: Super Bowl Count Down Take Two...More Appetizers
The nice thing about this recipe...it sort of had that feeling of summertime to it. We, fortunately, have been experiencing wonderful weather lately. Last week our highs were in the upper 70's!! Considering other people were still in single digit weather, I considered myself very lucky. With the warm weather came a craving for something light and fresh. And this little dish was the perfect fix for that craving!
Rotini with Cherry Tomatoes and Tuna
Printable Recipe
Ingredients:
1 1/2 cups cherry tomatoes, quartered (I may have actually used about 2 cups)
1/2 teaspoon thyme
2 teaspoons lemon juice
1/2 teaspoon salt
1/2 teaspoon pepper
1/4 teaspoon sugar
2 teaspoons, plus 2 Tablespoon olive oil, divided
1 Tablespoons fresh chopped parsley
1 yellow bell pepper, cut into bite size pieces
1 small zucchini, cut into bite size pieces or strips
1 garlic clove, minced
2 1/2 cups dried whole grain rotini pasta
1 can of tuna in water, drained
Directions:
In a bowl, add the cherry tomatoes, thyme, lemon juice, salt, pepper, sugar, 2 teaspoons olive oil, and parsley. Toss to combine; set aside.
Cook the pasta according to package directions. Drain; reserving 1/2 cup of the pasta water.
Meanwhile, in a large skillet, add 1 tablespoon of olive oil and saute the pepper over medium heat for about 3 minutes. Add the zucchini and saute another 2 minutes. Add the garlic and cook for 1 minute. Remove from heat and add the drained tuna. Toss in the drained pasta, the tomato mixture and the remaining 1 tablespoon of olive oil. Toss to combine. If the pasta is too dry, add more oil or the reserved pasta water. Top with parmesan cheese if desired and enjoy!!
One Year Ago: Super Bowl Count Down Take Two...More Appetizers
Monday, January 24, 2011
White Chocolate & Strawberry Muffins
A few weeks back, I won yet another awesome giveaway prize! This time, I won Silicone Moulds from Chef Dennis over at More Than a Mount Full. I was super excited cause I LOVE all my other silicone products. They are SO wonderful to have in the kitchen... talk about easy clean up. And you never have to worry about your cakes/muffins/whatever sticking to these...they pop out as if they too want to be congratulated on a job well done!! So thank you to Chef Dennis and also to Sarah-Jane!! I am super excited about using this product...it's a kitchen must have!!
Now.....If only I had not over baked these wonderful little muffins....if only I could go back in time and tell over doubting self to do as the recipe says....don't listen to anything this time: TAKE THE MUFFINS OUT AFTER 20 MINUTES - NOT A MINUTE LONGER!!! If only I could do that, I could be going on and on about how heavenly these muffins where, instead of telling you what a disappointment they were :( I might claim to be a sauce girl, I might claim to be kick ass griller (I don't even know if that's an actual word, I just love that title!!), but I will never say that I am anything near a baker. But I keep trying, so that's what counts the most!! Don't get me wrong, these muffins weren't inedible....oh, no, we at them....they were just over baked and a little dry.....otherwise, the flavors were wonderful!
Two things...First, I cut the original recipe ingredient amounts in half and did not fill the moulds as full as I should have. These muffins should have risen over the top a bit to give a look like Starbucks Crown Top Muffins. Second, I decided to put the batter directly into the moulds... I wanted to show just how wonderful a product this is. Seriously....this is what the moulds looked like after I took the muffins out.... I did not clean or wipe these down at all:
Amazing!! If for no other reason, considering buy some silicone moulds just to give you more ease in the kitchen....less clean up equals happy cook!!!
***The opinions stated on this site regarding the silicone moulds are just that...the opinions of Jenn's Food Journey. In no way was I compensated for this review***
White Chocolate & Strawberry Muffins
Adapted from Food.com
- makes 6-8 muffins -
Printable Recipe
Ingredients:
1 cup all purpose flour
1 1/2 teaspoons baking powder
1/4 teaspoon salt
6 oz white chocolate, finely chopped or 6 oz white chocolate chips (I used another 2oz of white chocolate chips to scatter on the tops of the muffins)
2 Tablespoons unsalted butter, room temperature
1 egg, room temperature
3/8 cup (6 Tablespoons) granulated sugar
3/8 cup (6 Tablespoons) granulated milk (I used 2%)
1/2 teaspoon vanilla extract
3-4 teaspoons strawberry preserves
Directions:
In a medium bowl, whisk together the flour, baking powder, and salt; set aside.
Add 2 oz of white chocolate and all the butter to the top of a double broiler set over simmering water. Stir constantly until half of the chocolate and butter is melted. Remove the top of the double broiler; continue stirring, away from the heat, until the mixture is smooth. Cool for 10 minutes. (You can also do this in a microwave safe dish, on LOW power, stopping to stir every 10 seconds, until half the chocolate and butter are melted-stir until smooth, let cool 10 minutes.)
Preheat oven to 375 degrees F. In a bowl of a stand mixer (or in a large mixing bowl using a hand mixer) fitted with a paddle attachment, add the egg and the sugar and mix on medium until thick and pale yellow (about 2 minutes). Add the cooled chocolate mixture and beat until smooth. Add the milk and the vanilla, beat until fully incorporated. Add the flour mixture a little at a time and beat until incorporated, scraping down the sides at least once. Remove bowl from mixer and fold in 4 ounces of white chocolate.
Fill silicone moulds or muffin tins (spray with non stick spray or line with muffin liners...you can do that with the silicone moulds too) 3/4 full. Top each one with 1/2 teaspoon of the strawberry preserves. Using a toothpick, swirl the preserves into the batter. Top with additional chocolate if desired. Bake for 20 minutes or until a toothpick poked into the center comes out clean; rotating the tins half way through baking time. Set pan on wire rack to cool for 10 minutes. Enjoy!
Now.....If only I had not over baked these wonderful little muffins....if only I could go back in time and tell over doubting self to do as the recipe says....don't listen to anything this time: TAKE THE MUFFINS OUT AFTER 20 MINUTES - NOT A MINUTE LONGER!!! If only I could do that, I could be going on and on about how heavenly these muffins where, instead of telling you what a disappointment they were :( I might claim to be a sauce girl, I might claim to be kick ass griller (I don't even know if that's an actual word, I just love that title!!), but I will never say that I am anything near a baker. But I keep trying, so that's what counts the most!! Don't get me wrong, these muffins weren't inedible....oh, no, we at them....they were just over baked and a little dry.....otherwise, the flavors were wonderful!
Two things...First, I cut the original recipe ingredient amounts in half and did not fill the moulds as full as I should have. These muffins should have risen over the top a bit to give a look like Starbucks Crown Top Muffins. Second, I decided to put the batter directly into the moulds... I wanted to show just how wonderful a product this is. Seriously....this is what the moulds looked like after I took the muffins out.... I did not clean or wipe these down at all:
Amazing!! If for no other reason, considering buy some silicone moulds just to give you more ease in the kitchen....less clean up equals happy cook!!!
***The opinions stated on this site regarding the silicone moulds are just that...the opinions of Jenn's Food Journey. In no way was I compensated for this review***
White Chocolate & Strawberry Muffins
Adapted from Food.com
- makes 6-8 muffins -
Printable Recipe
Ingredients:
1 cup all purpose flour
1 1/2 teaspoons baking powder
1/4 teaspoon salt
6 oz white chocolate, finely chopped or 6 oz white chocolate chips (I used another 2oz of white chocolate chips to scatter on the tops of the muffins)
2 Tablespoons unsalted butter, room temperature
1 egg, room temperature
3/8 cup (6 Tablespoons) granulated sugar
3/8 cup (6 Tablespoons) granulated milk (I used 2%)
1/2 teaspoon vanilla extract
3-4 teaspoons strawberry preserves
Directions:
In a medium bowl, whisk together the flour, baking powder, and salt; set aside.
Add 2 oz of white chocolate and all the butter to the top of a double broiler set over simmering water. Stir constantly until half of the chocolate and butter is melted. Remove the top of the double broiler; continue stirring, away from the heat, until the mixture is smooth. Cool for 10 minutes. (You can also do this in a microwave safe dish, on LOW power, stopping to stir every 10 seconds, until half the chocolate and butter are melted-stir until smooth, let cool 10 minutes.)
Preheat oven to 375 degrees F. In a bowl of a stand mixer (or in a large mixing bowl using a hand mixer) fitted with a paddle attachment, add the egg and the sugar and mix on medium until thick and pale yellow (about 2 minutes). Add the cooled chocolate mixture and beat until smooth. Add the milk and the vanilla, beat until fully incorporated. Add the flour mixture a little at a time and beat until incorporated, scraping down the sides at least once. Remove bowl from mixer and fold in 4 ounces of white chocolate.
Fill silicone moulds or muffin tins (spray with non stick spray or line with muffin liners...you can do that with the silicone moulds too) 3/4 full. Top each one with 1/2 teaspoon of the strawberry preserves. Using a toothpick, swirl the preserves into the batter. Top with additional chocolate if desired. Bake for 20 minutes or until a toothpick poked into the center comes out clean; rotating the tins half way through baking time. Set pan on wire rack to cool for 10 minutes. Enjoy!
Saturday, January 22, 2011
My Saucey Winnings....
Last week I told you of the exciting news that I received 2nd runner up prizes in the Women of the Grill Contest.....well.... here is the prize:
Will you look at all those tasty sauces - Honey Habanero ... Apple Chipotle ... Original BBQ ... All Purpose Sauce ... Seasoning Salt ... and the pièce de résistance: The Original Country Bob's Cookbook!!!
I can't wait to start using these products...and believe me, I'll be using them right away! The question is...which one first and on what type of meat??? AAAAAAAAAAAA!!! So many choices!!!!
How cool are those, huh? It's a PigTail Food Flipper!!! It turns, flips, moves, and carries food fast!! No more having meat slip through the tongs... YIPPY!! You know I will be using this immediately too!
I wanted to make sure that I gave a very big thank you to Dave of Barbequelovers.com and Ken and Patti of Date Night Doins BBQ for Two for all that you did regarding this really fun contest! I highly recommend checking out both their sites...who knows, someone might even show up on a guest post sometime :) AND, if you are a woman and you grill...check out the 2nd Annual Women of the Grill Contest.....if you can handle the competition that is!!
So thank you once again to Dave, Ken & Patti, and Country Bob's for the really awesome winning prizes! I can't wait to start creating with it all!!
One Year Ago: Chicken & Basil Stir Fry
Will you look at all those tasty sauces - Honey Habanero ... Apple Chipotle ... Original BBQ ... All Purpose Sauce ... Seasoning Salt ... and the pièce de résistance: The Original Country Bob's Cookbook!!!
I can't wait to start using these products...and believe me, I'll be using them right away! The question is...which one first and on what type of meat??? AAAAAAAAAAAA!!! So many choices!!!!
But wait.....there's more:
I wanted to make sure that I gave a very big thank you to Dave of Barbequelovers.com and Ken and Patti of Date Night Doins BBQ for Two for all that you did regarding this really fun contest! I highly recommend checking out both their sites...who knows, someone might even show up on a guest post sometime :) AND, if you are a woman and you grill...check out the 2nd Annual Women of the Grill Contest.....if you can handle the competition that is!!
So thank you once again to Dave, Ken & Patti, and Country Bob's for the really awesome winning prizes! I can't wait to start creating with it all!!
One Year Ago: Chicken & Basil Stir Fry
Friday, January 21, 2011
Sriracha Chicken Wings
With Super Bowl Sunday just a few weeks away, I thought it would be good to showcase a recipe that would be a wonderful addition to your Super Bowl party menu! Now I have made Grilled Sriracha Glazed Chicken before....inspired by one of my all time favorite chefs, Michael Symon...but I figured I didn't have a lot of followers back then and maybe some of you had missed it. So, why not revisit the recipe and adjust it using chicken wings instead of chicken breasts?? I considered smoking the wings again (like the Smoked Sweet & Spicy Chicken Wings), but then remembered that most of you do not have smokers, so I thought a method using the oven and the grill would be the most user friendly way of making these.
My first big accomplishment with these wings.... I cut them myself!! WOOHOO!!! I actually bought a package of full chicken wings and was going to just make them that way, than I thought...I could totally cut these and get the actual drummette AND wing combo that you find at most restaurants. I have always been hesitant when it comes to cutting up chicken, but for silly reasons...so this time I just did it. Granted it took a while, and my hands started to hurt after a while...but boy was it so worth it. We had the perfect chicken wing platter...it was way satisfying to finally do the deed too!! I think the chicken might have even tasted better, but that's just me :) Oh, and I saved the wing tips and froze them - I'll used them at some point to make chicken stock!!
ANYWAY...This is a very simple recipe that yields some pretty spicy little wings. Plus, because I bake and grill these, they are a ton healthier than the wings you would get if you went to the local sports bar! You can easily use any of your favorite sauces for this...if the Sriracha is a bit too hot for you, that is!! Serve a little Ranch along side these for those that need to tame the heat down a bit...(scratch the healthy part if you do that though!!)
I baked these first for about 18 minutes and than I finished them off on the grill (I wanted to do the entire thing on the grill, but was worried that I didn't have enough propane). If you didn't want to use the grill you could cook them in the oven for about 20 minutes and than turn on the broiler for about 5-8 minutes or until the skin starts to crisp up. Either way, you'll want to make up a batch or two of these bad boys....they will be a party favorite!
Sriracha Chicken Wings
Printable Recipe
Ingredients:
20 wing and/or drummettes
1 1/2 teaspoons garlic powder
1/2 teaspoon salt
1 1/2 teaspoons cayenne pepper (if that's too spicy, use 1/2 tsp cayenne and 1 tsp pepper)
3 Tablespoons unsalted butter, melted
1/4 cup Srircha Hot Chili Sauce
1 teaspoon lime juice
1 teaspoon honey
Directions:
Put the wings into a large bowl and season with the garlic powder, salt, and cayenne. Toss; making sure that all the pieces are seasoned. Cover and let sit in the refrigerator for at least 30 minutes but I recommend 2 hours.
In a small bowl, mix together the butter, Sriracha, lime juice, and honey. Pour 3 tablespoons over the chicken wings; tossing to coat. Cover and return to the refrigerator for at least 1 hour.
Preheat oven to 425 degrees. Place the chicken on a wire rack that has been placed in a cookie sheet (you can put it directly on the cookie sheet too, I just think they cook more evenly raised up on the rack). Bake for 18 minutes, rotating sheet half way through.
Preheat your grill to 400 degrees. Remove the chicken from the oven and let sit for 5 minutes. Put chicken back in large bowl, pour the remaining Sriracha sauce over the chicken and toss to coat. When grill is ready, place the wings directly over the fire and grill for another 10 minutes, turning halfway through. Remove from grill and serve with your favorite dipping sauce.......Enjoy!
One Year Ago: Lemon Tuna Pasta with Basil & Zucchini
My first big accomplishment with these wings.... I cut them myself!! WOOHOO!!! I actually bought a package of full chicken wings and was going to just make them that way, than I thought...I could totally cut these and get the actual drummette AND wing combo that you find at most restaurants. I have always been hesitant when it comes to cutting up chicken, but for silly reasons...so this time I just did it. Granted it took a while, and my hands started to hurt after a while...but boy was it so worth it. We had the perfect chicken wing platter...it was way satisfying to finally do the deed too!! I think the chicken might have even tasted better, but that's just me :) Oh, and I saved the wing tips and froze them - I'll used them at some point to make chicken stock!!
ANYWAY...This is a very simple recipe that yields some pretty spicy little wings. Plus, because I bake and grill these, they are a ton healthier than the wings you would get if you went to the local sports bar! You can easily use any of your favorite sauces for this...if the Sriracha is a bit too hot for you, that is!! Serve a little Ranch along side these for those that need to tame the heat down a bit...(scratch the healthy part if you do that though!!)
I baked these first for about 18 minutes and than I finished them off on the grill (I wanted to do the entire thing on the grill, but was worried that I didn't have enough propane). If you didn't want to use the grill you could cook them in the oven for about 20 minutes and than turn on the broiler for about 5-8 minutes or until the skin starts to crisp up. Either way, you'll want to make up a batch or two of these bad boys....they will be a party favorite!
Sriracha Chicken Wings
Printable Recipe
Ingredients:
20 wing and/or drummettes
1 1/2 teaspoons garlic powder
1/2 teaspoon salt
1 1/2 teaspoons cayenne pepper (if that's too spicy, use 1/2 tsp cayenne and 1 tsp pepper)
3 Tablespoons unsalted butter, melted
1/4 cup Srircha Hot Chili Sauce
1 teaspoon lime juice
1 teaspoon honey
Directions:
Put the wings into a large bowl and season with the garlic powder, salt, and cayenne. Toss; making sure that all the pieces are seasoned. Cover and let sit in the refrigerator for at least 30 minutes but I recommend 2 hours.
In a small bowl, mix together the butter, Sriracha, lime juice, and honey. Pour 3 tablespoons over the chicken wings; tossing to coat. Cover and return to the refrigerator for at least 1 hour.
Preheat oven to 425 degrees. Place the chicken on a wire rack that has been placed in a cookie sheet (you can put it directly on the cookie sheet too, I just think they cook more evenly raised up on the rack). Bake for 18 minutes, rotating sheet half way through.
Preheat your grill to 400 degrees. Remove the chicken from the oven and let sit for 5 minutes. Put chicken back in large bowl, pour the remaining Sriracha sauce over the chicken and toss to coat. When grill is ready, place the wings directly over the fire and grill for another 10 minutes, turning halfway through. Remove from grill and serve with your favorite dipping sauce.......Enjoy!
One Year Ago: Lemon Tuna Pasta with Basil & Zucchini
Thursday, January 20, 2011
Another Nut Topped Fish Recipe
I know you may be sick of fish recipes. I know you may be done with fish topped with nut recipes. I know you may even be giggling right now about how many fish tilapia recipes I actually post!! I know all of this, yet I still felt compelled to post this recipe! I believe the definition of insane is doing the same thing over and over again expecting to get different results??? Something like that... ANYWAY...I couldn't help myself. I had almonds, I saw a recipe for almond topped fish, I got an idea.....
This is simple, reasonably healthy, and pretty darn delicious - Enough said!
Almond Tilapia
Printable Recipe
Ingredients:
4 tilapia fillets
1/3 cup plain bread crumbs
1/3 cup slivered almonds, roughly chopped
2 1/2 teaspoons olive oil
1/4 teaspoon black pepper
1/4 teaspoon garlic salt
1/2 teaspoon Herbes de Provence
1/2 lemon
salt and pepper
Directions:
Preheat oven to 400 degrees. Rinse fillets and pat dry with a paper towel. Squeeze the juice of 1/2 a lemon over all the pieces. Season with salt and pepper and place in a baking dish that's been sprayed with non-stick cooking spray.
In a small bowl, mix together bread crumbs, almonds, olive oil, pepper, garlic salt and Herbes de Provence. Top each pieces of fish with mixture. Bake for 12-14 minutes or until fish flakes easily with a fork and the topping is golden brown. Enjoy!
One Year Ago: Pan Seared Tilapia with White Bar-B-Q Sauce
This is simple, reasonably healthy, and pretty darn delicious - Enough said!
Almond Tilapia
Printable Recipe
Ingredients:
4 tilapia fillets
1/3 cup plain bread crumbs
1/3 cup slivered almonds, roughly chopped
2 1/2 teaspoons olive oil
1/4 teaspoon black pepper
1/4 teaspoon garlic salt
1/2 teaspoon Herbes de Provence
1/2 lemon
salt and pepper
Directions:
Preheat oven to 400 degrees. Rinse fillets and pat dry with a paper towel. Squeeze the juice of 1/2 a lemon over all the pieces. Season with salt and pepper and place in a baking dish that's been sprayed with non-stick cooking spray.
In a small bowl, mix together bread crumbs, almonds, olive oil, pepper, garlic salt and Herbes de Provence. Top each pieces of fish with mixture. Bake for 12-14 minutes or until fish flakes easily with a fork and the topping is golden brown. Enjoy!
One Year Ago: Pan Seared Tilapia with White Bar-B-Q Sauce
Wednesday, January 19, 2011
Baked Penne and Chorizo
One of the things I used to order whenever I went to any Italian restaurant was Baked Ziti. A simple dish, yet always delicious, and always the same no matter where you went. Those were my younger years. Now I love to order dishes like Chicken Piccata, Gnocchi with Brown Butter and Sage, and Calamari Fra Diavlo, but that does not stop me from still craving the more simple dishes. And a craving was what I had...but I did not have any ground beef or ziti in the house, so it was time to improvise! I still had 1/2 pound of the chorizo left over from my Chorizo and Rice Casserole....and I always have penne on hand....so why not make a baked penne...????? With chorizo!! And that's exactly what I did. It turned out to be just what I wanted. I did worry that the chorizo and the pasta sauce would not blend well together, but I was worried for nothing...the flavors of the Mexican spices in the chorizo actually complimented the pasta sauce really well. I added the red pepper because it's what I had in the fridge. You can leave it out.. or better yet, caramelize some onions and add that to the dish too...it would be fantastic! Whatever you do, just try it...you too will quickly become a fan!
Baked Penne with Chorizo
Printable Recipe
Ingredients:
2 cups whole grain penne (I actually used just a bit over 2 cups)
1/2 lb Mexican chorizo
1 red pepper, sliced thin
2 garlic cloves, minced
3/4 - 1 cup pasta sauce (homemade or store bought)
2 Tablespoons cream cheese
1 1/2 teaspoons dried parsley
salt and pepper to taste
mozzarella cheese (I used just under 1/2 cup, but you might want to use more)
Directions:
Cook pasta according to package directions; drain well.
Preheat oven to 350 degrees. Spray a small baking dish with non-stick spray and set aside.
In a medium skillet, over medium heat, cook the chorizo about 3 minutes; breaking it up with a wooden spoon. Add the red pepper and cook another 3 minutes. Stir in the garlic and cook for 1 minute. Pour in the sauce (I used just under 1 cup of sauce), stirring to combine. Stir in the cream cheese until it's fully incorporated. Season with parsley and salt and pepper to taste. Pour in the pasta and toss to coat.
Pour pasta mixture into prepared baking dish and top with mozzarella cheese. Bake for 5-10 minutes, or until the cheese on top is melted and bubbly. Serve with warm crusty bread. Enjoy!
One Year Ago: Bourbon Chicken
Baked Penne with Chorizo
Printable Recipe
Ingredients:
2 cups whole grain penne (I actually used just a bit over 2 cups)
1/2 lb Mexican chorizo
1 red pepper, sliced thin
2 garlic cloves, minced
3/4 - 1 cup pasta sauce (homemade or store bought)
2 Tablespoons cream cheese
1 1/2 teaspoons dried parsley
salt and pepper to taste
mozzarella cheese (I used just under 1/2 cup, but you might want to use more)
Directions:
Cook pasta according to package directions; drain well.
Preheat oven to 350 degrees. Spray a small baking dish with non-stick spray and set aside.
In a medium skillet, over medium heat, cook the chorizo about 3 minutes; breaking it up with a wooden spoon. Add the red pepper and cook another 3 minutes. Stir in the garlic and cook for 1 minute. Pour in the sauce (I used just under 1 cup of sauce), stirring to combine. Stir in the cream cheese until it's fully incorporated. Season with parsley and salt and pepper to taste. Pour in the pasta and toss to coat.
Pour pasta mixture into prepared baking dish and top with mozzarella cheese. Bake for 5-10 minutes, or until the cheese on top is melted and bubbly. Serve with warm crusty bread. Enjoy!
One Year Ago: Bourbon Chicken
Tuesday, January 18, 2011
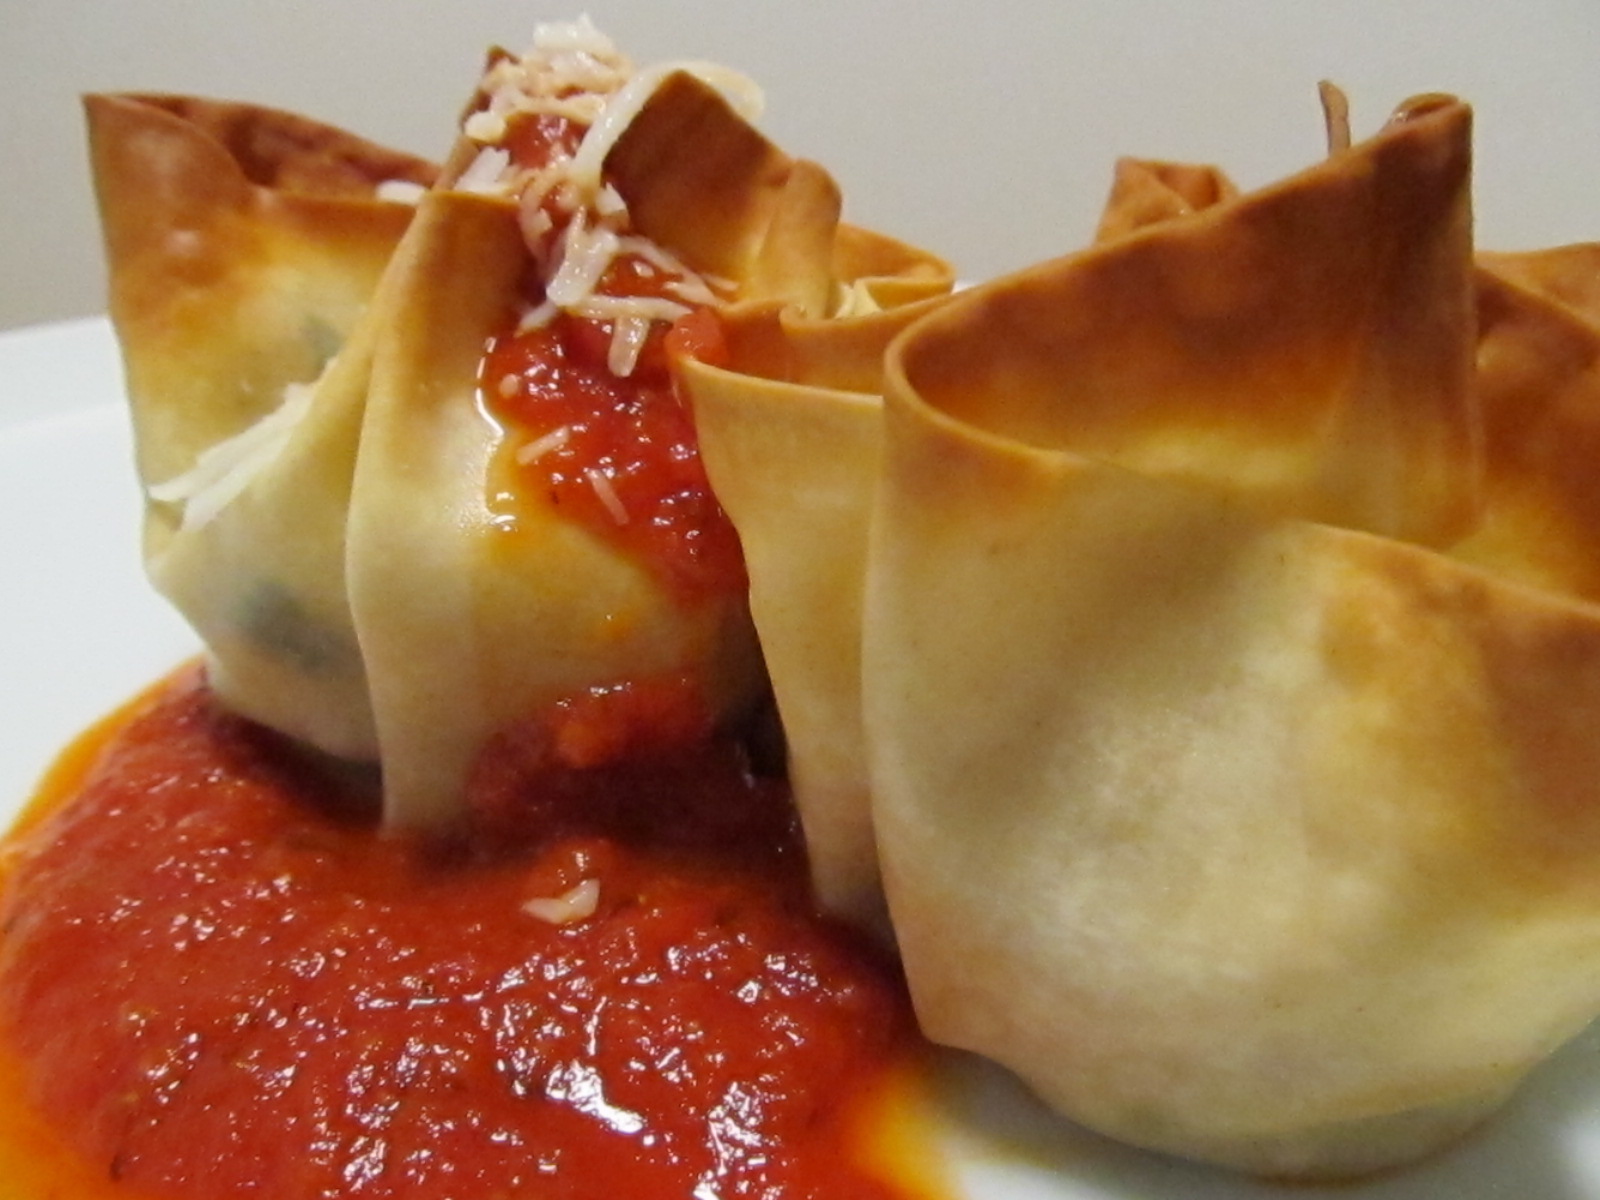
Italian Chicken Bundles
Here's something most of you might not know about me: I used to be a personal chef. I actually had my own business called "In Your Kitchen". I would go to people's houses and cook meals that could be frozen and than later reheated and enjoyed. I spent about 8 hours at their house cooking, but when I was gone, their was no sign I was there except 2 weeks worth of dinners in their freezers. Those dinners were left with instructions on how to properly thaw and reheat each meal. Yep, that's right...my very own personal chef business. Why am I not still doing it? Well, at the time I was living by myself, working a full time job, and trying to cram in as many clients as I could on a weekend so that I could still pay all my bills....and well, I'll be honest...I started to hate it. I was spending my entire time off cooking for other people and it became a job. I was making no time for myself and I started to not look forward to cooking. I knew I didn't want to continue if it was something I was going to hate. So, I stepped back, re-evaluated things, and decided that I needed to put the personal chef business on hold until a time came where it could be my only job. As time has gone by, I have considered starting it up again, but now I believe that I need more schooling to be the actual personal chef I really, truly, know I can be. Maybe some day that time will come, but for now, I am happy just having a large collection of recipes from the United States Personal Chef Institute at my fingertips!
This recipe is one that comes from that collection. I have a few favorites, of course, and this would be one of them. I just like the convenience of being able to freeze them. I like that they are in little pouches of crispy goodness. I like that they are versatile; you can truly put whatever ingredients you want in there. And of course, I like that it really takes no time at all to make. Oh, and let's not forget the taste. I LOVE the taste. It's just a good mix of creamy cheeses, flavorful chicken, and a crispy outside texture.
P.S....check out the one year ago link at the end of this post...some good ideas for this years Super Bowl party!!
Italian Chicken Bundles
Adapted from the United States Personal Chef Institute
Printable Recipe
Ingredients:
1 1/2 cups chicken (cut into small bit sizes pieces)
3 green onions, chopped
1 teaspoon olive oil
1 garlic clove, minced
3 Tablespoons shredded parmesan cheese (you could use grated)
3 Tablespoons shredded mozzarella cheese
2 Tablespoons cream cheese, room temperature
1/4 teaspoon dried oregano
1/8 teaspoon nutmeg
salt and pepper to taste
garlic powder
2 Tablespoons butter, melted
10 egg roll wrappers
Tomato Sauce (homemade or store bought)
additional parmesan or mozzarella cheese for topping if desired
Directions:
Season the chicken with salt, pepper, and a little garlic powder. In a non-stick skillet, heat the oil over medium heat. Add the chicken and cook until lightly browned, about 5 minutes. Add the onion and garlic and cook for 1 minute longer. Remove from heat and allow to cool slightly. To the skillet, add the parmesan, mozzarella, cream cheese, oregano, and nutmeg. Stir to combine. Season with salt and pepper to taste.
Preheat oven to 350 degrees. Using a 12 cup muffin tin, brush half of the melted butter into 10 of the 12 cups. Carefully press one egg roll wrapper into a muffin cup and fill with the chicken mixture. Close the wrapper over the filling and brush with some of the remaining melted butter. Continue until all 10 muffin tins are completed.
Bake for about 20-25 minutes, or until lightly browned on the top. Carefully remove from the muffin tin; top with warmed sauce and cheese if desired. Enjoy!
***If you aren't going to eat all 10 bundles, you can freeze them to enjoy at another time. Once baked, allow to cool completely. Wrap separately in aluminum foil then place in a large freezer ziploc bag and store in the freezer for up to 3 months. When ready to use again, thaw in the refrigerator the night before the day of consumption. Unwrap from aluminum foil and place on microwave safe plate. Heat for 2-3 minutes and than topped with heated sauce and cheese.***
One Year Ago: Super Bowl Count Down...Take One: Appetizers
This recipe is one that comes from that collection. I have a few favorites, of course, and this would be one of them. I just like the convenience of being able to freeze them. I like that they are in little pouches of crispy goodness. I like that they are versatile; you can truly put whatever ingredients you want in there. And of course, I like that it really takes no time at all to make. Oh, and let's not forget the taste. I LOVE the taste. It's just a good mix of creamy cheeses, flavorful chicken, and a crispy outside texture.
P.S....check out the one year ago link at the end of this post...some good ideas for this years Super Bowl party!!
Italian Chicken Bundles
Adapted from the United States Personal Chef Institute
Printable Recipe
Ingredients:
1 1/2 cups chicken (cut into small bit sizes pieces)
3 green onions, chopped
1 teaspoon olive oil
1 garlic clove, minced
3 Tablespoons shredded parmesan cheese (you could use grated)
3 Tablespoons shredded mozzarella cheese
2 Tablespoons cream cheese, room temperature
1/4 teaspoon dried oregano
1/8 teaspoon nutmeg
salt and pepper to taste
garlic powder
2 Tablespoons butter, melted
10 egg roll wrappers
Tomato Sauce (homemade or store bought)
additional parmesan or mozzarella cheese for topping if desired
Directions:
Season the chicken with salt, pepper, and a little garlic powder. In a non-stick skillet, heat the oil over medium heat. Add the chicken and cook until lightly browned, about 5 minutes. Add the onion and garlic and cook for 1 minute longer. Remove from heat and allow to cool slightly. To the skillet, add the parmesan, mozzarella, cream cheese, oregano, and nutmeg. Stir to combine. Season with salt and pepper to taste.
Preheat oven to 350 degrees. Using a 12 cup muffin tin, brush half of the melted butter into 10 of the 12 cups. Carefully press one egg roll wrapper into a muffin cup and fill with the chicken mixture. Close the wrapper over the filling and brush with some of the remaining melted butter. Continue until all 10 muffin tins are completed.
Bake for about 20-25 minutes, or until lightly browned on the top. Carefully remove from the muffin tin; top with warmed sauce and cheese if desired. Enjoy!
***If you aren't going to eat all 10 bundles, you can freeze them to enjoy at another time. Once baked, allow to cool completely. Wrap separately in aluminum foil then place in a large freezer ziploc bag and store in the freezer for up to 3 months. When ready to use again, thaw in the refrigerator the night before the day of consumption. Unwrap from aluminum foil and place on microwave safe plate. Heat for 2-3 minutes and than topped with heated sauce and cheese.***
One Year Ago: Super Bowl Count Down...Take One: Appetizers
Subscribe to:
Posts (Atom)
